"Self-sufficiency does not mean 'going back' to the acceptance of a lower standard of living. On the contrary, it is the striving for a higher standard of living, for food that is organically grown and good, for the good life in pleasant surroundings... and for the satisfaction that comes from doing difficult and intricate jobs well and successfully." John Seymour ~ Self Sufficiency 2003
Showing posts with label saving seeds. Show all posts

Saturday, 20 February 2016

Vital crop

The one vegetable / fruit that I need to plant, and harvest in quantity, each year is tomatoes.

Last year I was devastated when the mice managed to eat / damage / decimate most of my tomato crop.  The little buggers weren't picky either - sampling this one, that one, any-which-one, and never finishing the meal they started.

What a waste!  Haven't they heard of food poverty?

Thankfully, this year we have seen very few mice in the garden, so I am harvesting enough tomatoes each week to keep me busy in the kitchen over the weekends, when the pressure of (income producing) work is lessened.
Clockwise from the top left:
My new purple tomatoes, golden yellow,
red beefsteak heirloom and cocktail tomatoes
Earlier in January I found a tomato seedling in the local nursery that had me intrigued - so, naturally, I had to buy a specimen.

It was a black (purple) tomato plant.

I have been excited - yes, it doesn't take much, does it ;) - to see what developed.

They are much smaller tomatoes, and really interesting.
A sliced purple tomato
As you can see in the pic above, when they are sliced, the inner edges still retain a touch of that "bruised" look.  I will be saving seeds from one of those I harvest in order to grow my own next year.

I need to make a salad from the different tomatoes I'm growing to show you the different colour contrasts.

A mixed tomato salad with a bit of basil and crumbled feta, sprinkled with balsamic and olive oil - heaven!!

But, the main reason I grow tomatoes is so that I can preserve them.
There are approximately 16 large beefsteak
 tomatoes reducing down in this pot - with 1 single
 yellow one added (it was almost over-ripe and I
 didn't want to waste it).
The must have staple of my pantry / freezer is tomato purée.

Cocktail tomatoes are to throw into a mixed salad.  Only.  I tried preserving them whole a few years ago, but it was a waste of time.  They disintegrated down into an insipid watery mush, and the small jars took up far too much space in my pantry.

Heirloom tomatoes, on the other hand, are invaluable.

My main source of tomato purée is from the heirloom tomatoes -  the beefsteak and the yellow one.  I love the irregular shape of the heirloom tomatoes - it almost gives each one a different character.

(Did you know that perfectly round tomatoes are a result of needing a suitably tidy shaped tomato to put on a take-away hamburger?  Have you ever hear anything more ridiculous?  The bloody hamburger dictates what tomatoes are commercially grown these days - if you can call them tomatoes, as I find them completely tasteless and pasty in colour.)
This is what I mean about a disfigured
 heirloom tomato.  Don't you love the
 uneven appearance of them :)
The heirloom tomatoes around the stem are normally "disfigured" as in the pic above.  I have no idea what causes that, but their taste is amazing, so I don't give a hoot.  The "disfigured" section goes to my worm farm occupants - the worms don't know any different lol

The yellow tomatoes are my favourite, too - and they make the most amazing tomato purée - producing a much deeper colour than that of the beefsteaks.  The purée from the yellow tomatoes seems almost tinged with a dash of turmeric. That is quite a contradiction, as I had imagined, given their yellow appearance, that that purée would have more of a yellow appearance.

I use the purée in a myriad of ways - for pizza bases, in casseroles, soups, dips, sauces, etc.  This winter I also want to try using it in bread, in place of water :)
Recycled plastic containers holding yummy
 thick tomato pur
ée paste cooling down
 before they are popped into the freezer.
1.125 ltrs of tomato to enliven those wintry
 nights.  One of those oval 125ml containers is
 enough for a meal.  I have also water bath preserved
tomato puree in larger Ball jars for my pantry :)
There is something about the luscious redness of tomatoes in winter which, together with a roaring "Rosie" uplifts the cold, dreary days.  The hint of spring around the corner, with the promise of the next tomato harvest...

Wednesday, 27 November 2013

Spring garden goodies


Welcome to dreamer - my newest follower.  dreamer is from southern Scotland - an area called Cairnsmore to be specific.
dreamer doesn't appear to have a blog / web page - if I'm wrong, dreamer, please let me know, and I'll gladly insert the link.  Thanks for hitting the followers button.

Update: dreamers bog can be found at : http://dreamer-dreamingofasimplelife.blogspot.co.uk/

She has a very interesting blog - won't you pop round and have a look?

-------------------------------

The first plants to start producing this spring were my strawberries.  They were so eager that they started flowering at the beginning of July!!
I have never known strawberry plants to produce
flowers, never mind fruit, in July...
...in South Africa?!?
The three ducks that we inherited from one of our neighbours over a month ago, found they had a taste for strawberries, and proceeded to wipe out as many as they could, Until I caught them in the act.  And here I blamed those poor field mice again...

So - that resulted in my buying some bird netting from the local co-op and draping the entire 25mtr long bed.  And here my poor brain thought bird netting was only for the flying kind...
Strawberries - some for eating and the rest
I popped into the freezer until I have enough
to make jam...
The strawberry plants have produced a fair number, but not all at once.  So, apart from those we've eaten fresh, I popped the other strawberries into bags which I keep in the freezer.  I figured that once they stop producing, I can take the strawberries from the freezer and make jam with them - in my solar oven. Yum - can't wait :)

I've harvested about 5 kgs so far...
The plum trees were the first
to blossom - t'was stunning to
see
Then the fruit trees - the plum trees were the first to get those gorgeous, uplifting, awe-inspiring spring blossoms.  And loads of fruit - which the wind proceeded to blow off.  Ah well, I think the trees are only two years old and still need a year before they should be allowed to keep their fruit - so nature is guiding me well.
Peach tree in blossom
You recall back in May this year that I wrote about saving those onion bottoms and, after allowing the dried roots to re-hydrate in a small bowl of water for a couple of days, planting them back in your veggie patch?

Well, the pic below is one of those "re purposed" onions.
Five onions gorwing from the old bottom of a single
onion - whoo hoo!
Here I thought each onion bottom would only grow one onion, but this one has produced 5!  Happy days :)

Apart from the onions, I also have garlic (which I've harvested most of already), tomatoes, the swiss chard is growing in profusion again (and that's given me a hint of what to make for dinner tonight - creamed spinach with a fried egg and toast), as is my zucchini and pumpkin, and the saved seed from the Franchi Sementi purple and yellow bean plants from last years harvest - and a nice crop of chickpeas and carrots is also growing.  It has already been too hot for my lettuce - even in the shadecloth veggie patch - and the plants have all bolted, but I am going to make a plan to turn up a couple of the re-purposed sub-irrigated Styrofoam containers (that I still have) into  raised veggie patch boxes, literally, and place them in the shade - with light being bounced off from a nearby wall.  That should sort out the overheating / bolting problem.

Those re-purposed styrofoam containers have been brilliant - I've used them for growing plants in, for using as deep drip trays for propagated lemon trees, and as a bath for the newy adopted ducks, amongst many other uses.  S'funny, talking about the ducks - whoever owns them has not come looking...? Maybe they have too many?  But, they're free to return home - the way they came - however that was...

None of my chilli and pepper seeds has peeked above ground yet, and I have still to buy a tray of aubergines seedlings from the local nursery - it would appear that I am completely unable to rear them, so I leave that to the experts LOL


And finally, for the first time, I have managed to grow cabbages - I companion planted them amongst the strawberries LOL  So  - there is lots of coleslaw in the future, as well as stuffed cabbage leaves cooked in the solar oven, and cabbage cooked in milk, instead of water, with garlic, butter, salt and pepper - quite delicious :)  Maybe I'll try fermenting some cabbage too - if it's not too hot...

Sunday, 5 August 2012

My first (and only) pumpkin thus far...

When DD was here for 4 - 5 days in June she spied my one-and-only home grown pumpkin, which I hadn't cooked yet.


And she had a brilliant recipe for it.


Basically, you carefully cut a hole in the top of the pumpkin (where the balance of the stem remains).  Then you scoop out the pip area, plus a bit of the flesh.  Reserve both - the pips - for planting next season - and the flesh, which will go back into the hollow with the other vegetables.
After you have peeled and chopped up a selection of vegetables, add a bit of grated cheese (feta, cheddar, whatever) and a knob or two of butter, season, and stuff into the cavity you have created.   Then pop the "lid" back on top.
We used chopped zuccini, yellow and red peppers,
cauliflower, broccoli and sweet potatoes to
stuff the pumpkin
Place the stuffed pumpkin into a casserole dish (to catch any juices) and pop in the oven.  Allow the pumpkin to cook until it is tender when you insert a knife (which in the Dover took about 3 1/2 - 4 hours).
We cooked the stuffed pumpkin in the Dover stove,
which is heated from the top - thus the "burnt"
appearance round the opening
We ate it with a pot of fresh macaroni cheese - yummy - it didn't last long. :)
Now - all I need is to grow more pumpkins this year - many, many more.  Eating home grown vegetables is completely addictive.  I really feel for those who don't have the space or the confidence to do so.

Saturday, 2 June 2012

Wild flowers and patience...

At the beginning of April, whilst walking on DD & WGuys property in order to take some photo's for them, I came across a tumbleweed.
Then, shortly afterwards, I encountered a bit of synchronicity.
Tumbleweed - the dried flower head
of the Malgas Lily
Diana unknowingly gave me the name of the plant a couple of weeks later.  It is the Malgas Lily or Ammocharis longiflora
Image source: http://www.plantzafrica.com/
plantab/ammocharlong.htm
 
I have seen the plants flat leaves "lying" on, or close to the ground, and they fascinated me.  Now that I know what it is I am even more excited. Why, I hear you wonder?

Well, I picked up the dried tumbleweed type flower head and left it in a box in the kitchen.  Last week when we returned to the farm I noticed that the seeds had burst out of the plant and were growing!
Malgas lily seeds - growing without any soil
There were some seeds still on the dried head and they too were bursting forth.
Seeds growing in the dried seed pod
Naturally, I had to plant those valiant little seeds.  They appear to be eco-friendly and water-wise, and as such will be given their opportunity to shine in my garden.


However, the patience bit enters the here - for apparently it takes 7 years until the plant produced from the seed will produce a honeysuckle smelling flower...


It's worth it - I can wait :)

Friday, 16 September 2011

A simple year round source of nutrition

I was watching an episode of "Jamie at Home" on TV the other day, and this time sprouts was on the menu.  Not brussel sprouts, but seed sprouts.  Now, this has to be one of the most eco-friendly foodstuffs out there as their highly nutritious preparation requires no power from the grid :)


Yes, I know there are / have been scares regarding sprouts and salmonella or Escherichia coli.  Those bacterial infestations are more prevalent in commercially grown sprouts.  Providing you carefully wash the seeds before sprouting them there is no reason why you cannot grow sprouts at home.


Also, apparently some sprouts can contain harmful toxins and should thus be reserved for stir frying prior to eating.  Any any sprouts of the solanaceae family (tomato, potato, paprika, aubergine or eggplant) or the rhubarb should definitely be avoided, as they are poisonous.

Providing that you purchase your seeds from a store (a health store is probably the best) in which they are packaged as food, there should be no problem in sprouting them.  Seeds sold for crops / planting should not be used, as they may contain toxic chemicals.
Seeds for sprouting
Some of the type of seeds which may be sprouted are:


Pulses (pea family) : alfalfa, chickpea, fenugeek,  lentil, mung bean,  pea, soyabean*.
Cereals: oats, maize (corn) wheat, rice, barley, rye, quinoa, and buckwheat.
Oily seeds: sesame, sunflower, almond and linseed
Vegetables and herbs: broccoli, cabbage, carrot, celery, lettuce, mizuna, mustard, onion, rocket and tatsoi.


* Important update:  Apparently Soyabean is one of the harmful beans, and, if sprouted, should be added to a stir-fry.


The seeds can expand to eight times their size and will germinate within 2 - 4 days from the start of soaking.  If you soak for longer than the necessary time you run the danger of making the seeds ferment or rot.


Once they are to the required state of growth, sprouts will keep in the fridge for at least a week.


Sprouts are an excellent source of protein and vitamin C.  They have established that the sprout retain their B complex vitamins, and, further, sprouting increases the amount of Vit. C and Vit. A they contain. Sprouting also causes starches to be converted to simple sugars, which allow sprouts to be more easily digested. And sprouted beans do not contain the gas making properties of cooked beans :)


They are quite simple to sprout.  I have a fancy sprouting tower, but they may just as easily be sprouted in a plain glass jar with holes pierced in the lid.
My sprouting tower
On the first morning rinse the seeds well.


Place them on the sprouting tray / in a glass jar.  Sprinkle a small amount of water over the seeds, and cover.


At the end of the day, rinse the seeds again.  This not only cleans them, but also replenishes the water they require in order to sprout.

Sprouts at the beginning of day 2
Repeat rinsing the seeds morning and evening until you notice your seeds are beginning to sprout.
Sprouts on the morning of day 3 -
the mustard seeds are beginning to pop open
The flavour of sprouted seeds / pulses is completely different to the cooked versions.  And the taste of each seed / sprout is different.  Almost sweet, definitely crunchy, and completely, addictively, more-ish...


Toss a selection of sprouts with crumbed feta and fresh croutons and dress with your favourite salad dressing, add them to your salads / stir fries, fill half an avocado with sprouts, add them to an egg mayonnaise sandwich or use them as a garnish.  I even enjoy a sandwich of plain sprouts.  They could probably also be blitzed in your favourite smoothie.  Or eaten as a non-fattening snack.
Day 4 - there are less than I started out with,
as I can't resist fresh sprouts, and I couldn't wait
for them to finish sprouting...
It is so easy to forget this important source of nutrition in the winter months. The sprouts are so easy to grow and the seeds are easy to store.  Even my menfolk, who aren't mad about quiche, will eat sprouts.  Maybe, not as vociferously as I do, but they will eat enough to keep me happy...  (And it's a sneaky way to get them to eat the dreaded lentils now and then LOL)


Remember - as with everything - everything in moderation!  Don't overdo the eating of sprouts.  Use them as an extra source of nutrition, not as a replacement.

And sprouts are a good reason to allow some of your organic vegetable plants to go to seed for reasons other than next season's crop.

Tuesday, 13 September 2011

Black Pearl Chilli

I have a different chilli plant growing in my garden.

It is a unique black-leaved chilli plant, which when young, is green, and, as it matures, it changes to glossy black (when grown in sunny conditions).  The plant is bushy, with strong branches, growing 45 cms (18") high, with a spread of 30 cms (12").
Black Pearl Chilli plant
The "Black Pearl" chilli boasts  the most dramatically deep purple leaves and fruit imaginable.


In mid-season it begins to display lilac-hued blossoms.  These blossoms form the abundance of black fruit, which turns a dark, deep shade of red.


The "Black Pearl" is a patented variety.


Last season I had a plant which died off, and one of it's seed pods spilt onto the soil of the pot it was growing in.  Last week I noticed that I had "free" chilli plants growing...
Self-seeded Black Pearl Chilli seedlings
In the colder climates the plant will die off in winter.  But here in the warmer southern hemisphere, it will shoot again from the base of the plant in spring.
Seeds pods awaiting harvest -
note the new growth at the base of the plant
I have since harvested all the seed pods off the plant above.  I have quite a few seeds - if there is anyone local who would like a few, please let me have you address - I'll happily send some off to you.  You can send your name and address to: dani at ecofootprint dot co dot za
Harvested Black Pearl Chiili seeds
The specifications, and growing requirements are as follows:


Height : 45 - 60 cms (18 - 25 ")
Plant spacing : 40 - 60 cms
Position : Full sun
Pungency : Hot, Hot, Hot ( above 30000 Scoville Units)
Fruit shape : Round
Fruit size : under 4 cms (2 ") in length
Fruit colour : Purple changing to red
(the above information came from: http:/davesgarden.com/guides/pf/go/118938/index.html )


The plant makes a definite statement in your garden. The black leaves with the red fruit - absolutely stunning!


And, be warned.  Don't be an idiot like me.  Just because the fruit is dried and wrinkled, don't think the seeds won't be hot.  They are!  And the evidence of that lingers on the fingertips and (under the nails) for ages - long after you've forgotten not to rub your eyes...

Tuesday, 12 July 2011

Time out (side)

It's been a difficult couple of weeks recently - my camera decided to go on the fritz, even my cell phone felt lonely and did likewise, so with both out of commission I have been unable to take any photo's - talk about feeling marooned...  Add to that the fact that just I've developed another bout of bronchitis (it's only three months since my last bout - and twice in one winter - what is gong on - too much international air travel spreading new infections to all in sundry?)


I think you get the picture...


However, I remedied the photo problem this last weekend, buying myself a cheapish Kodak - it'll do until I can get my Canon fixed, and that entails a trip across to the other side of town.
We are currently experiencing a "berg wind" (a hot, off-land wind) in our area - a welcome break from the cold, wet and miserable weather we've been having recently, and I figured it was the perfect time to wash all those towels and jerseys LOL  And the perfect opportunity to get out into the garden...


The garden has patches of colour - the lemon tree is full of fruit, the hibiscus trees are displaying their exotic flowers, the Camellia bush is about to burst into bloom, and the lavender bushes are in full swing.
Broad beans in flower
Even my broad beans are full of flowers... but I've only found 6 pods! Very disappointing.  But I think I have discovered the reason why:
The bees are all on the lavender bushes...


Wrong, wrong, wrong side of the garden, guys!  I need you to do your thing on the broad beans!


I have managed to harvest a few things from the garden though:
Lavender flowers, lemons and clivia pods
The lavender flowers are in the spare room - acting as a room freshener...
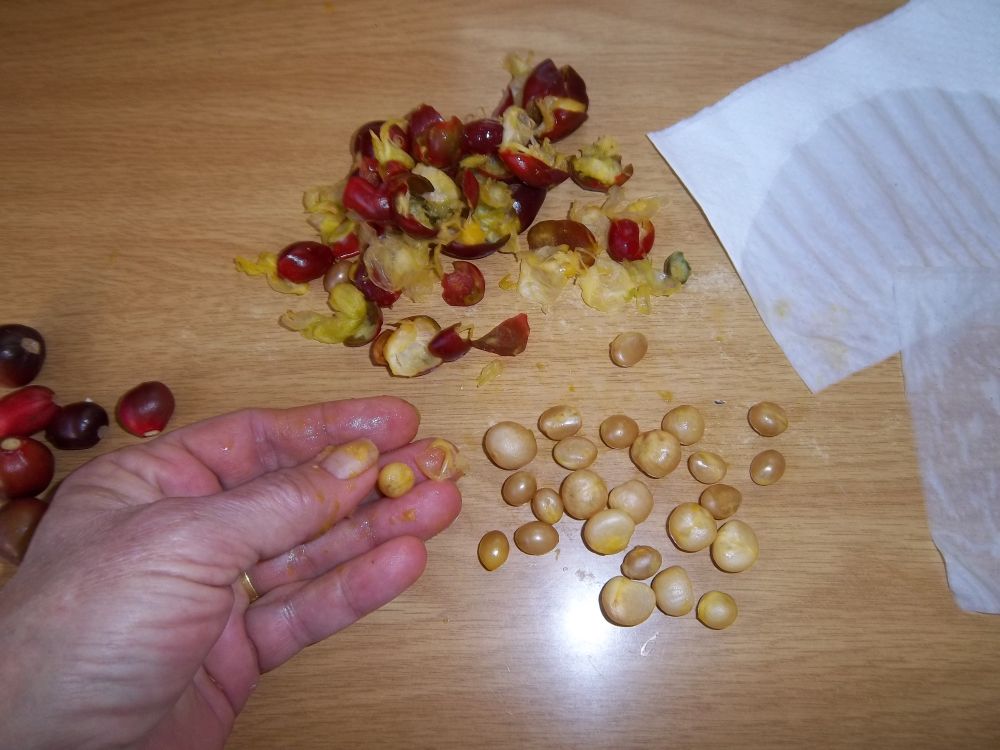
The red Clivia pods are free plants waiting to happen.  And all it takes is a bit of preparation.
Firstly, remove the hard outer shell of the pod.  Inside that you'll find another, softer sheath around the seed - remove that as well:
Place the seeds between a couple of pieces of damp kitchen paper towel:
...and tie them up in a plastic bag...
 ... leave the bag in a dark-ish spot for about a month, until you see the seeds starting to produce shoots - and then plant the seeds in a seed tray, until they are big enough to transplant into the garden.
Then all it takes is patience - about three years worth LOL  The reward?


A magnificent show once a year!
Clivias love to be positioned in dappled shade, so providing you can provide that, they will reward you with colour in a darker part of your garden.  They are not terribly fussy about requiring lots of water - a sprinkling once a week is all that they need.


If anyone has any seed pods from pale apricot, or yellow clivia plants they don't want, I'd love them - please :)


What did I do with the lemons?


You'll have to wait until next time to find out...! :)

Tuesday, 5 April 2011

Yet another delay...

RMans' dad passed away in June last year and RMan has just received authorization from the Executors that he may take possession of his inheritance.  So, in place of ambling on to the farm after seeing MKid off at the airport this weekend, RMan will go upcountry for a few days to collect what his father left him.  It is easier for him to fly up there (together with MKid) and bring back the items than to try and organise for a courier company to collect - they won't package.  One of the items is an oil painting, and as it is over 160 years old, we would like to ensure that it arrives safely and in one piece.  So this weekend will be devoted to collecting, securely packaging and returning with said painting safely ensconced in the hold of (hopefully) the same aircraft - but one never knows...  Hopefully, this will also give RMan some closure on his loss.

Although time does heal, it never completely leaves one - I know, for my mother passed away when I was 16, and the ache remains.  There is so much I have never shared with her, and never can.

But next weekend (16 - 17th April) we will definitely be travelling up to the farm - come hell or high water.  It's been too long since we were last there and we're experiencing withdrawal syptoms.

So sad to say goodbye to MKid again - it will probably (and again hopefully) only be in December that we see him again.  Yes, we can, and do, Skype with him, but it's not quite the same - one can't Skype a hug... yet.  It always tears us apart to say goodbye, but at least this time he will not be crying at the airport, as he is led off by the designated air hostess.  This time he will be travelling with his grandad :-)  I reckon MKid is an amazingly brave little guy - here he is, only 7 years old, and he has no problem hopping onto a plane, on his own, so that he might visit with his Nana and Granda.   Bless him.


Red capsicum


Red, yellow and green peppers
waiting to be harvested
He has thoroughly delighted in picking the last of the corn off the stalks, the last of the tomatoes from the vine and the last of the green beans - and then wolfed them down with his dinner :-)  Surely no nicer thing in the world than for a child to see his dinner growing in the garden and then picking it!  Such a simple act, and one which is so easy to take for granted when it happens on a daily basis, but this memory is one which I know will last a long while in his mind.

We'll use this for Eggplant Parmigiana I think
He is also taking NGirl some peppers from the garden - red, yellow and green - as well as an aubergine or two:-)  He says that they won't be too heavy, and that he'd like to carry them himself - I mustn't put them in his suitcase.  I was very impressed how well the peppers grew in the pots - I'll definitely do that again next time.

He has been a brilliant help this past week - helping me to plant the last of my garlic (hope I'm not too late), onions, and peas.  Such little fingers putting holes into the soil and carefully covering up the bulbs / seeds.  He calls them "his vegetables".  And I have to send him progress photo's LOL


We had a friendly robin hop right next to us when we were busy preparing the soil and planting the bulbs - I told him that Roger Robin was looking for any worms which we had unearthed - that tickled his fancy!  He has been feeding the pigeons for me every morning, so now of course, he wants to find worms for the robin too...


Roger Robin certainly has a beady eye :-)
MKid also helped me save some marigold seeds, which he's taking to NGirl, so that she can plant some in her garden :-)  She will also be able to salvage and save some of the pepper and aubergine seeds - so another veggie garden is in the making.


I just love passing suchy earthy knowledge on, especially to such a willing and eager recipient :-)