"Self-sufficiency does not mean 'going back' to the acceptance of a lower standard of living. On the contrary, it is the striving for a higher standard of living, for food that is organically grown and good, for the good life in pleasant surroundings... and for the satisfaction that comes from doing difficult and intricate jobs well and successfully." John Seymour ~ Self Sufficiency 2003
Showing posts with label alpaca poo. Show all posts

Sunday, 11 December 2016

It's that time in the garden... (part 2)


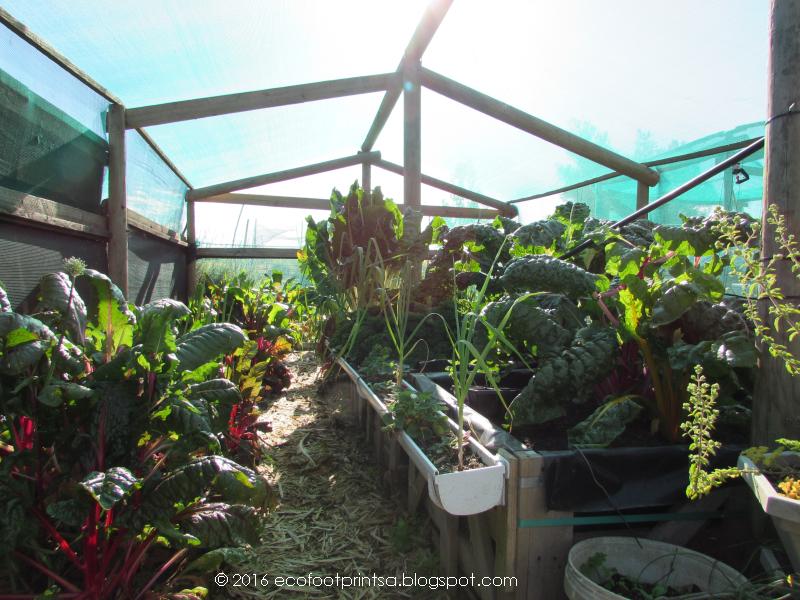
The first shadecloth covered veggie patch is doing well - perhaps too well.  We can't eat what is growing in it quick enough... (so ruddy great armfuls get given away - neighbours / kids, etc)
Garlic and swiss chard - they did wonderfully this year inside
 the shade cloth covered veggie patch
My multi-coloured swiss chard did really well - a lot of self seeding went on at the end of last summer when the previous plants bolted....
Swiss chard city lol
... and I left them to it.
That parsley plant is roughly 45 cms in diameter - it obviously
 loves the raised bed


As the chickens loved my strawberry plants they had to be
 moved away from beneath the berry beds.  I placed them
in gutters, and fixed the gutters to either side of the raised
beds.  That has worked brilliantly and has kept most of
 the strawberry loving insects (a.k.a. snails and slugs) away .
 I also planted garlic between the strawberry plants
 in the gutters 
I then took a wander to the pumpkin veggie patch area.

I love recycling whatever I can and when we scored some raised bed pallets / boxes from the tile shop at the end of last year, I lined them with plastic and chucked alpaca poo into them during the winter months until they were full.  Then I tossed in some pumpkin and butternut seeds, ran a sprinkler head to each one, and left them to do what they wanted.

This is what they wanted to do - with no further help from me...
A recycled tiles transportation pallet, lined with plastic and filled
 with alpaca poo  makes a brilliant pumpkin bed - especially if it's
 placed next to an "anti chicken" wattle fence
 Those raised pumpkin beds are there permanently - I will empty them out every autumn, use the contents to work into other veggie beds, and start filling them with alpaca poo every winter so that they are ready in late August for more pumpkin / butternut seeds again.  I am totally addicted to growing pumpkin and butternut against a "trellis" - it keeps them off the ground so that RMan can still mow, keeps the orange filled orbs of deliciousness high enough away from slugs / chickens and other devious creatures / insects, and makes harvesting such a breeze.
The anti-chicken fence is ideal for growing pumpkins on :D
Finally, for the first time ever, I found some 2 year old artichoke plants in the nursery on the way to town.  RMan and I LOVE artichokes (however, after our latest cholesterol tests perhaps we'll have to go a little easier on the butter when we eat them).
It seems that the artichoke plants love their position between
 the two raised pumpkin beds
I popped the two artichoke plants facing west between the two pumpkin beds where they are protected from the worst of the wind - and they seem to love their spot.
Another couple of days and that artichoke will be ready for eating
I am amazed how quickly they grew, and started producing...

Yummy luscious-ness straight from the garden.  It seriously doesn't get better than that!


For more info on the Foothills DryAway please click the link.

Saturday, 8 October 2016

Putting chickens to work

...is, I believe half the point of having chickens.  The other point is their eggs - and their flesh - not that RMan or I would ever be able to kill one...

But getting them to work effectively needs guidance :D

Since we have restricted them to the back area they have had a merry time destroying whatever they can.  That is a chicken's wont though, isn't it ;)
The previous poo pile worked - after a fashion
And once we had removed the black plastic cover from on top of our alpaca poo pile, creating havoc out in our alpaca poo area was one of their greatest delights.
But, as a chicken claw or two and soon the
alpaca poo was widely distributed where it
wasn't wanted
So, we had to step in and create some order out of their chaos.

Once again, the 3 mtr long alien Black Wattle "droppers" we have in the tractor shed came to our rescue.  ("Droppers" are so named because they are normally "dropped" in along a barbed wire fence to add some strength / stability to the long expanses of wire.)
Black wattle "droppers" to the rescue once again
Once again RMan used the garage entrance / door to square off the "frame" before screwing the pieces together.
One of the side frames before it was knocked
 into the ground
Then it was a case of knocking the longer end and middle supports into the ground, and filling the slots with pre-cut pieces of Black Wattle.  Thank goodness we have had a little rain recently - trying to knock anything into this ground in summer, when the soil is baked harder almost than concrete, is not possible.
You can see the far side "wall" is still short of some
"dropper" pieces - but 3 minutes later it was all sorted!
 Ha!  Take that chicks!
The one side was purposely left shorter than the other three.
Te shorter side is just the perfect height
 to use it for wheelbarrow emptying 
That was done so that we could collect the alpaca poo in the wheelbarrow, and then, using the shorter edge as a fulcrum, tip the contents of the wheelbarrow into the newly designated alpaca poo compost pile :)

This year there won't be a shortage of alpaca poo for the veggie beds and fruit trees.

It works a treat - and, because the poo is contained and the chickens aren't scattering the contents far and wide, the contents are keeping them much busier for longer :D   Not only that, but we have caught them sitting on top of the poo "fence" - no doubt providing them with a better view for surveying their kingdom.

A bored chicken gets up to all sorts of mischief!

Sorry it took so long to share, Mum - but there - now you have our solution ;)

Sunday, 18 September 2016

Restricted, but still working

This was a strange winter.  I didn't put on my warm jacket once.
But, surprisingly, we had snow on the mountains which are visible from our smallholding - not once, not twice, but three times!!
It's a pity the snow doesn;t come lower,
but I guess it is better than nothing :)
Normally if that happens only once a winter we are lucky, but three times???

Given our topsy-turvy weather, I have this niggly feeling that this summer is going to be an extra-ordinarily hot one.

So I have to make plans now.

The chickens have had free access to the entire property ever since they arrived here.  Not that you'd know it - they tend to hang as close to the house as they possibly can - trying to wheedle food out of us every time they see us.

And, the new rooster, Tweedle dee's now grown up chick, has decided that RMan will be the target of his displeasure when he feels that the (easy) food distribution is taking too long.
Existing chicken range
The problem with allowing the chickens total free reign is two-fold.

1  They are casting aside whatever mulch we place round fruit trees, grape vines, veggie patches and berry bushes.

2  We run our Cape Town based business from home, and, the rooster has no remorse crowing right by the back and front doors whenever he feels like it.  What our potential, or existing customers think about that noise as background to their telephone conversations I have no idea, and there is no additional charge for the sounds effects, but it is not an ideal situation.

3 Stepping out either the front or back door became an obstacle course - trying to avoid their "parcels".

Plus, I have one chicken who refuses to lay with the others - look what I found under the  bay tree...
As you can tell, I have been searching for her
 eggs for 13 days...
So, we have made a plan.

We decided to restrict their free ranging to the back area - in our lemon orchard.
New chicken range
Being, on average, 38mtrs X 30 mtrs in extent (or 1140mtr2), and considering that they are given a generous amount of chicken feed / laying pellets twice every day (good morning and goodnight) I am not concerned that they are going to suffer.  (Note: Althought the 24/7 feed bucket worked very well, and was hung high enough in the coop to prevent the mice from accessing it, I had to remove it from the coop as the wild birds found it.  Perhaps I will introduce it again next winter...)

The chickens noses are a tad put out of joint, but they'll get used to it ;)  The occasional one has found her way over the new fence, but that generally happens round about the evening feed time, so getting her back into the orchard area is quick and easy - she follows me because I'm holding the chicken feed bucket.
The separation involved running a chicken wire fence down next to the berry area.
New gate to access the lemon trees and the
 chicken coop.
We have placed a gate right next to the coop...
New tractor access gate
... and RMan has made a stonking gate next to the boys paddock so that he can still get his tractor out of the area.

The only problem is we keep our alpaca pool pile in that new chicken area.

We covered it up with heavy black plastic for the winter - to prevent any potential heavy downfalls of rain from "washing the goodness away" and to encourage the pile to heat up and kill any weed seeds.   That also meant that the chickens didn't have access to it - they were tending to scatter it's contents to the wind...
Seems like a small pile of alpaca poo, but we have
already started feeding the plants with a dose of it's
 goodness in anticipation of their bearing fruit / veggies
However, as they will now be restricted to the area where the poo pile is located so that doesn't seem all that clever.

On re-potting a pot plant on our patio last weekend, I also noticed that the soil inside the pot was full of cutworm - which must've come from the alpaca poo pile.

So, exposing the poo pile to the chickens is win-win - they get additional insect protein whilst they're turning over our poo "compost" :D

Oh yes - look what we've got access to...!
Actually, they get (got) more than insects.  As we lifted the black plastic, we spotted a fair sized frog (which they totally ignored) and a mouse - which crouched transfixed at the sudden sunlight / sight of us and the chickens.
One mouse - it had just seconds to
realise what was happening...
It didn't last long though.  One of the chickens spotted it, grabbed it, ran away from the other chickens and, in one gulp, swallowed it.
She is doing that chickens are meant to do -
find the insects in the poo pile - but, in so doing,
 she is scattering the alpaca poo far and wide...
But, what to do about their scattering the gorgeous compost material everywhere?

For that solution, you'll have to wait until it is complete and I can share it with you all... :D

Sunday, 14 February 2016

Raised beds


Back in November when we scored some pallets from a local tile shop which were turned into the second chicken coop, we also scored some "boxes".  I use the term boxes loosely, as they do not have full sides - they're more slatted.
This looks like a pile of junk, doesn't it.
 To RMan and I it means sooo much more...
RMan and I had a "together" moment when we saw these babies - we reckoned they'd make perfect raised beds.  My lower spine is not (and cannot without a major op, which I'm not keen on) getting any better, and the less crouching I have to do, the easier it is for me to garden (which is another reason I planted the pumpkins in tyres so that they could grow up and along the fence of the other veggie patch).

These "boxes" will make that possible.

So, when we had a spare moment in January, I got to work.

I started by clearing out everything in my shadecloth veggie house.
Stones from our fields were added at the base to
  act as drainage
Serendipitously, the three "boxes" fitted perfectly between the two internal support poles - a sign I took that they were meant to be placed where they are.

I layered loads of newspaper on the ground underneath them.  Then, we uploaded some of the gazillion stones we have littering our fields and layered them at the very base of the boxes - on top of the newspaper
The sides of the "boxes" were covered with black plastic
  which was stapled in place
The sides were covered with black plastic which was stapled in place - to prevent the soil from being washed out.  Then layers of straw, alpaca poo, topsoil, straw, alpaca poo, topsoil...
Then we proceeded to fill the mtr3 with a lasagne
 layer of goodness
...were added until the new raised beds were full.
Nearly full.  We were surprised how much it
  took to fill the mtr3
Finally, after watering everything in well, I let it settle, topped up the soil the next morning (it had sunk a little due to the watering) and started sowing seed / planting.

This is what it looks like just under a month later...
Luscious yumminess growing happily in the
 raised beds :)
I'm chuffed.

Carrots, lettuce, radish, chard, some garlic, even a "trial" single tomato plant and the odd-companion planted onion - they're all doing well - and we've already harvested chard, radish, lettuce leaves.
Yeeha!!  Ginger growing for the first times ever
 in my garden
Due to the rich well-manured composition of the soil, I am even able to grow ginger for the first time ever.  (Ginger, being a plant which grows in a mediterranean climate, requires a richer soil, which retains water and loves being grown below other plants - so that their leaves can shade the soil and filter the light.)

These raised beds are certainly assisting my back :)

And the "boxes" were just sitting rotting at the tile shop where we found them.  Another good recycling project completed :)

Although my pumpkins are producing madly, RMan is not mad about growing anything in tyres, so, we're going to go back to the tile store to get some more raised beds, which will be dedicated pumpkin beds next spring / summer.

Thursday, 14 January 2016

Growing pumpkins / butternut 2016

Bill - this one's for you :)

This summer I tried a different way of growing my pumpkins / butternut.

Previously, I have dug a ruddy great hole in the ground, filled it with compost (or more recently alpaca poo) and then added my pumpkin / butternut seed.

But, the plants spreadeagle themselves everywhere, making mowing round them a nightmare.  Which is a problem, because we like to try and keep the vegetation as short as possible in order to prevent any snakes taking up residence / camouflaging themselves in the undergrowth.  Plus, the plants always succumbed to downy mildew before the season was finished.

I had seen a pumpkin growing concept I forget where, where the pumpkin plants were encouraged to almost grow over an arbour, with the fruit easily visible hanging down from the plants.

Now, I don't have an arbour, nor am I ever like to have one.  But, thinking laterally, I did have a half finished shade cloth veggie patch which I reckoned could be amended to fit the bill.

This took some planning - 8 months in advance.  And that was because I used alpaca poo.  Using straight compost wouldn't entail such forward planning ;)
The tyre towers were placed roughly 1.5 - 2mtrs
(4 - 5 feet) apart
What I did was take the used tyres that RMan scored on the auction many, many years ago, place them at reasonable distances apart round the unfinished veggie patch, fill them with alpaca poo - then allow the winter rains / worms to do their bit.
The pumpkin stems are encouraged to grow along
the wattle pole fence
Come August 2015, two seeds were sown in each tyre tower.  Clever that - because it turned out I had cutworm in two of the tyre towers - how they got in I'll never know.  But, thankfully (and with a bit of repeat sowing) I managed to get a seed (or two) growing in each tower.
I didn't succeed with this tyre - it had too many
 cutworm inside, which I only discovered when I
emptied out the alpaca poo.  The chickens loved
 their easy meal though :)  I have since planted a
 sweet potato in this tyre and it is doing well. That
 too will be easy to harvest when it is time
As the plants grow, I merely encourage the stems to suspend themselves on the horizontal wattle poles every time I water the plants from the rainwater tanks - which is roughly twice a week.  Once the plants were established, I also added mulch to the top of the decomposed alpaca poo - to prevent evapouration from the surface.
Harvesting the pumpkins / butternut will be a breeze
As the fruit is developing, it hangs visible on the wattle fence - which will make it easier to harvest, and prevents it from being attacked by slugs, etc.
No sign of downy mildew on these
 pumpkin leaves :)
The plants are all healthy.  They are producing fruit madly.  And there is absolutely no sign (thank God) of the normal downy mildew which has plagued my pumpkin / butternut plants in the past.  Obviously, the air that is able to waft passed the leaves helps in that regard.  I have only had two days where the leaves have wilted slightly from the heat / insufficient water.

And, most importantly, the stems / leaves are not cluttering up the land making mowing impossible.

This system of growing pumpkins / butternuts has worked so incredibly well,  I am definitely doing this again next year :)  Probably the only change I will make is to paint the tyres white - that should help to keep them / the compost inside them that little bit cooler, especially if we hit extreme temperatures similar to those we have seen this summer so far.

Tuesday, 15 September 2015

Weather warnings...


We woke up to the strangest weather on yesterday (Monday) morning.

Bear in mind our weather fluctuates between 14 - 18oC at this time of year.
Well, on Monday morning we woke up to 27oC - at 8.30a.m.!!!  That is a mid-summer type of day, not early Spring.
I kid you not - this is not the moon, but
is the sunrise that greeted us yesterday
morning.  I have never see one so
 "other-worldly" looking
The climatic appearance outside was really weird too - high clouds, and a sunrise like I've never seen before - almost alien.

Add to that this article:


I reckon that those in the northern hemisphere would be well advised to stock up on whatever fuel they need to keep their homes warm this coming winter.  Don't wait until stocks run out.

We have already ordered our firewood for next winter and are just awaiting word that we can pick it up.  8 - 9 months to season it should mean that it is good and dry when it is required.

As for us this summer - we've just ordered another 2 X 5 000lt tanks and a 12volt portable solar pump - we have a spare 140watt solar panel, so we will run the pump straight off the panel with a return pipe so that it will be re-circulated every day ;)

That will give us 40 000 lts of rainwater (and whatever hasn't evapourated out of our +/- 350 000 - 400 000 ltr dam) that we don't have to drain from the municipal supply - if, and when, it becomes necessary in order to keep our crops / fruit trees alive.  All our existing tanks are overflowing - and we're praying that we get enough rain before the end of December so that we can fill the new tanks too, and thus be better equipped to handle the hotter months of January / February / March.
Boy, has this little trailer ever worked for us - as
 you can see it's back gate is in a sad state...
But it still managed to get 1.5 - 2 mtr3 of mulch
safely back to our smallholding
Then, we schlepped the trailer through to Swellendam last week and loaded it up with wood chips from the local sawmill.
The wood chip mulch showed evidence of
decomposition :)
Adding a bottom layer of alpaca poo, and then a layer of wood chip mulch all round should help to retain whatever water we give to all the fruit trees / veggie beds.
20 minutes of huffing and puffing by Rman and
 myself - the wood chips are all offloaded.
As much as is there, I think we may need yet one
 more load...
Preparation is the key - otherwise we have only ourselves to blame...

Saturday, 4 July 2015

'N Boer maak 'n plan...


(translation of the title of this post : a farmer makes a plan)

There are roughly 40 lemon trees in our orchard - 98% grown from pips, and the balance from cuttings.

Yeah, I know - what are you going to do with the fruit from 40 lemon trees?

I have a couple of idea's.  But I will have to wait until they actually start producing fruit in quantity (and hopefully quality lol).

So far I am getting flowers, and a couple of really small baby lemons, but 99.9% of those are falling off.  Why?  I have no idea.  We are feeding the soil, adding the ashes from the Rosie, keeping them watered, and have even put up more of the privacy wattle fence to protect them from the hectic south easterly winds which blow in summer.

My worm farm is also due an empty out - which means worm casings and worm tea.  And I intend using some of that worm tea on the lemon trees.

Which means I need a sprayer :)

I tried using a 10 lts spray bottle (which has to be pumped in order to create the pressure to use) slung over my shoulder, but found that it took 3 - 4 hours of back-breaking walking, and spraying, and refilling in order to complete the task.

We needed something more hard-core :)
I spotted this beauty (in the pics above) for sale, which would work with my quad bike.  But, at over ZAR10 000 (without the trailer in the far right pic) it's a bit more than we were prepared to pay.

So, RMan set to making one :)

We purchase a pump.  And a 100 lt water container.  And some tubing.  And some straight tube joins and t-joins.  And hose clamps.  And spray heads.  And a hand held sprayer.  And a couple of in-line taps.  And an electrical isolator switch.  And a ratchet tie (to secure the tank to the quaddie).  Electrical wires and cable ties we already had.

The pump and the container were the most expensive parts - the pump was + / - R900, and so was the container.

But, a bit of fiddling here, and a bit of fiddling there, and this is what we ended up with...
1  the outlet hose from the tank to the pump
2  the water pipe to the handheld pump
3  the water pipe to the back spray heads
4  the in-line tap "valve" to prevent water being sent
 to the spray heads when it is not required
5  an in-line filter from the water tank
 to the water pump
6  a return pipe from the pump to the tank with
 in-line  tap "valve" - to regulate the water pressure
 and redirect excess water back to the tank.
Note : I took these pics shortly after RMan had
 completed his construction and whilst he was on
 his first trial run.  He has since secured those
 wires leading to the battery with more than
 tape...
Now we are able fill the tank with the organic "muti" (translation : medicine - which in this case = nutrition), hop on the quaddie, start it up, and take a slow drive whilst we smell the scent of lemon blossoms:)
The pipe labelled 3 in the first pic leads to the 3 X
 spray heads (1) at the back of the quaddie in the
 pic above.  When the red in-line tap valve
 (below the tank and in the middle of the pic above)
to the the spray heads is closed, then the water
is pumped to the hand held sprayer only (2).
But, that tap also allows us to regulate the
flow of water to the spray heads and the hand held
 sprayer simultaneously - which means we can spray
from the top / middle, and down on the bottom
 branches at the same time when necessary
We can fill the tank with worm tea from the worm farm, or with tea from alpaca poo.  Being 100 ltrs the contents of the tank last ages - we have to fill it at least twice in order to do the lemon orchard.

That is soooo much easier than walking round with a shoulder strapped 10 lt spray bottle which entails having to keep stopping, removing, pumping (to increase the pressure) before re-hoisting it onto my shoulder again in order to continue spraying before the next re-fill - which always came too quickly lol.
The pump is powered from the quaddie battery.
When the pump is not in use, the isolator switch
1 is in the off / disconnected position.
2 shows you the in-line tap "valve" to the back
 sprayers
3 shows you the in-line tap "valve" on the
return pipe to the tank
And, by closing the in-line tap to the back sprayers completely, we can, if we so desire, feed the ground / root area only of the lemon trees, fruit trees, grape vines and my veggie patches by means of the hand held sprayer.

Clever RMan :)

The cost?  Just over a 1/4 of the cost of purchasing the "real McCoy" :)

Monday, 15 December 2014

"Oh me, oh my...

... do I have a pot big enough to cook this monster in?" was the question that popped into my head when I saw this.
RMan's size 9 shoe for size comparison
This "beetroot" was grown in a bed in my shadecloth veggie patch - in soil that had had a healthy dose of alpaca poo added 2 months ago.  And nothing but alpaca poo.
Trimmed of it's leaves, my hand is in the lower
left hand corner
It was "hiding" behind some red veined swiss chard leaves.  In fact, I started harvesting some leaves of what I thought was swiss chard to make my creamed spinach recipe when I happened to glance down and saw the beetroot "globe" peeking out of the soil beneath the leaves.
The giant beetroot inside a 10lt pot
There is no sign of the beetroot bolting, so once it is cooked the flesh inside should be good and tender.  And plentiful.

Ha!!  Two for the price of one :)  We enjoyed creamed spinach (a.k.a. swiss chard / beetroot) with our dinner on Friay night, and today (Saturday) I am cooking the beetroot.

Update prior to posting:
Tender all the way through - eventually :)
It took a full hour to cook that baby but I started early enough and RMan and I enjoyed a helping with our dinner that night.
2.5 kgs of beetroot relish - enough for us
and to give as a gift
I still have plain beetroot slices in the fridge, and, yesterday, I made 2.5 kgs of beetroot relish.  RMan will enjoy that with his braai-ed boerewors (barbecue sausage) and ostrich sausage, and, we'll enjoy it with a roast chicken dinner too.  Not to mention putting a dollop on top of a cheese filled cracker...

Yum.