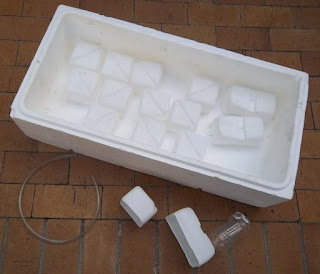
Given the heat that we normally experience here in summer, together with the fact that we hope to be on the farm for a couple of weeks in December, I thought I'd give them a try - that way hopefully my vegetables wont die when I'm not at our (town) house to give them regular water - we don't have timed irrigation there like we do on the farm.
So, this is my tutorial on how I made a sub irrigated planter.
Firstly, what I gathered together:
A container (I've used a styrofoam box which RSon got from the restaurant where his girlfriend works). A bucket would work as well.
Enough bases from (in my case) recycled milk bottles, to "line" the base of the container.
A recycled bottle for the water inlet / fill tube
Piping
Cut your milk bottle (future) oxygen reservoir bottles at the required height.
Make a hole in the top of one of the oxygen / water reservoirs and insert your fill tube container - in this instance it was a clean oil bottle, with it's base removed and the neck of the bottle inserted in the hole.
The, drill holes into the individual oxygen reservoirs and place them cut side down in your planter container. It is not necessary to link the individual oxygen containers as water will flow along the base of your planter and rise up in all those openings.
Cut a hole into one of the oxygen reservoirs and insert a pipe
Make a corresponding hole in your SIP container for the the overflow pipe and thread it throughCarefully add your soil, tamping down between the reservoirs in order that it can act as a wicking system until the roots of your plants / seedlings have grown down towards the water in the reservoirs
Plant up your sub-irrigated container
And finally, add water through the fill tube until you see water coming out of the overflow pipe.
The water won't evaporate as it would when one waters from the surface, as it is not exposed to the heat of the day, but is, instead, at the base of the plants where they need it most. That should be sufficient water for at least 7 - 10 days. When the fill tube is visibly empty at it's base, and thus more water is required, simply add it through the fill tube again, until it overflows through the outlet pipe.
What has this cost me? Just half an hour of my time, and ZAR1.00 (US 0.14 / 10p) for some piping for the overflow pipe.
I have recycled a fair amount, which should stand me in good stead for quite a few years to come, because, as the plastic is not exposed to sunlight, it shouldn't perish. Environmentally, I am very chuffed.
And, finally, I have a self-watering, raised veggie patch which has utilized what would have been waste packaging / thrown out with the garbage if you don't / aren't able to recycle.
This would also work for all those northern hemisphere residents as this container could easily be utilized for all those hot days you've just experienced this past summer, or it could be planted up with early spring seedlings and placed under a covered verandah where it would be sheltered from the last frost of winter? Invariably, restaurants have food grade containers which they have to, hopefully, recycle. Make their job easier by taking some of that recycling off their hands and putting it to good use growing your veggies / salads :)


Very interesting post. Quite a crafty project you did. I hope it saves your plants while your away in December.
ReplyDeleteJane- Love crafty things / making something (anything) with my hands.
ReplyDeleteYeah, also hope it works... I'll let you know.
What a great project. Since we are a desert here, we're going to do all of our gardening in planters to conserve water.
ReplyDeleteDenese - In that case this would probably work very well for you :)
ReplyDeleteingenious! that is such a great idea! when you leave town for a bit there is always the risk of losing your plants...
ReplyDeleteSprig - Exactly :)
ReplyDeleteJust love this idea! So cool!
ReplyDeleteSlowvelder - LOL. I thought so too, and having been chaffing at the bit, for our wet, wet, wet weather to improve, so that I could share it with everyone :)
ReplyDeleteI made some wicking beds with aggregate at the base - never seen this idea - I will be interested to see how it works long term.
ReplyDeleteAA - I've been using it for the past 2 years and it works well :) But, as I said on http://ecofootprintsa.blogspot.com/2013/11/spring-garden-goodies.html I am going to be making a stand for the boxes - firstly to get them off the ground and away from any snakes who want to crawl between the boxes, and secondly, I have the spare wood for the stand, and working at waist height for a change will be wonderful ;)
Delete