"Self-sufficiency does not mean 'going back' to the acceptance of a lower standard of living. On the contrary, it is the striving for a higher standard of living, for food that is organically grown and good, for the good life in pleasant surroundings... and for the satisfaction that comes from doing difficult and intricate jobs well and successfully." John Seymour ~ Self Sufficiency 2003
Showing posts with label recipe. Show all posts

Saturday, 18 November 2017

Candied


I love ginger.

I especially love a bit of ginger with my meal (finely chopped raw ginger).


But, I also love candied ginger.

So, with some of the home grown ginger I've harvested I decided to make some of the latter.

First, I peeled the ginger - using a teaspoon makes that task easy.
Peel the ginger with a teaspoon
Then the peeled ginger was thinly sliced with the assistance of a mandolin.
When slicing the ginger with the mandolin, use a flat hand to
 hold it securely - less sliced fingers this way
This sliced ginger went into a pot with enough water to cover it completely.
Add enoughj water to just cover the peeled sliced ginger
After boiling for 30-odd minutes, the ginger was removed from the liquid in the pot and drained.  The liquid was reserved in a jug.
Peeled sliced ginger simmering in plain water

Using ½ - 1 cup of the reserved liquid add it back to the pot with 1½ - 2 cups of granulated sugar.
As the ginger simmers in the sugar syrup you will notice that it
 becomes more and more translucent
Heat gently whilst stirring until the sugar is dissolved and then add the ginger to that mixture and simmer gently for 30 - 40 minutes until the ginger is transluscent and glassy looking.
Sugar syrup soaked ginger draining before dusting with castor sugar
Remove the ginger from the pot with a fork and place piece by piece on a drying rack.  Allow to drain of all the excess juice overnight (any excess juice will cause the castor sugar to dissolve instead of adhering to the ginger.)
Homemade candied ginger
The next morning toss the now drained ginger in castor sugar and place in an airtight container.
I have found that leaving the candied ginger for a week or two improves the first taste of end product.
  
Then, climb in...😀

Shelf life - a good 9 - 12 months, if not longer.  If it lasts that long...  Just ensure that it is kept in an airtight container.


Ingredients for candied ginger:

400 - 450 gms (1lb) peeled and sliced ginger.  (Try and use young fresh ginger as it will contain less "fribrous threads".)
Water - enough to cover the sliced ginger
2 cups of granulated sugar
Castor sugar - for coating the cooked ginger.
Left over syrup from first boil
The leftover juice (from the initial boil) was added to the left over sugar syrup and reduced down.  That will be used for:

Adding to lemon and honey and warm water - very soothing drink for a sore throat
To drizzle over pancakes / waffles / fruit salad
In a salad dressing
Drizzled over roasted veg
To add to sauces for that asian flavour
With the addition of lemon juice, to glaze chicken (or our turkey this Christmas)

Be warned - this syrup will be concentrated - with a really good bite to the finished product.

Monday, 9 October 2017

Pickled broad beans (fava beans)

Broad beans are like zucchini - boy, do they proliferate...!

So I really tried to limit the number of broad bean plants that went into the ground this year.  But, even with 6 plants, I had more than I could give away and more than RMan was willing to eat - to frequently.  So, I went searching for some way to preserve them.
The umteenth harvest of broad beans
I had tried blanching and freezing them a few years ago, only to take them from the freezer and discover that they had "turned".  I obviously didn't prep them properly, or I left them in the freezer for too long.  I'm not sure which error I made, but I wasn't keen to try that again.  They were revolting.

Drying for me is not an option, as the yucky looking brown beans don't appeal.

Then I hit upon a recipe for marinating broad beans.  But, the life span was still too short - only 3 - 4 days in the fridge.  That is classified as serving them too frequently as far as RMan is concerned...

Finally, I found a recipe to pickle broad beans.
Pre-cooked, twice shelled, and ready to add to the pickling liquid
 in the sterilized jars.
Just a note on the jars.  Yes, they are re-purposed, but their
 previous contents were not vacuum sealed so the lids are
re-usable and will form a perfect seal when water bathed.
I shelled them (from the main pod) and, after boiling them for 5 minutes, allowed them to cool and I then removed the inner "sheath".  Yeah, I'm a sucker for punishment... 😏  It is tedious and time consuming, but we prefer to eat broad beans that way.
The inner shell / sheaths went to the dogs
As I am on a zero waste everything mission, the outer pops went to my compost heap, and the inner shell / sheaths went to the dogs - they L-O-V-E broad bean shells.
On the left is the plain pickled broad beans, and on the right
 is two jars of water bathed pickled broad beans.
One jar was just pickled (3 - 4 months), but the other two were placed in the pickling liquid and then water bathed in order to prolong their life (6 - 8 months).

I will report back on the pickled broad beans in 3 weeks time.  And, I will also report back IF the water bathed broad beans are not viable after six months  If you don't hear from me, then they were good 😏


If you'd like to try for yourself, here is the recipe I used.


Ingredients
1 shelled broad beans 
1 cups water
1 cups white vinegar (apple cider)
2 tablespoons kosher salt
tablespoons sugar
1 large red chilli pepper or 4 - 5 dried chillies
4 cloves garlic
teaspoons mustard seeds
teaspoons fennel seeds
2 teaspoons coriander seeds

Instructions
Shell the beans. 
In a large pot of boiling water, blanch the beans for 3-5 minutes or until bright green and tender-crisp. Drain, and immediately transfer to an ice water bath to stop the cooking process.  Remove 2nd shell / membrane.
In a medium saucepan set over high heat, bring water, white vinegar. kosher salt and sugar to a boil. Continue boiling for 2-3 minutes, or until the salt and sugar are completely dissolved.
Divide the chili pepper between the sterilized jars, and add two garlic cloves, 2 teaspoons of mustard and fennel seed per jar.
Fill each jar with beans, packing them in fairly tightly, but without squashing them. Pour the hot pickling brine over the beans, filling up to 6mm / ¼" from the top.
Seal jars with lids and / or rings. Let the jars cool on the counter and then transfer to the fridge.
Allow at least two to three weeks to fully pickle before opening. The plain pickled beans will keep for 3 - 4 months in the fridge.
For longer storage, process the jars for 10 minutes in a boiling water bath, then store in a cool, dry place - away from light - for up to 6 months.
Dated so that this time I know when their best before date is 😏

Saturday, 5 August 2017

Back then...

... is just as valid now, and it's bloody delicious.

Back then?

Oh, I'm talking about back in the Depression.  No, I wasn't alive then (thank goodness) but I have to say that the women of the house were ingenious when it came to feeding their families with reduced provisions / money.

This recipe is a perfect example (and, given the recent S&P's, Moody's & Fitch's financial downgrades / state of this country's coffers as a result of looting / corruption) of enjoying a "treat" using less expensive, more basic ingredients, and may, if things don't change dramatically here in the very near future, become as popular now as they were back in the 1930's...

It's a cake recipe that uses no eggs, no milk and no butter.

Anyone like chocolate cake?

This recipe can be made into a chocolate cake, coffee cake or lemon cake (alternative ingredients are at the end of this posting).


Chocolate cake ingredients:
3/4 - 1 cup sugar
1 1/2 cups flour
3 - 4 (or even 5 if you like) tablespoons cocoa powder
1 teaspoon baking powder or bicarbonate of soda
1/4 - 1/2 teaspoon salt

1 teaspoon white vinegar
1 tablespoon vanilla extract
5 tablespoons vegetable oil
1 cup water

Pre-heat the oven to 180oC / 350oF
Mix all the dry ingredients together
Making three depressions in the flour add the vinegar to one, the vanilla in the other and the vegetable oil in the third.  Pour the water over and mix well till smooth.
Pour into a pre-greased baking pan and cook for 3/4 - 1 hour.

Allow to cool.

Frosting ingredients:
4 tablespoons cocoa powder
6 - 7 heaped tablespoons of icing sugar
2 tablespoons of butter / margarine
2 tablespoons of Nach Musik, Kahlua or any other chocolate liqueur

Mix well until smother.

Spread the frosting over the cooled cake.

Don't wait for a special occasion - cut a slice and enjoy immediately 😂

It is deliciously, and surprisingly moist, and definitely more-ish - RMan scoffs down 2 slices every time he's offered some.  It also lasts in a "fresh and moist" state for 5 - 6 days (if it survives that long).

Depression era chocolate cake - absolutely bloody marvellous 😃
Alternative recipes for a no eggs, no milk and no butter cake:

Ingredients for Coffee cake:
3/4 - 1 cup sugar
1 1/2 cups flour
3 - 4 (or even 5 if you like) tablespoons cocoa powder
1 teaspoon baking powder or bicarbonate of soda
1/4 - 1/2 teaspoon salt

1 teaspoon white vinegar
1 tablespoon vanilla extract
5 tablespoons vegetable oil
1 cup strong coffee

Frosting: add strong cold coffee and / or Kahlua or Nach Musik liqueur.

Ingredients for Spiced cake:
3/4 - 1 cup sugar
1 1/2 cups flour
1 teaspoon baking powder or bicarbonate of soda
1/4 - 1/2 teaspoon salt
1 teaspoon mixed spice
1 teaspoon cinnamon

1 teaspoon white vinegar
1 tablespoon vanilla extract
5 tablespoons vegetable oil
1 cup water

Frosting choice is yours ;)

Ingredients for Lemon cake:
3/4 - 1 cup sugar
1 1/2 cups flour
1 teaspoon baking powder or bicarbonate of soda
1/4 - 1/2 teaspoon salt
1 - 2 tablespoons fresh lemon zest (or more for a stronger lemon taste)

1 teaspoon white vinegar
1 tablespoon vanilla extract
5 tablespoons vegetable oil
1 cup water

Cover with a lemon (juice and zest) frosting using the lemon juice in the place of Kahlua or Nach Musik.


T'is my birthday on Thursday next week and this recipe is so good that I'm going to make a Lemon version for tea time.  I have a couple of fresh granadilla's, so I'm going to be adding them to the frosting.


Now, if our corrupt President could just be removed with a successful Vote of No Confidence on Tuesday the 8th, then that would be the best bloody birthday gift I could ask for.  Here's hoping and praying...

Saturday, 3 September 2016

Finally - culinary success

Kymber is forever posting about fermented veggies and kimchi.

And, although I have tried making sauerkraut a number of times, it has alway managed to "achieve an aroma" which put me off, and has caused RMan to throw it away.

I have finally succeeded this winter though.  And I now know why my previous attempts have been a failure.
Fermented cabbage - success at last!
In tryng to make sauerkraut in summer, the ambient room temperature has been too hot.
Home made salad dressing to splash on the
(95% home grown) salad
(our avo trees are still to young to produce),
and homemade fermented cabbage -
easy summer veggies to serve at the drop
 of a hat :)
It was the winter 2016 issue of the go! Platteland magazine that spurred me on to try again this year - with these two recipes.
Fermented cabbage & kimchi recipe
(Recipe courtesy of go! Platteland Winter 2016 issue)
So, with the success of my first trial batch, I got clever.  Not only have I got fermented white cabbage, but I have got fermented red cabbage too ;)  Success, of course, made me giddy - and I know have 6 jars of white and red sauerkraut in the fridge.  Loving ginger as I do, I added about 2.5 cms of peeled, chopped ginger to two of the sauerkraut jars.  I haven't tasted those yet though...

BUT, even if you're an avid fermented cabbage fan, please, make yourself a batch of their sweet and sour pickled cabbage.  It is just too devine :D
Sweet & Sour pickled cabbage recipe
(Recipe courtesy of go! Platteland Winter 2016 issue)
I added some of my preserved piquante peppers to
 this as well as the chillies - yummy...
I am completely hooked on it - and would even eat it with boiled eggs if I could ;)

Very cool!!

I will try and see if I can grow cabbage in my shadelcoth veggie patch this summer and, if I am successful, from now on before I make any cabbage for RMan and I, and before the chickens demolish the outer leaves and the alpaca's wolf down their share of thinly sliced cabbage, I am definitely making more pickled cabbage this summer.  Saukerkraut and kimchi - when my fridge stock is finished I will just have to wait until next winter when the temperature is once again suitable for fermenting vegetables... 


P.S.  Don't fret if you can't find the Winter 2016 issue in the store anymore - go! Platteland have additional copies which can be back ordered

Saturday, 30 July 2016

Winter for some, and summer for others


I fortuitously met up with a wholesale seed supplier at our local co-op the other day and asked him why I was unable to find watercress seeds.

It turns out that apparently they have been classified as "alien" plants and they are not allowed to sell them anymore.

Whaaaaaaat?

They are so incredibly rich in nutrients.  And a good source of Vitamin A & C, and, like swiss chard, especially high in Vitamin K.

Damn - I wanted to grow them firstly for the fresh greens, and secondly for the seeds so that I can sprout them next winter.

So, here's a question for you all.  Does anyone have any watercress plants that they would be willing to send me a cutting (with roots) of?  Or can you find edible (health section) or crop seeds in your local store?

I am willing to swop seeds with whosoever has access to watercress.  I've got heirloom yellow, black and red tomatoes, mung beans, piquanté pepper and broadbean seeds to offer.  Take your pick :D

Anyway, talking about broadbeans (fava beans), back to today's posting.

It is really strange to me to read on overseas blogs that you are growing peas and broadbeans - in summer.  They only grow here in winter.

When it comes to shelling them, I plug my MP3 player into my ears, switch it on and settle down for a music session - the time passes in a wink ;)
Broad beans and peas - a delicious winter
 treat here
I have been steadily harvesting both for quite a few of weeks, and although RMan isn't mad about broadbeans I manage to get him to eat them by removing both the outer pod, and the inner capsule.  Tedious, but worth it to get the goodness inside him.

(To twice shell - place the inner encapsulated broad bean in boiling water for 2 minutes.  Thereafter the capsule will easily slide off the inner bean.  Dogs L-O-V-E that inner capsule - Scallywag couldn't get enough of them, but strangely enough wasn't mad about the actual inner bean).

Last week I made each of us a crustless quiche and added both peas and broadbeans to it.  Yum - that was stunningly delicious - even RMan enjoyed it (but it could also have been the bacon bits that I added to his one ;)

Tonight I am making chicken à la king - with twice shelled broadbeans added to the sauce lol  He wont even notice...

But, my most favourite recipe for broadbeans is just warm, twice shelled beans with a knob of butter splashed with freshly squeezed lemon juice and a sprinkling of S & P to taste.
A full 456 grams of broadbeans, and 256gms
of freshly shelled peas.  What more could I ask
for?
Peas - those he'll happily shell and munch on in their raw state - and the balance, after a quick blanch, I'm popping in the freezer for use next summer when it is too hot to grow them here.

For those who are interested here is the crustless quiche recipe:

Peel, slice and chop an onion and brown in a little oil.  Set aside.
If you're adding bacon bits, use the same frying pan and par cook them.
Add the onions and bacon bits to the shelled broadbeans and peas.
Break into a bowl and beat as many eggs as you are going to use. To this add seasonings as required - salt, pepper, garlic, herbs, etc - and a splash of milk.
Add the broadbeans, peas, onions and bacon bits into your beaten egg mixture and pour into a well oiled / buttered casserole dish / deep baking tray.
Add sliced tomatoes on top and sprinkle with grated cheese
Cook in a 180oC oven until the egg is set and firm to the touch - roughly ½ - ¾ hour

I have not given quantities as it will vary according to how many people you are serving - and that adjustment is common sense.

It is also a brilliant way of using up a surplus of fresh, free-range chicken eggs :D  God bless my chickies.

(The only shop bought items in that meal was the seasonings, grated cheese and the bacon bits for RMan ;)  )


What are your favourite broadbean (fava bean) recipes?

Sunday, 18 October 2015

Mostly homemade

Now that the weather is warmer stodgy, starchy meals are on the back burner.

I find that summer meals are so much easier than winter ones.  Don't get me wrong, I love cooking in the Rosie (and wish I could light it every day of the year), but, when it's too hot to light the Rosie, and not sunny enough to use the solar oven, then meals are (old caravan) stove top only.  And that normally takes a far amount of thought and preparation.

But, basically, if one has a loaf of homemade bread - your options are endless.

I have been googling 3 ingredient meals - the days here are so hectic, that I barely have time to think about what to cook, never mind actually prepare it.

Last week I made a salad that we hadn't had in years.  What made me think of it, I have no idea.

What was it I hear someone ask?
My version of Caesar salad - 
lettuce, snipped chives, anchovy fillets,
 blue cheese crumbles, avo slices,
 1/4 hard boiled eggs and finally...
Caesar salad :)

For those who have never had one it is a salad which consists of lettuce, anchovies and thinly shaved cheese.  But, I made a twist to the recipe because I didn't have any parmesan to shave.

I rinsed, and shook dry homegrown lettuce leaves and garlic chives.  The leaves were broken into more-or-less bite / mouth sized pieces and the chives were snipped small-ish.

Add to that a couple of Tweedle Dee's eggs (before she got broody) which were hardboiled, peeled and cut into quarters.

Then, in place of shaved cheese, I had a chunk of Creamy Blue in the fridge (good for late night snacking on biscuits whilst watching TV :) )  So that got crumbled onto the leaves together with a sliced avo and 12 X anchovy fillets.  Finally, I made fried croutons out of a couple of slices of homemade bread.
... croutons were added before the salad was 
 sloshed  with the homemade dressing ... :)
The dressing was made using :

1 X tablespoon of the oil from the anchovies
4 X tablespoons of olive oil
1/3 - 1/2 teaspoon of prepared (English) mustard
1 X teaspoon of Worcestershire Sauce
2 X overflowing tablespoons of freshly squeezed, homegrown lemon juice and
2 X tablespoons of plain yoghurt
scattering of dried garlic flakes
salt & pepper (to taste)

They were all whisked together and poured over the salad.

Surprisingly filling, definitely yummy - to the point that RMan even wiped the last of the croutons by dipping them in the leftover dressing - he calls that "knubbering" (snacking on something yummy).

Nothing nicer that completely empty plates, and no a single leftover in the fridge :)

And, apart from the creamy blue, the anchovies and the avo - all the other ingredients were home grown / provided :)

Then, on Saturday, Tweedle Dee's eggs to the rescue again.
Creamed spinach filled omelette
Omelettes filled with creamed spinach, grated cheese and tinned tuna for RMan, and leftover homegrown creamed spinach and grated cheese for me.

Served with a couple of slices of homemade bread.

Not 100% self-sufficient, but good enough for me :)

Saturday, 12 September 2015

Settling in

DumDum & DeeDee have settled into their new home wonderfully.

So much so, that DumDum has started crowing.  At first he sounded absolutely pathetic, but he has worked on it, and now spends much of his day chatting crowing backwards and forwards with our neighbour's rooster.
DumDum just after
a crowing session ;)
He gets so excited
that he stands on
tip-toes to crow lol
I wonder what they discuss...?
DumDum and DeeDee have taken
 to coming right up to the kitchen
door every afternoon - when they
think  it is suppertime...!  It
doesn't take them long to learn
my routine, does it?
Cheeky blighters!
And, even bigger, more exciting news - DeeDee has started laying eggs.

On Monday late afternoon, RMan went to get the alpacas their lucerne from the ½ water tank in which we store it - away from the field mice.
Can you spot what RMan saw...?
As he bent down to grab an armful, he spotted something in the far right corner - her first egg.
DeeDee cleared a spot to lay her very first egg.
How she got in there - and what made her go in there specifically, I have no idea.  Our neighbour, who gave us the chickens, said he didn't expect them to start laying for another couple of months.  Because of that, I hadn't prepared a nesting spot for her.  So, she found her own.
A recycled, "opened" quad bike tyre makes a perfect
high sided nesting box.
We went to town the next day and got a 2nd hand used quadbike tyre from a tyre shop - they are soft enough to open up the sides and it is more than fit for it's purpose - she immediately began laying an egg in it from the day we installed it inside the coop.

Various feeding possibilities have been tried, but invariably DumDum knocked them over.

Googling, there are plenty of ideas, but all involved purchasing something.  I wanted to use what we already had.

So, I came up with this idea...
The chickens feed (and water) gutter bowl
I took a small (30cms / 1') section of rain gutter, PVC welded the end caps on, and it has been fixed to the side of the water tank frame chicken coop.  The front has not been snapped into the gutter supports, so it is easy to remove and clean - when necessary.

I've done the same with their water gutter bowl - although the supports are more securely cable-tied to the frame.  I need to move the water bowl to the left hand side of the coop though, because DumDum literally gets beside himself with excitement when he sees me arriving in the morning to let them out and climbs right onto / inside it.

The feed gutter is working well - the sides are high enough that, when they eat,  the feed doesn't land on the floor thereby attracting field mice - not that they leave a scrap in it.  Their rations of sunflower seeds, mealies (corn) lentils, pearl barley and oat seed gets polished off in 15 minutes.  The rest of the time - well, they need to forage for their food - can't have any slackers here lol.

Talking about that, my herb tower has been struggling, so RMan and I tipped the contents out onto the driveway today.  I lost count of how many cutworm they found,and devoured...  No wonder the herb tower was struggling!  That will have to be refilled with fresh soil mixed with alpaca and chicken poo :D

So, now that the feathered family is happy and content, I had to decide what to do with the very first egg.

And decided on this recipe :)
4 ingredient sweetcorn bread
 4 Ingredient Mealie Bread (sweetcorn bread)

500gm self-raising flour
1 X 415gm (14gm)tin of creamed sweetcorn
1 X 385gm (13oz) tin condensed milk (less the 2 tablesspoons that RMan and I licked off a spoon - talk about childhood memories...!)
1 X egg - beaten
Soft, slightly sweet and definitely delicious
Mealie bread
Sift the flour.  Add the sweetcorn and beaten egg to the flour.  Mix well then add the tin of condensed milk.  Ensure that it is all well mixed then put into your loaf tin (I made it in the bread-making machine - set on "bake" only and cooked it for 1½ hours (but you can also make it in the oven pre-heated to 180°C / 360°F for 40 - 50 minutes.)  Prick the loaf with a skewer to ensure that it is cooked through at 40 minutes.  Then remove from the bread machine, and then the loaf tin and allow to cool before digging in - if you can wait that long...?

Quite.  Deliciously.  Yummy.
Toasted mealie bread with grated cheese for breakfast anyone?
And, toasted, and topped with some grated cheese left over from spag bol, and a cup of tea - it makes the perfect start to a busy day.

Be warned.  It is definitely more-ish... :)

Saturday, 15 August 2015

Birthday cake

Now, I'm not really a cake eater - apart from a lovely fresh carrot cake, or a baked cheesecake.  And I don't normally make a cake for my birthday.  But, I happened upon this recipe whilst browsing the net, and I just had to try it.  This is recipe is absolutely amazing!!
3 ingredient cheesecake
What makes it even more incredible is that it uses only three ingredients. 

Three.

I lie not.

The recipe is as follows:


3 eggs
120gm (4.3 oz) white chocolate
120gm (4.3 oz) cream cheese

Preheat the oven to 170°C (338°F)

Cut baking paper to fit your cake tin.  Line the tin and butter well.  This will prevent the cake from cracking as it bakes.

Separate the eggs and place the whites in a bowl.  Leave the egg whites in the fridge until you require them (that makes the meringue more stable.)

Break the chocolate into pieces and soften in a bowl placed over hot water (double boiler).

When they are melted, add the cream cheese and mix well.  Remove from the heat and add the egg yolks.  Again - mix well.

3 ingredient cheesecake with granadilla reduction
topping
Remove the egg whites from the fridge, and place in a deep bowl.  Beat well with a mixer until stiff peaks form (and the egg whites remain in place when you turn the bowl upside down).

Then add 1/3 of the meringue mixture to the cream cheese mixture and mix in gently with a spatular.  Add another 1/3, and finally the last 1/3 mixing gently each time.

Pour the mixture into the prepared tin and knock gently on the counter to remove large air bubbles.  Place in the oven and bake at 170°C (338°F) for 15 minutes, 160°C for 15 minutes, and then switch off the oven and bake with the remaining heat for a final 15 minutes.

Remove from the oven and leave on a wire rack to cool.

I coated the top of the cheesecake with a homegrown granadilla reduction.

RMan's conclusion.  Delicious.  He wiped most of it lol

Plus, I have a sneaky feeling that I can adapt it to a solar oven recipe...

So, I'm going to try that next summer.

The only problem I encountered - I presumed that my baking tin was "normal" but it was too wide - the recipe asked for a 15cm (6 inch) baking tin, and my smallest was 22cms (9 inches)  and the cake, although risen, was "spreadeagled".  So - either next time I use a smaller tin, or I make double.

What a stress!!  bwahahaha

Whilst I was at it I decided to make John's Amish coleslaw from the recipe which he had been very kind enough to send me
John from The Simple Life's Amish coleslaw
That, too, worked well, and now resides in my pantry :)

Dont'cha love it when plans come together?

Saturday, 1 August 2015

Winter fare

Isn't it funny - you can have the best intentions in the world, but winter always gets the better of you.

I promised myself this winter I would be a good girl.  But, I haven't been.  1.0kg heavier already and still a couple of months of cold weather to go sigh

And, it's all the Rosie's fault.  And my new all the bells and whistle's fridge.  Now that I have freezer space to store "snacks", I'm taking full advantage of it.

RMan and I love nibbling - especially when it's cold.  But, the "ready made snacks' available in the supermarkets are revolting, and a complete rip-off.  More pastry than filling - if you can find any filling at all...

So, I decided that I would make my own.

I boiled up an entire chicken, and when it was cooked, and cold, used the chickeny / herby / garlicky water it had been boiled in to make a gravy.

I stripped the chicken away from the skin and bones and added it to the gravy.

Then I pulled out the phyllo pastry which was in the fridge.  Slathering each sheet with a good dose of olive oil I  cut the sheets into strips.  I used only one strip - you'll see why now...

Taking one of the strips, I added a spoonful of the chicken mixture - right at the end.
The corner of phyllo pastry got pulled over the chicken...
 ... and the corner got folded again...
 ... and again...
 ...and again...
... and again...
 ...and again...
 ... and again...
 ...and again...
That last little bit of phyllo pastry got folded up
against the samosa
 ...and then folded again for the last time.  I didn't worry about the uneven triangle I had created - as long as the filling is securely enclosed and doesn't leak out during the cooking process, to my mind all those bits of phyllo pastry edges which are visible in the pic above = extra crispy crunch in the mouth :)  .
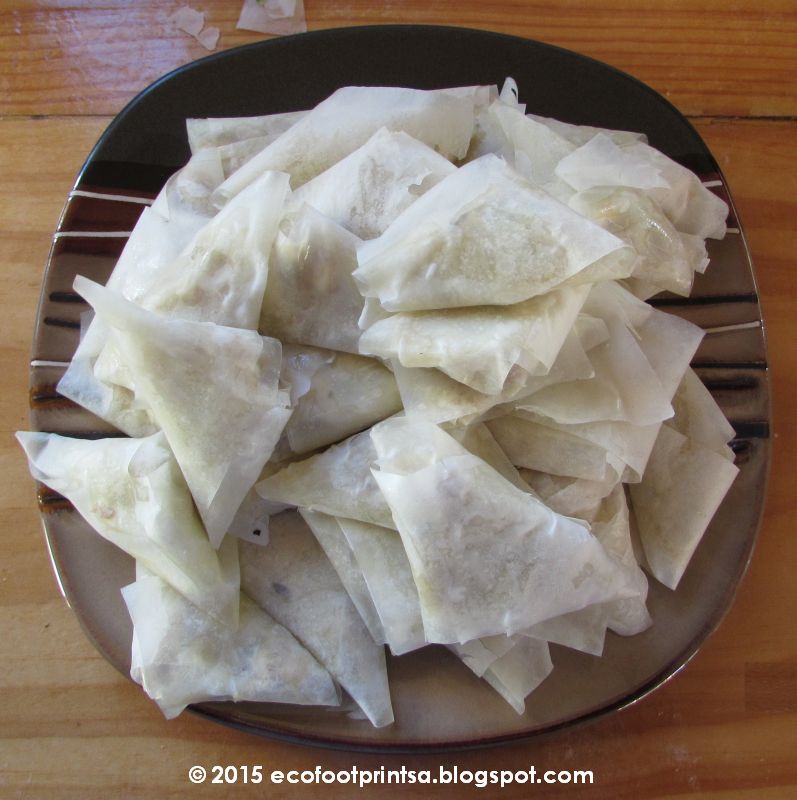
A whole plateful of homemade chicken samosas :)
What was I left with?

A whole plateful of chicken samosas.

One strip of phyllo pastry got folded 10 times - equivalent to ten layers of phyllo pastry :)

3/4 of the plateful has gone into the freezer.  The other 1/4?  As soon as we light the Rosie later this afternoon, and it gets to temperature, I'm going to have a nibble :)

(I can't wait to posts this, so I'll add a pic of the cooked samosa's when they're ready :) )

1½ hours to cook / simmer the whole chicken (which also became chicken pie and chicken à la king), 15 - 20 minutes to boil and reduce the stock and make the chicken gravy, ten minutes to strip the cooled flesh from the carcass and 20 minutes to roll the chicken and gravy mixture spoonfuls in the phyllo pastry.  Effectively, it took 30 minutes of actual work to make enough chicken samosa's to last us a month (I hope...lol)

Who needs to buy ready made nibbles, when they are so easy to make yourself?

Update:
Baked at 200°C for 20 minutes and served with a
chopped side salad and some chilli sauce.
Dunno what happened to the sauce, but they
tasted full of moist chicken - goal accomplished :)
RMan wanted to know how many I made, and how many I had left in the freezer.  He says 24 is not enough... ;)

They were, even if I say so myself, absolutely, excellently yummy, crispy, and tasty!!