"Self-sufficiency does not mean 'going back' to the acceptance of a lower standard of living. On the contrary, it is the striving for a higher standard of living, for food that is organically grown and good, for the good life in pleasant surroundings... and for the satisfaction that comes from doing difficult and intricate jobs well and successfully." John Seymour ~ Self Sufficiency 2003
Showing posts with label shadecloth tunnel. Show all posts

Saturday, 29 April 2017

Preparation paid off

How many of you remember me telling you about some raised beds we made back in February last year?

For those who are new readers I'll  give you a quick recap:
Granite tile crates
We got some crates which had been used to pack / transport granite tiles from the local tile shop and placed them in our shadecloth veggie patch.
Once in position, the crate base was lined with stones - to keep
moles out, and to allow for adequate drainage / prevent compaction
 at the base
 The base of the crate was lined with rocks - to allow for drainage.
one of the layers of alpaca poo
  Then we lined the sides with plastic to prevent the soil washing out, and to retain water.
Lined and layered - it was allowed to settle for a month
Then we layered straw, alpaca poo, soil, straw, alpaca poo, soil, etc (plus some bone meal) until it was full.  it was watered and allowed to "sit" (a.k.a. sink / settle) for a month, after which it was topped up again.

I have always had difficulty growing ginger, turmeric and carrots in our stony, clay beds.  So, I throught I'd try growing them in the raised beds and see if I had more success...

Those turmeric leaves are +/- 4 feet high
Well, I'm please to say the attempt was successful.  The pic above is the turmeric.  Actually, I planted the corms in the wrong season, and forgot about them.  Lo, and behold! one day I spotted growth, and thinking back, I recalled that turmeric had been placed there.
I always think of alpaca's when I see carrot tops
 - they l-o-v-e them ;D
The carrots - they did bloody marvellous mate :D  with no distortion of the carrot due to stones ('cos there were no stones in the bed lol).
My finger gives you something to compared the carrot top to
 I didn't succession plant them (yet) - I wanted to see how they would do.
Matchbox for size indication, and scale weight as proof
 To give you an idea, one carrot weighed 540 gms (19 oz).
Proof that the 540gm carrot was not an isolated thing -
 there are others still in the bed of a similar size.
And there are more like that...  Lots more :D
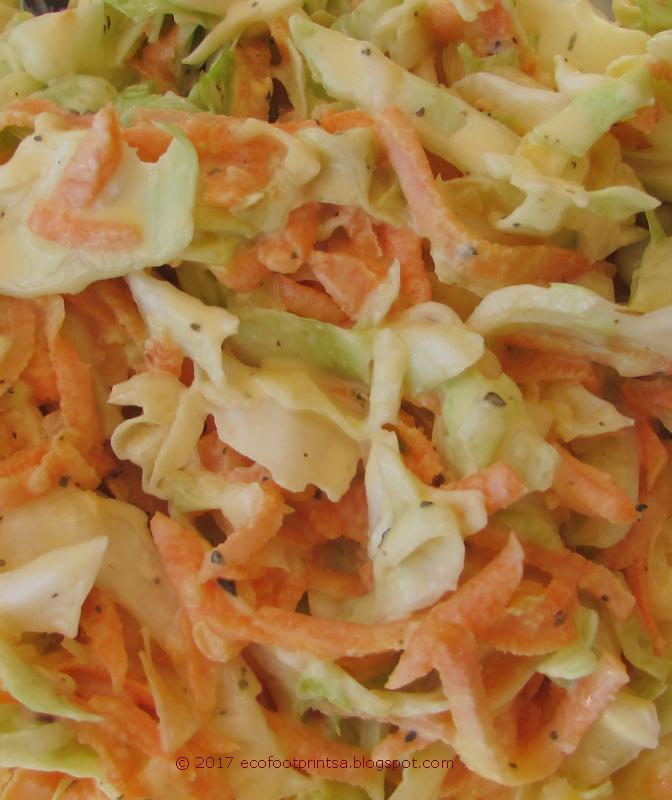
Yummy, home-made coleslaw
How did it taste?

Absolutely bloody delicious :D  Juicy and sweet.

Half of the 540 gm carrot immediately went into a coleslaw, the rest will make some yummy carrots in honey butter.  And the tops were wolfed down by the alpaca's.

No waste here lol

All that alpaca poo, soil and straw layering definitely paid off.  I'm very happy with the results and will now allocate one of the three raised (crate) beds / year to carrots - rotating each crop between the three.

Sunday, 5 March 2017

Sorting out my excess harvests

I had some fun this past week.

Even though our drought continues, due to the mountains of mulch we scattered everywhere, plus the neighbouring shadecloth veggie patch offers plenty of protection against the drying southerly winds, my 2017 piquanté pepper harvest is beginning to roll in.

The only problem is I still have preserved peppers in my cupboard from last year.  So, what to do with them all?

Why, dehydrate them, that's what 😃
Washed, de-stalked and halved - let the dehydrating commence
So, after the stalks were removed and they were given a quick rinse, they were cut in half and were laid on the inner drying shelf in the Foothills DryAway.
Chopped piquanté peppers - to speed up the dehydrating process
As piquanté peppers, like green peppers, contain a lot of water, dehydrating them was taking too long.

So, plan B.

I roughly chopped them and spread that on trays in the Foothills DryAway.
The dehydrated piquanté peppers were ground down to a
 powder in my food processor
When they were dry (later that day) I placed them once again in the food processor and blitzed away until I had piquanté pepper powder.  I purposely left the seeds in - for that little extra "bite" on the tastebuds.
Dehydrated and bottled - these piquanté
 peppers will last for ages 😂
I can taste the piquanté pepper sprinkled roast chicken that I am going to make in the Rosie this winter already... 😂


For info on how you can obtain your own Foothills DryAway solar / wind food dehydrator please click the link.

Saturday, 17 December 2016

Mulch rescue 2 a.k.a. preparing for water shortages


The signs have been there for the past months.

Our rainfall for the passed three years
Our rainfall this year is averaging out at 43.3mm / month, compared to last year at 60.3mm or 2014 at 53.5mm.  Looking at the graph you get the full sorry picture.  And, all the forecasts are not predicting any rain whatsoever in the next 10 days... :(

So, most things hereabouts are crunchy, crisp and dehydrated...
http://www.fin24.com/Economy/drought-is-a-wake-up-call-on-sas-water-needs-20160911-2
We were warned back in September that our dams were in dire straits.  Harry commented last week that everything looks so lovely and green compared to his brown, hibernating winter scenery.  Well Harry, pics can be deceptive.

As you can see from the pics below, we are well in the throes of a drought. 
Dead looking, dry and drab - that about sums it up
Between the unusually high temperatures for the time of year, plus the hectic drying winds, and finally with the lack of rain our garden is in a sorry state.

 But, forewarned is forearmed.  Between my rainfall records, and what has been published in the newspapers, we knew that it was gong to be extreme this summer.  So, we took steps to counteract the situation as best we could - without going greedily overboard with municipal water usage.

That was in our best interests because if everyone decided that bugger the cost, they were going to water willy-nilly, then how long would the water in our local dam last?  That municipal water supply is all we have - there is no nearby stream or river that we could use.

Believe it or not, our 8 X 5 000lt rainwater tanks are also empty... :(
Piquante peppers under a protecting
 blanket  of wood chip mulch
So eight trailer loads of wood mulch (roughly 8 X 1.5mtr3 or 12mtr3 in total) from our local sawmill has certainly assisted our fruit trees to produce their fruit - not as big as last year, but at least it was enough for me to bottle some - and make some jam / cordial.

And the wood mulch is a Godsend for my veggie beds.  A dose of organic nitrogen (a mix of seaweed liquid fertilizer / alpaca poo / chicken poo and worm casings) helps overcome the nitrogen leech than wood mulch causes.

An added bonus with the wood mulch is that weeds can't grow - so weeding is, for once, at a minimum :D  Yeeha!!!
There's not much we can do for the grass, and, as far as the alpaca's grazing is concerned, we managed to buy in oat and barley hay from the local farmers, so the alpaca's won't starve.
4 large round bales of hay to help the alpaca's.
The infamous, and over worked trailer is on the right hand side of the
pic, under the self seeded wattle tree.
But, the extreme dryness is not pleasant on the eye.  And the crunch underfoot makes one aware how dire the circumstances are.
A single turmeric leave is visible in amongst the rocket
But, on a more positive note, a few months ago I saw turmeric root for sale in the shops, and, as I had never seen it in our shops before, I couldn't help myself - I had to buy some. 

I immediately planted it all into one of the three raised beds in the shade cloth veggie patch - and forgot about them.  They hadn't forgotten about me though.  In the last week I noticed some strange green leaves poking up between the rocket, and deduced that the turmeric had decided it liked being where it is, and, by way of thank you, it would peep a lookout above ground to see it's surroundings.

Great excitement LOL
In the centre of the pic you can see a ginger stem, which
 was accidentally left in situ last year, and which is growing again too
I thought if it grew it would probably look something like ginger, but it doesn't - it's completely different.

Finally, an errant sunflower seed, which wasn't gobbled up when I fed the chickens one day, surprised me by showing it's face in the berry patch.

Sunny, bright and cheerful - an unexpected
 sunflower to add to the seeds I purposely
 planted in order to feed the chickens throughout
the coming year.
Aren't we blessed with being able to grow all manner of amazing plants - both big and small ;)


For info on how you can obtain your own Foothills DryAway please click the link.

Saturday, 3 September 2016

Finally - culinary success

Kymber is forever posting about fermented veggies and kimchi.

And, although I have tried making sauerkraut a number of times, it has alway managed to "achieve an aroma" which put me off, and has caused RMan to throw it away.

I have finally succeeded this winter though.  And I now know why my previous attempts have been a failure.
Fermented cabbage - success at last!
In tryng to make sauerkraut in summer, the ambient room temperature has been too hot.
Home made salad dressing to splash on the
(95% home grown) salad
(our avo trees are still to young to produce),
and homemade fermented cabbage -
easy summer veggies to serve at the drop
 of a hat :)
It was the winter 2016 issue of the go! Platteland magazine that spurred me on to try again this year - with these two recipes.
Fermented cabbage & kimchi recipe
(Recipe courtesy of go! Platteland Winter 2016 issue)
So, with the success of my first trial batch, I got clever.  Not only have I got fermented white cabbage, but I have got fermented red cabbage too ;)  Success, of course, made me giddy - and I know have 6 jars of white and red sauerkraut in the fridge.  Loving ginger as I do, I added about 2.5 cms of peeled, chopped ginger to two of the sauerkraut jars.  I haven't tasted those yet though...

BUT, even if you're an avid fermented cabbage fan, please, make yourself a batch of their sweet and sour pickled cabbage.  It is just too devine :D
Sweet & Sour pickled cabbage recipe
(Recipe courtesy of go! Platteland Winter 2016 issue)
I added some of my preserved piquante peppers to
 this as well as the chillies - yummy...
I am completely hooked on it - and would even eat it with boiled eggs if I could ;)

Very cool!!

I will try and see if I can grow cabbage in my shadelcoth veggie patch this summer and, if I am successful, from now on before I make any cabbage for RMan and I, and before the chickens demolish the outer leaves and the alpaca's wolf down their share of thinly sliced cabbage, I am definitely making more pickled cabbage this summer.  Saukerkraut and kimchi - when my fridge stock is finished I will just have to wait until next winter when the temperature is once again suitable for fermenting vegetables... 


P.S.  Don't fret if you can't find the Winter 2016 issue in the store anymore - go! Platteland have additional copies which can be back ordered

Monday, 4 July 2016

Prepare yourselves...


...life is going to be very different on Mother Earth.  It would appear that we have passed the point of no return, and there is no going back.

This is seriously scary stuff...


'Unprecedented': Scientists Declare Global Climate Emergency After Jet Stream Crosses Equator

http://www.rawstory.com/2016/06/unprecedented-scientists-declare-global-climate-emergency-after-jet-stream-crosses-equator/
 or if you want to watch this on YouTube:
 
https://www.youtube.com/watch?v=CKasUm77D0U
Take the time to consider how this change in our weather / climate / jet stream is going to affect you, and how you, personally, can mitigate the changes to enable you to continue to grow your own produce and provide for yourselves.


I wrote this posting above before :

1) I lost my internet connection for 3 days due to vandalism
2) I discovered that there is no need to panic - jet streams moving from the northern to southern hemispere, and back are apparently "normal" (https://www.washingtonpost.com/news/capital-weather-gang/wp/2016/06/30/claim-that-jet-stream-crossing-equator-is-climate-emergency-is-utter-nonsense/

But, the original article does raise a point.  Actually, a couple of points.

Climate change, is, I believe, irrefutable, and with that in mind, the more steps we all take to prepare ourselves for the difficulties that lie ahead, the better off we will be to assist those in need / without knowledge when the time comes.  Standing back and waiting for someone else to solve our problems is the normal reaction.  But, being proactive, and starting the process for ourselves - and for our children - will stand us in better stead.

What can you do I hear some of you ask?

1)  Conserve water - don't take your access to water for granted, not even if you have a crystal clear stream passing through your property.

i)  Source (if necessary) and seriously apply mulch around your plants
ii)  Collect and store whatever rainwater falls in whichever way you can
iii)  Experiment with a simple hydroponic / aquaponic system - don't let the fear of the unknown stop you from investigating this food growing avenue. Experimenting now will allow you to become more "qualified" and able to use this method confidentially in the future.  (note - we have had to make an adjustment with our hydroponic experiment - more news coming up in a future posting).

2) Adapt

i) Be prepared to change the types of crops that you normally grow - for instance consider growing different crops that are suitable for the changing weather in your area
ii) Invest in shade netting / greenhouse tunnels to assist your plants in performing / providing to their maximum ability.
iii)  If there are crops that require a certain amount of rainfall, start researching similar alternatives which will provide you with those nutrients / carbohydrates / proteins now - don't wait until TSHTF.

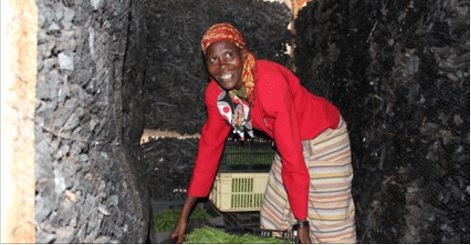
This charcoal cooler room reduces the outside
temperature from 30°C to 8°C
http://www.nation.co.ke/business/seedsofgold/Our-charcoal-cooler-keeps-produce-fresh-/-/2301238/2397960/-/119pv5mz/-/index.html


3 Look to the 3rd World people / underprivileged for idea's on how to cope in what will be, for you, "different" times but for them it is perfectly natural

i)  For storing food long(er) term without adding additional strain on the system / environment, their innovative ways are amazing e.g. charcoal cooler rooms for storing harvests.  Such a blooming simple idea, and it obviously works :)  And is a damn sight cheaper than (electric) refrigeration...
ii)  Learn to preserve your harvests via dehydration or canning - it's not difficult if you get yourself a reputable preserving book.  And is oh, so gratifying, to use those preserves out of season.  Plus you get the added benefit of knowing exactly what is in what you are eating and can be reassured that GMO and chemicals are not forming a hidden part of your or your family's nutritional intake.
iii)  Investigate (a.k.a. Google lol) how they manage to grow crops in their adverse climates (both extremely hot and cold) and what measures they take to ensure that they are able to harvest something / anything...

Those are just a few thoughts I wanted to share with you and they are just a few of the steps that can be taken now that will benefit you in future.

I leave you with this:


http://www.forbes.com/sites/marshallshepherd/2016/07/02/lessons-from-jet-stream-crossing-the-equator-mania/#8535b905a8c3

P.P.S.

This is what the vandals did - this little action affected at least 350 - 500 people!
The power junction box was ripped off
 the tower and the cables were
 disconnected.  I took Escom 4 days
to repair... :(

Saturday, 22 August 2015

Tweedle Dum & Tweedle Dee


I am so excited about this - I can't wait to share it...

One of our neighbours, Eddie, was kind enough to give us a hen and a rooster.  We seem to have an insect infestation in our shadecloth veggie hut, so I had asked his wife if we could possibly "rent" a couple of their chickens for a couple of weeks - to sort out the problem in as eco-friendly a way as possible.
New chickens exploring the shade covered
veggie patch
When she arrived with the chickens, she said that they have over 40 ("... which is more than enough...") and that we can have the two.  Yoohoo!!  RMan didn't want chickens - seems like he has no choice in the matter now ;)  (sly, aren't I?)

Please meet Tweedle Dum (the rooster) and Tweedle Dee (the hen) - Dum Dum and Dee Dee for short.
They were a tad nervous for the first couple of
 days - strange surroundings, and even stranger
 new "owner" ;)
We set up a temporary coop for them inside the shade cloth veggie hut - complete with roosting perch - but they weren't interested.  They settled themselves down on the ground every evening in the corner farthest away from the temporary coop.  Damn and blast it!
Once Dum Dum and Dee Dee were allowed outside
the shadecloth structure they rushed merrily around
- here, there and everywhere - at full speed.
After they had been locked in the veggie hut for a week (as per Eddie's instructions) the time came to let them explore their new surroundings.  They thoroughly enjoyed scratching below the lemon trees (eating the ants?)...
They fancy my strawberry / youngberry patch the
most - much to the inquisitiveness of the alpacas
...before investigating my strawberry / youngberry patch.  Much to the curiosity of Rupert and Minky.  They couldn't quite work out what these duck like looking creatures were - and they were the wrong colour.

But, the problem of their chicken coop / roosting perch remained.  I was very uncomfortable with them just sleeping on the ground - and was worried about karakul / otters gaining access to the veggie patch in order to snaffle the chickens.  All they had for protection was a single layer of shadecloth.

Not good enough.  I didn't sleep comfortably for that week.
1000 lt water tank
Wandering round the property trying to think of a solution, I spied the empty support cage from the one rainwater tanks which we had cut in half in order to store the alpaca's lucerne and oats away from the mice.
The one water tank was cut in half to be used
as a mouse free storage space for the alpacas
 lucerne / oats
My brain had a light bulb moment, and feverishly started conceptualizing what was happening inside it lol

Grabbing RMan, and dragging him to where the frame was located, I explained my idea.

We had some chicken wire which we were using to sort / clean the VM out of the alpaca fibre.
The arrows indicate where the doorway has been
 situated - bear in mind that the tank has been
 turned on it's side
If we took that chicken wire, turned the frame on it's site, used the two top cage structure supports as an entrance and covered the rest of it (top and sides - the bottom is a solid base) with chicken wire, we would have an instant secure chicken coop that no predator should be able to access.

So that's exactly what we did :)
The frame was completely covered with chicken
 wire.  The two top supports (shown with arrows
 in the above pic) are now a doorway, which I
 can easily access.
We placed a piece of galvanized roof sheet on the top to keep the rain out of the coop.  On top of that we fixed the chicken wire - thus the chicken wire is "holding" the roof sheet in place and preventing it from blowing away / rattling in the wind.

God bless the person who invented cable ties.  Cable ties (aplenty) secured the chicken wire to the frame perfectly.
Dum Dum and Dee Dee were easily coerced into
 their new home with some corn:)
(You can see the solid base now acting as a side
in the above pic.)
Having "taught" the chickens that the shade cloth veggie patch was their new home, I was concerned that I would battle to get them into their even newer home - which has been placed just next to the shade cloth veggie patch.

I needn't have worried.  Sprinkling a bit of food in the entrance and a larger pile further in, they couldn't resist.

Quick as a flash I closed the door that RMan had made out of a piece of plywood (hinged with - yeah, you guessed it - cable ties bwahahaha), and the chickens were safely ensconced inside for the night:)
Success!!!  Two roosting chickens :D
I went out ½ hour later and both of them had finished munching and were finally roosting :)

Hehe.  I do so love it when I'm on the same page as animals I am trying to assist.

This coop will also be easy to move whenever we need to - RMan and I will just pick it up and place it in it's new position.  Chicken poop will be easy to scoop up when the coop is moved.

And, with John's, (the casual labourer) assistance, RMan and he will be able to pick it up over the wooden fence and place it in the newer veggie area when we want / need the chickens assistance / nitrogen there.
Shadecloth draped over the top of the new
chicken coop will provide rain, shade and wind
 protection to the coop.
Note the nesting box just inside the door -
yup, I'm ready for when the hen is ready to
lay ;)

(in the pic you can clearly see the
 6 X cable ties which are the door hinges)
This morning we draped the top half of the coop with a double layer of 80% shade cloth and secured it with cable ties once again - to help keep the rain off them if it slants down sideways whilst they're roosting, and it will also give them some shelter from the wind, and help to keep the roof sheet cooler during the hot summer months.
Can you see the roosting perches?
I have found them on both the upper
and lower perches
I just l-o-v-e this little chicken coop.  Measuring 1.0 mtrs high X 1.2 mtrs wide and 1.0 mtrs deep it should suffice for at least 6 - 8 chickens.

Firstly, it is definitely secure against karakul and otters, and it will keep the chickens protected from inclement weather.

But, mostly importantly to me, the old water storage tank frame is almost serendipitously perfect to (re)use as a chicken coop, especially given that it had just been lying around - unused and unwanted.  Recycling at it's best :)

As for RMan - the chickens have worked their magic - if  they spot either of us outside, they immediately run up, and start following us.

"They're very cute", says RMan, "not ducks, but cute nevertheless" - with a smile on his face, and a twinkle in his eyes, as the chickens chase after him.

"...here kip-kip, kiiiiiip-kip-kip, kip-kip-kip..."

Sunday, 19 April 2015

Detering the hares

Follow my blog with Bloglovin

RMan and I met our first ever blogger friends on Friday.  Rae & Dino from  African Bliss were on their way to Cape Town, and dropped in for too brief a visit.  How do you cram getting to know someone into an hour... :(  They are wonderful, open, friendly people - and we both wish that they lived closer.  Finding, and finally meeting, people that you have so much in common with is uplifting - and not to be squandered.  Thanks guys - for taking the time to break your trip, schlepping along our sand road, and for dropping in :)  Now, when are you next coming our way...? lol

This passed summer was a complete washout as far as growing sweetcorn was concerned.  Three full packets of seeds only produced eight sweetcorn pants - why, because the hares kept nibbling the tender young shoots.  Those few plants which did survive  battled.  (I lived in constant hope of more showing themselves above ground, especially as I planted the 2nd, and then 3rd packet, but alas the hares with their nocturnal visits prevent that from happening)

So, I tried manually cross fertilizing the flower heads - obviously I didn't do a good enough job.
Evidence of inadequate cross fertilization
Similarly, my pea harvest last winter was a disaster.
The centre of the sweetcorn husk showed distinct
seed head origins
And my cabbages...
Cabbages chewed to death by hares
But - I am of the opinion that waste not is want not, so even those mangy veggies were used.  After all a stir fry is the perfect recipe to "hide" misshapen items and baby sweetcorn tastes and looks the same as what my garden produced :)
Stir fry consisting of home grown sweetcorn,
Baby Emerald squash, carrots, cabbage,
the last of my fresh yellow heirloom tomatoes
 and onions.
I may be slow on the uptake, but once I get the full picture I will go all out to prevent the same situation from occurring again - ever...!
My old shadecloth veggie patch to the right of
the pic and the new one in the background
We have all those alien black wattle trees in the area around us.
Black Wattle droppers as walls - you can see in the
foreground how many pathetic sweetcorn plants
the hares left me
And once again they came in handy.
This veggie patch is slightly bigger than the
original shadecloth one - that will allow me an
extra veggie bed
Gum poles for corner and centre supports, with Black Wattle droppers fixed along the sides to form walls.
The new hare proof veggie bed, with my original
shadecloth one in the background.  We have used
the bark which falls off the wattle / bluegum firewood
we order for the Rosie as mulch in the veggie patch bed
pathways - hopefully that will mitigate the winter rain
sticky clay effect when I need to harvest some veggies
I'm please to tell you that it's working - the new veggie patch "walls" are too high for the hares to jump over and my cabbages and peas are coming on fabulously this winter :)

Next spring we will be adding a shadecloth roof which will allow me to grow veggies there during the heat of summer.  I'm not going to bother with shadecloth walls - the wattle "dropper walls" will suffice as windbreaks / dappled sunlight.  And anyway, the field mice eat a hole in the shadecloth so that they can access the goodies inside.  So adding it to the walls is pointless.