"Self-sufficiency does not mean 'going back' to the acceptance of a lower standard of living. On the contrary, it is the striving for a higher standard of living, for food that is organically grown and good, for the good life in pleasant surroundings... and for the satisfaction that comes from doing difficult and intricate jobs well and successfully." John Seymour ~ Self Sufficiency 2003

Friday 30 September 2011

Aha, a little bit of assistance never went amiss...

When we first purchased the plot of land, and were waiting on municipal approval of the architects plans, we decided to preempt the outcome, and thus we proceeded with the digging of the foundations, hiring a digger loader to do the heavy / dirty work.


We also intended to have a cellar below our kitchen floor.  Cellars are not common in South Africa - and for the life of me I cannot figure out why not - they are such useful and secure storage areas.


So we excitedly proceeded with our foundations, only to be informed by our architect, who came to do a site visit, that we had incorrectly placed them on the land. Our building had to be 30 mtrs from the neighbouring fence - why???  In the towns you have to have permission to be within a metre of your neighbours fence - on a plot of land you need 30 mtrs?  Makes absolutely no sense to me.


But, we had dug our foundations within that 30 mtr restriction...


So we had to start all over again, hiring the digger / loader, and digging a second set of foundations.  This was done in such appallingly cold and wet weather that all thoughts of a cellar flew out the window.


But, our original cellar opening remains...
This hole will, hopefully, one day be a stand alone cellar with an earth / living roof.  I reckon, given the slope of the land, that we should be able to site the doorway on the lower (eastern) side and we will only have to increase the height of the higher side by about 1/2 mtr.


But, that is in the future, when finances are hopefully, more stable (i.e. when this damn recession is finally over).

Until then, the future cellar is a ruddy inconvenient hole in the ground.  And one which fills up with water every time it rains.
In the past certain members of the family has been known to climb into the muddy hole on a hot day and splash about with a resident frog, but I have a feeling that that will not happen again.  One frog is possibly (shudder) bearable, but the number of tadpoles residing in that hole after the past winter rains... I counted 40 - with many more that escaped the tally.
Guess that mozzies won't be a problem this summer :)  And I wonder if frogs eat (yellow) slugs?

Thursday 29 September 2011

Misty Spring

We woke early on the farm last Sunday morning to a completely misty morning.


This is a photo of the sunrise which just begged me to take a photograph, albeit with my cell phone camera, as RSon had to take my camera to site with him.


It felt weird looking at the rising sun, which was only obscured by the mist, as opposed to an eclipse, or a veil of smoke from a veld fire.  Rather the mist than the fire though, any day.  I was amazed that the sun was able to shine so brightly through the mist - a seemingly perfect orb just suspended above the skyline.


Even the insects didn't escape the effects of the mist.


A spiders web, which I know had formed overnight, glistened with drops of water - yesterday I had been working in exactly that area - but that's for another posting... :)


And the locust climbing up the walls with it's young on its back...
We had seen a locust the day
before with two young on it's
back - in order of size as well :)
...and the (yellow!) slugs seemed to relish the experience.
Hmmm, I wonder what
these two slugs are up to...?
I have never seen yellow slugs before - they are a tad creepy :)  Or should that be creepier than normal slugs - not mad about either of them.


Don't you find that when mist drapes itself over everything, and surrounds you as you venture out into it, that your entire perception of your day ahead, yourself and even your awareness of life seems to change?  It's somehow mystical, cold and damp, and yet familiar, all enclosing and safe.  A quiet peacefulness seems to envelope everything.
RMan spent the previous day recycling
a clients old steel balustrade - which was in
perfectly good condition,
and perfect for our application :)
Slowly, slowly the mist cleared.  But not lifting from the bottom, rather compressing down and allowing the sky above to peep through.
The mist remained until noon, gathered tightly into the valleys, refreshing and replenishing all the plants there with its life giving liquid.


I felt so privileged - to witness such natural simple beauty and to experience such serenity.

Wednesday 28 September 2011

When is a lemon tree not a lemon tree ...?

Seedlings in March this year
I don't know if you recall back in March this year I mentioned that I found three tiny trees growing from seeds that I had planted on the farm at the end of last year.  After I had eaten the fruit, the seeds were just been shoved into the soil, with no attention at all and no water (save the rainfall of the past winter).


This is what they look like now...
Seedlings in September this year
Well, this time, they are much bigger, and I was thus able to pinch of a couple of leaves, in order to smell, and correctly identify them.


They are not lemon tree sapling, they are... baby naartjie (mandarin) trees :)  Happy Days!  We now have both lemons and naartjies growing on the farm.


And, as for the lemon trees I planted in January, this is the progress they have made...

Lemon tree saplings in January 2011
Lemon tree saplings in March 2011
Lemon tree saplings in September 2011 -
they're peeping above the shade cloth.
Even the 2nd row has flourished beautifully :)
They are coming along beautifully.  With their timed irrigation and eco-friendly pest control recipes (1 & 2) they have nearly everything they need.  The only assistance my lemon trees most urgently require from me is... weeding!
Devil thorns invading the weed guard
around my lemon trees

Each plant grows hundred of these nasty thorns
A close up of these nasty b*ggers
These thorns are hectic enough that they will go straight through Crocs - and, whatever you do, don't walk anywhere without your shoes, nor kneel / sit anywhere without scouting around for this plant first - you WILL regret it!  But, even worse than that is the fact that when they get stuck in the sole of your shoe, the chances are that they will drop off as you walk indoors, which can create a nasty surprise if you walk barefoot in the house.  So checking underneath your shoes prior to entering the house is a definite.

And that, MKid, is the reason we always tell you to put your shoes on as soon as you wake up in the morning, and to leave them on all day :)

Tuesday 27 September 2011

Leave it to Mother Nature

Last Friday, we decided, on the spur of the moment, to nip up to the farm for the weekend.

When we went to the farm in the middle of May, I had shoved four broad bean (fava bean) seeds into the ground next to each of the three trees which we had just transplanted out of pots, and which hadn't been doing well at all. These trees are now on the irrigation system, so planting the beans beneath them, meant that the beans would get water also :)
I wondered if they would produce, without my tender loving care / staking against the wind / pest control, etc. :)
So, arriving at the farm on Friday, I got the surprise of my life.  I had a broad bean harvest that completely blew me away!  The plants, heavy with pods, and not having been staked, were sprawling all over the ground - with beans even hiding under the fallen plants.  Not one of the bean pods, either on the plants, nor lying on the ground, was damaged / eaten by insects - be they slugs / locusts or giant grasshoppers.
In fact, I harvested approximately 12 kgs (26lbs) of broad beans...
... which translated into just over 3kgs (6 1/2 lbs) of beans out of their pods.
Glorious, luscious, plump morsels of...
...heaven in each mouthful :)

I now have a supply of food which is very low in saturated fat, cholesterol and sodium, whilst being high in dietary fiber, protein, phosphorus, copper, manganese and an excellent source of folate.

We ate a portion last night - simply boiled until the outer sheath split and then slathered in butter.  Delicious :)

I have placed the rest of the beans in the freezer, but, would like advice on how else to preserve the beans?  And what is your favourite broad bean recipe?

It just goes to show you, Mother Nature, when left to her own devices, is perhaps the best gardener of us all :)

Thursday 22 September 2011

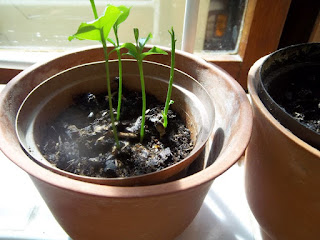
Confused lemon pip

As is my wont or OCD habit, every time I cut open a lemon, I have to shove the pips into some soil in a pot on my kitchen windowsill - my plant nursery :) (especially in winter as it's one of only two windowsills which gets any kind of sunlight - in the entire house!)

And, I invariably get little lemon trees popping their heads above ground some time later.
But, recently, I noticed that one of them appears to be different from the others for it seems to be very confused...
It has stopped growth on the original stem... 
...and it appears to be forgoing it's original plan and it's growing another lemon stem from the same pip, which it has shoved above ground.
It looks like it is a plant with ambition - b-i-g ambition...

I wonder if plants have split personalities.  Or if they grow twins?

Monday 19 September 2011

Sub-irrigated planters

This past winter I have been busy researching quite a few different growing options.  One of which is a sub-irrigated planter.


Given the heat that we normally experience here in summer, together with the fact that we hope to be on the farm for a couple of weeks in December, I thought I'd give them a try - that way hopefully my vegetables wont die when I'm not at our (town) house to give them regular water - we don't have timed irrigation there like we do on the farm.


So, this is my tutorial on how I made a sub irrigated planter.


Firstly, what I gathered together:


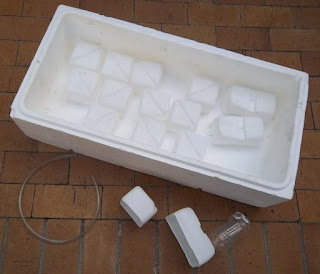
A container (I've used a styrofoam box which RSon got from the restaurant where his girlfriend works).  A bucket would work as well.
Enough bases from (in my case) recycled milk bottles, to "line" the base of the container.
A recycled bottle for the water inlet / fill tube 
Piping
Cut your milk bottle (future) oxygen reservoir bottles at the required height.
Make a hole in the top of one of the oxygen / water reservoirs and insert your fill tube container - in this instance it was a clean oil bottle, with it's base removed and the neck of the bottle inserted in the hole.
The, drill holes into the individual oxygen reservoirs and place them cut side down in your planter container.  It is not necessary to link the individual oxygen containers as water will flow along the base of your planter and rise up in all those openings.
Cut a hole into one of the oxygen reservoirs and insert a pipe
Make a corresponding hole in your SIP container for the the overflow pipe and thread it through
Carefully add your soil, tamping down between the reservoirs in order that it can act as a wicking system until the roots of your plants / seedlings have grown down towards the water in the reservoirs
Plant up your sub-irrigated container
And finally, add water through the fill tube until you see water coming out of the overflow pipe.
The water won't evaporate as it would when one waters from the surface, as it is not exposed to the heat of the day, but is, instead, at the base of the plants where they need it most.  That should be sufficient water for at least 7 - 10 days.  When the fill tube is visibly empty at it's base, and thus more water is required, simply add it through the fill tube again, until it overflows through the outlet pipe.   


What has this cost me?  Just half an hour of my time, and ZAR1.00 (US 0.14 / 10p) for some piping for the overflow pipe.


I have recycled a fair amount, which should stand me in good stead for quite a few years to come, because, as the plastic is not exposed to sunlight, it shouldn't perish.  Environmentally, I am very chuffed.


And, finally, I have a self-watering, raised veggie patch which has utilized what would have been waste packaging / thrown out with the garbage if you don't / aren't able to recycle.


This would also work for all those northern hemisphere residents as this container could easily be utilized for all those hot days you've just experienced this past summer, or it could be planted up with early spring seedlings and placed under a covered verandah where it would be sheltered from the last frost of winter?  Invariably, restaurants have food grade containers which they have to, hopefully, recycle.  Make their job easier by taking some of that recycling off their hands and putting it to good use growing your veggies / salads :)

Friday 16 September 2011

A simple year round source of nutrition

I was watching an episode of "Jamie at Home" on TV the other day, and this time sprouts was on the menu.  Not brussel sprouts, but seed sprouts.  Now, this has to be one of the most eco-friendly foodstuffs out there as their highly nutritious preparation requires no power from the grid :)


Yes, I know there are / have been scares regarding sprouts and salmonella or Escherichia coli.  Those bacterial infestations are more prevalent in commercially grown sprouts.  Providing you carefully wash the seeds before sprouting them there is no reason why you cannot grow sprouts at home.


Also, apparently some sprouts can contain harmful toxins and should thus be reserved for stir frying prior to eating.  Any any sprouts of the solanaceae family (tomato, potato, paprika, aubergine or eggplant) or the rhubarb should definitely be avoided, as they are poisonous.

Providing that you purchase your seeds from a store (a health store is probably the best) in which they are packaged as food, there should be no problem in sprouting them.  Seeds sold for crops / planting should not be used, as they may contain toxic chemicals.
Seeds for sprouting
Some of the type of seeds which may be sprouted are:


Pulses (pea family) : alfalfa, chickpea, fenugeek,  lentil, mung bean,  pea, soyabean*.
Cereals: oats, maize (corn) wheat, rice, barley, rye, quinoa, and buckwheat.
Oily seeds: sesame, sunflower, almond and linseed
Vegetables and herbs: broccoli, cabbage, carrot, celery, lettuce, mizuna, mustard, onion, rocket and tatsoi.


* Important update:  Apparently Soyabean is one of the harmful beans, and, if sprouted, should be added to a stir-fry.


The seeds can expand to eight times their size and will germinate within 2 - 4 days from the start of soaking.  If you soak for longer than the necessary time you run the danger of making the seeds ferment or rot.


Once they are to the required state of growth, sprouts will keep in the fridge for at least a week.


Sprouts are an excellent source of protein and vitamin C.  They have established that the sprout retain their B complex vitamins, and, further, sprouting increases the amount of Vit. C and Vit. A they contain. Sprouting also causes starches to be converted to simple sugars, which allow sprouts to be more easily digested. And sprouted beans do not contain the gas making properties of cooked beans :)


They are quite simple to sprout.  I have a fancy sprouting tower, but they may just as easily be sprouted in a plain glass jar with holes pierced in the lid.
My sprouting tower
On the first morning rinse the seeds well.


Place them on the sprouting tray / in a glass jar.  Sprinkle a small amount of water over the seeds, and cover.


At the end of the day, rinse the seeds again.  This not only cleans them, but also replenishes the water they require in order to sprout.

Sprouts at the beginning of day 2
Repeat rinsing the seeds morning and evening until you notice your seeds are beginning to sprout.
Sprouts on the morning of day 3 -
the mustard seeds are beginning to pop open
The flavour of sprouted seeds / pulses is completely different to the cooked versions.  And the taste of each seed / sprout is different.  Almost sweet, definitely crunchy, and completely, addictively, more-ish...


Toss a selection of sprouts with crumbed feta and fresh croutons and dress with your favourite salad dressing, add them to your salads / stir fries, fill half an avocado with sprouts, add them to an egg mayonnaise sandwich or use them as a garnish.  I even enjoy a sandwich of plain sprouts.  They could probably also be blitzed in your favourite smoothie.  Or eaten as a non-fattening snack.
Day 4 - there are less than I started out with,
as I can't resist fresh sprouts, and I couldn't wait
for them to finish sprouting...
It is so easy to forget this important source of nutrition in the winter months. The sprouts are so easy to grow and the seeds are easy to store.  Even my menfolk, who aren't mad about quiche, will eat sprouts.  Maybe, not as vociferously as I do, but they will eat enough to keep me happy...  (And it's a sneaky way to get them to eat the dreaded lentils now and then LOL)


Remember - as with everything - everything in moderation!  Don't overdo the eating of sprouts.  Use them as an extra source of nutrition, not as a replacement.

And sprouts are a good reason to allow some of your organic vegetable plants to go to seed for reasons other than next season's crop.

Thursday 15 September 2011

Recycling for "fridge" use

I don't know if anyone has access to "pap saks" (foil bags) like we do in South Africa.  Here one can buy anything from bulk tomato sauce, fruit juice, wine, etc in this packaging.

I have a friend who uses these bags for cooking in.  Removing the tap, she cuts open a corner, turns it inside out, removes the plastic lining, turns it round the right way again, and then she gives it a good clean.  She fills it with vegetables, herbs and a dash of white wine.  She then seals the bag by folding it over and fastening it with a paper-clip, pours a bit of water in the bottom of a "potjie" pot, pops in the foil bag, places the lid on and cooks it over a fire.

However, I have found, what I reckon, is a pretty cool way of assisting our food preservation on the farm.  I will be using them as a giant ice blocks.

First, finish the contents of the bag - an enjoyable experience regardless of what it contained :)

Then, open the tap and rinse out the bag well... (tedious work, but I reckon it's worth it)...
Rinse out the bag, and fill with water
...after rinsing well, fill three quarters of the bag with water, and squash the bag to remove most of the air.  (Allow for some expansion space, otherwise the bag will burst in the freezer.)  Close the tap.
Squash the bag to remove most of the air
Place the water-filled bag in the freezer.  When it is frozen, it can be used for keeping food in cooler boxes cool, as an ice remedy for an injury, or as a cooling method for buckets filled with water.
Pop in the freezer until frozen
As it is less bulky than a 5lt bottle, this is exactly how I am going to create a fridge in my cooler box on the farm!

And, Jane, I thought that perhaps, next summer, you could use it in the top of your beautiful old ice box...?  It doesn't drip LOL

Tuesday 13 September 2011

Black Pearl Chilli

I have a different chilli plant growing in my garden.

It is a unique black-leaved chilli plant, which when young, is green, and, as it matures, it changes to glossy black (when grown in sunny conditions).  The plant is bushy, with strong branches, growing 45 cms (18") high, with a spread of 30 cms (12").
Black Pearl Chilli plant
The "Black Pearl" chilli boasts  the most dramatically deep purple leaves and fruit imaginable.


In mid-season it begins to display lilac-hued blossoms.  These blossoms form the abundance of black fruit, which turns a dark, deep shade of red.


The "Black Pearl" is a patented variety.


Last season I had a plant which died off, and one of it's seed pods spilt onto the soil of the pot it was growing in.  Last week I noticed that I had "free" chilli plants growing...
Self-seeded Black Pearl Chilli seedlings
In the colder climates the plant will die off in winter.  But here in the warmer southern hemisphere, it will shoot again from the base of the plant in spring.
Seeds pods awaiting harvest -
note the new growth at the base of the plant
I have since harvested all the seed pods off the plant above.  I have quite a few seeds - if there is anyone local who would like a few, please let me have you address - I'll happily send some off to you.  You can send your name and address to: dani at ecofootprint dot co dot za
Harvested Black Pearl Chiili seeds
The specifications, and growing requirements are as follows:


Height : 45 - 60 cms (18 - 25 ")
Plant spacing : 40 - 60 cms
Position : Full sun
Pungency : Hot, Hot, Hot ( above 30000 Scoville Units)
Fruit shape : Round
Fruit size : under 4 cms (2 ") in length
Fruit colour : Purple changing to red
(the above information came from: http:/davesgarden.com/guides/pf/go/118938/index.html )


The plant makes a definite statement in your garden. The black leaves with the red fruit - absolutely stunning!


And, be warned.  Don't be an idiot like me.  Just because the fruit is dried and wrinkled, don't think the seeds won't be hot.  They are!  And the evidence of that lingers on the fingertips and (under the nails) for ages - long after you've forgotten not to rub your eyes...