"Self-sufficiency does not mean 'going back' to the acceptance of a lower standard of living. On the contrary, it is the striving for a higher standard of living, for food that is organically grown and good, for the good life in pleasant surroundings... and for the satisfaction that comes from doing difficult and intricate jobs well and successfully." John Seymour ~ Self Sufficiency 2003

Thursday, 23 December 2010

They get it!

A  couple of nights ago we were all sitting round the table, and naturally the talk turned to our farm.

So frustrating - this recession has effectively delayed our plans, and move, by at least a year (at this stage).  Being nasty - I hope that the families of those bankers who caused this recession and who are not in jail, are also having a hard time of it - but I doubt that, as I'm sure their savings accounts are well padded after all the years of exorbitant salaries / bonuses they have received...  I will NEVER understand why those excessive yearly payouts, for work that they are employed to do, occur!!!!?

But, we were trying to explain to WGuy what it is like on the farm - WGuy has never been there.

The comment that was passed was: "It's amazing - how one can make do with less.  Every time one switches on a light, it is because it is necessary, and not because one wants a house lit up like a Christmas Tree.  Living with less (electricity, mod cons, etc) makes one think twice before just blindly switching / turning something on".

That comment was not made by RMan nor myself!

And then both of our children stated that it is easy to adapt - and that adaptation does not mean that life is deprived - just more thoughtfully lived.

Whoopeeeeeeee!  I almost feel like Henry Higgins did when he successfully coached Eliza Doolittle to speak like a lady.

To hear our children admitting, to us, that the "normal" lifestyle is one that is actually based on luxury, and that a comfortable life "without" can be lived with little or no great harm / difference to their lives, is exactly what we set out to do - to show our children that one can walk far more gently on this planet.  To know that they genuinely, and honestly, appreciate the simpler way of life - well, that just warms the cockles of my heart :-)

And to hear them say that what draws them back to our little farm each time is the peace and quiet - the serenity and the sense of being totally aware of their surroundings.  For we never force them to go there - it is always up to them if they would like to take that 2 1/2 hour drive away from the hustle and bustle of the city life.

I feel like I have just received the very best gift I could ask for.

The simple life - I love the glow created by candle light / paraffin lamps, and feel no lack of TV, for our simple car radio keeps us in touch with what is happening "out there", whilst also providing our favourite music.  A roof over our heads, running water, clean air and crystal clear evening skies...

So what if the wind blows - you learn to adapt and shelter from it - or open windows on the other side of the house from which it is blowing.  And with the sun which pelts down in summer - well, one just gets up earlier to do what is necessary before it gets too warm - then a little siesta J - before continuing later in the afternoon when the temperature has dropped.  Adaptation is the key word.

I am so very grateful that we have been able to expose our children, and grandchild, to a more real side of life.  Hopefully they carry that knowledge / experience / awareness forward in their lives, and that they are better people for it.


This is the first time that I have done an indigenous kranz -
MKid can hardly wait to open all those gifts under the tree... :-)
 Merry Christmas.  We are all going to spend a week on the farm - that is just what is needed to see the back of this past year.  May 2011 be all and more than you hope for, and, as a friend of mine so succinctly put it, may it also "include many, "make-your-life-easier miracles" for you all :-)

And thank you one and all for your friendship, encouragement and support of my blog - your friendship is very important to me.

Monday, 20 December 2010

MKid solar biscuits

Earlier this month I baked a couple of batches of biscuits for everyone for Christmas (using this recipe :
http://ecofootprintsa.blogspot.com/2010/11/solar-baking-biscuits.html) and I put a lump of the biscuit dough in my freezer, so that when MKid was here I could show him how the sun can even cook his favourite biscuits.

So last night I took the dough out of the freezer and place it in the fridge to defrost overnight.  This morning MKid and I got stuck into baking some solar biscuits.

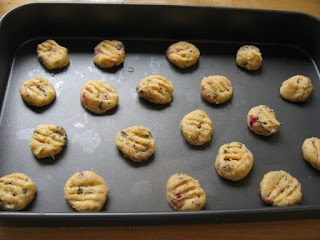
This is what he produced...


Actually - this is about half of what he produced - the rest is already in his tummy :)  Seems he's just like his grandad when it comes to solar baked biscuits!

He is amazed that the sun can do even this, and now understands even more why it is so important that he wears sun lotion.

So, two important lessons were learnt today - one the sun is powerful enough to cook almost anything he would like to eat, and two, what it can do to food, it can do to his skin too.

I somehow don't think he is going to forget either lesson in a hurry.

Sunday, 19 December 2010

Christmas is togetherness time

On Saturday, 11th December, our daughter, NGirl, and our grandson, MKid, and NGirls' partner, WGuy, drove 1500kms to spend Christmas with us.  A 17 hour trip, which began on a Friday night at 6.15 pm and ended at 11.00 am on the Saturday morning.

The first part of the trip was stormy and very wet, but that, thankfully, kept the other cars off the road - apparently they had the road almost to themselves - even the long distance lorry drivers had pulled over to the side of the road to sleep!

I am so grateful that they left when they  did - since then the holidays have started and over 200 people have been killed on our roads nationwide.

Apparently, during the drive, MKid told WGuy in some detail that his Nana had a veggie garden, and he always helps his Nana with it.

Sure enough, the first evening they were here, I needed to pick salad from the garden for our dinner.  And, naturally, MKid did most of the work.  His delight in picking (and quickly eating 5 or 6) ripe, warm cherry tomatoes from the vine, snipping fresh, crisp lettuce leaves off the plant, and yanking carrots and radishes out of the ground was honey to my eyes.  Snipping chives, rocket and green beans off the mother plant  - he even found the last 10 peas in their pods - his and RMan's favourite!


I do so wish I'd had my camera with me that first evening - as he was walking back into the house carrying his bounty carefully, he went up to his mum, and with a mouth dripping with tomato juice, said, "Look what we got from Nana's garden"!  The pride and excitement in his voice - just too precious.

How wonderful to be able to show my grandson that it is not necessary to buy everything from a shop.  That with a little bit of planning, and a little bit more work, one can produce food for oneself.  I firmly believe that teaching the young to do something so simple can have far reaching benefits.  Hopefully, his lasting memory of me will be one like this!  And that he, too, may have his own vegetable garden one day.

As he drifted off to sleep that night his last words were: "Nana, we need to pick more salad tomorrow".

We did :-)

Thursday, 16 December 2010

Further milk bottle recycling

I have had so much use out of recycling our plastic milk bottles (http://ecofootprintsa.blogspot.com/2010/10/recycling-and-storing-tip.html) that I couldn't help but wonder what other uses the bottle could be put to.

Well, this is my latest one...


I am going to use them to grow upside down tomatoes, peppers, peas and beans in.  That way it'll save on having to buy hanging baskets with coir liners(which the dratted starlings are shredding as bedding for their nests) and, as the bottles are see through, I can also clearly see when the soil needs another gulp of water.

What I did was this -  about 2 1/2 cms (1 ") below the lid I cut open and removed the front top half of the bottle, leaving the back half of the bottle to support the neck.  I also punched two holes in the base for drainage.


Then I tied some twine around the neck, planted it up, and hung it where, in this instance, the tomato plant will get the morning sun, but will be in the shade during the hot afternoons.  A raised bed with a difference :-)  And I wont have to tie up the tomato plants on a stake as they grow - they'll grow down towards the ground which will make them much easier to harvest.

I guess one could also use this idea in a workshop for holding nuts and bolts, screws, nails, etc. Or clothes pegs. Or next to a childs desk to hold their pens and pencils.

But for me - any extra year round sunny garden space is a bonus - even if it is 1.5 mtrs (5') above the ground!  So I've also cut out two (opposite) top sections, with the area in between the spaces being the support for the neck, and the open areas allowing me access to harvest the fruit - perfect as a strawberry pot?  Time will tell...


All I have to do now is cut off the two flaps and
there we go - instant hanging strawberry pot
Has anyone got any other ideas?

Thursday, 9 December 2010

Battling the elements, insects and birds

I have not much time to blog over the past few days - for I've been madly busy getting the solar cook book sorted (it's going to be a few weeks yet) and also we have redesigned the vegetable garden.  I had to make it bigger because the old one was, firstly, not big enough, secondly, it was getting overcrowded with all the goodies that are growing in it, and finally, it wouldn't be at all big enough for what I want to grow in it next Spring.

For next Spring I will need to plant mealies (sweet corn) somewhere other than where I planted them this year - and that's not even taking crop rotation into account.

This last Spring I decided that my retainer block section could possibly grow some vegetables - well, it can, but not the veggies that I anticipated.  Anything more than 30 cms (15") high will just get wind blasted - we have a wicked South Easter which blows here in summer - they call it the Cape Doctor, for it blows all the winter smokey air, which is still lingering, out to sea.

But the Cape Doctor is not kind to gardens:


As you can see I had to support my mealies with whatever I could find - even tying them up with stakes...


Then we thought of putting up some shade cloth - to break the force of the wind.  Not the prettiest, but it worked thankfully!

The end result - I have a couple of mealie plants which have survived the wind thus far - and for which I am extremely grateful.  But this spot certainly wont do for next year, so...

RMan to the rescue!

I have to say the RMan came through 110%.  I am completely blown away at what he constructed, using alien Black Wattle poles!

This is the old veggie patch - my attempt:


And this is what I have now:


The start of the makeover
RMan in action

Finished - my new shade cloth "tunnel" - and already
planted (on the right hand side) with all the
seedlings I had ready

He even installed an irrigation system for me - bless him!  10 minutes every morning - watering sorted!

And another benefit of my new, improved and enlarged veggie patch, is that my broccoli and cabbages should be safe from Cabbage moth, etc - for they can't get in!  As for cutworm - I have planted every seedling in a protective loo roll holder, so they are stymied.  Not even snails can get access as I have an impenetrable border round the base.  Now - to sort out the moles...

I'll post a pic of my "bath" raised veggie patch later in the week - that also worked a treat - we've eaten so much salad from it - we actually can't keep up.

Also, I thought I would share with you how I am protecting my strawberries - the Black Starlings can have 10% of the harvest - no problem, but the rest is for us :-) 


I saved some netting which my winter squash had been packed in, and draped them over the strawberries - it works a treat!  They can see them, but can't get to them!


Now, if only MKid would hurry up and get here (NGirl and MKid arrive on Sunday) for these beauties are for them :-)

Saturday, 4 December 2010

Christmas baking with the sun

I guess you all know me well enough by now to understand that if I’m presented with a solar cooking opportunity then I’m going to at least try it. Even though cloudy conditions were predicted for yesterday, there was enough sun peeping through to encourage me to attempt a baking session.

I didn’t bake a Christmas cake last year, because I still had one left over from the marathon baking session I had at the end of 2008.

And, yes, I know it’s late in the year to be baking my Christmas cake, but what the heck – it would still have 3 odd weeks to mature. And adding double the brandy – that’s sure to help the maturing! So – baking a solar Christmas cake was on the “to do” list yesterday.


RMan making his Christmas wish :-)

I used a fruit cake recipe (which will be in my “book”) and it turned out perfectly.

I managed to fit 1 X round cake and 2 X “loaves” in
the oven at the same time – one for us, one for NGirl
and a spare one for a gift.


The end result – a delicious smelling, (and tasting - the scraps from the pan which I devoured were very yummy!) moist and perfect looking fruit cake – I’m a very happy little puppy :-)

Wednesday, 1 December 2010

Anyone for solar oven sandwiches, tea or dinner?

We're heading for a couple of days of overcast / rainy weather, so I thought  would share with you what I have prepared in my solar oven this week.

Firstly, these are the pots I'm using in my solar oven - the glass lidded (cast iron base) one is nice because it allows me to see the food bubbling away :-)  But, the Bush Baby is solid cast iron (weighs a ton), so that one always gets preheated with the oven prior to any food going into it.

I also have a roasting tray (not in the pic) which is lidless
Firstly - last Saturday I made a savoury bread - absolutely yummy and definitely a keeper!
Raw savoury bread in the loaf tin
Luckily I made double the recipe - one for eating and one for...


...slicing thinly into savoury biscuits which were dried in the solar oven.  They will be delicious with cheese.


The I had a harvest of tomatoes with which I decided to try and make sun dried tomatoes.


Slicing 9 tomatoes into 1/3's


It's working...


Sun-dried tomatoes - done and dusted!  Next time I'll keep
my eye on them so the ones on the edges don't overheat 

I propped open the lid of the solar oven to aid the evapouration of moisture

Sunday morning I made an almond loaf for tea...


I'm baking my first cake in the pot with the see through lid
that way I can see how long it takes and when it's ready

Perfect - yeeha!

Then on Sunday (late morning) I put an apple and pork roast for the menfolk (I don't eat meat) into the oven.  Tender, to the point of falling off the bone, moist and browned - the crackling won't crisp, but does go a lovely shade of brown :-) 


Monday was a roast chicken on a bed of veggies...

  
Tuesday was chicken cooked in yoghurt curry sauce served with...


...a fresh garden salad from the garden and a freshly baked loaf of bread, for sopping up the gravy.


RMan doesn't like leftovers (but he still gets them disguised as another meal). I have to let a day or two pass before preparing the meal from leftovers.  So, with the weather we are having today and tomorrow, he will get a chicken soup with the left over roast chicken and a pork stew from the roast - both of which I am going to cook in my crock pot / slow cooker.  While they are eating the pork, I will finish the chicken curry.

I LOVE my solar oven!  And I seriously can't understand why everyone doesn't use one!?  I have even found someone in the northern hemisphere who has baked bread on a sunny morning, with snow lying around the solar oven.

Eight prepared "meals" in a week - using no electicity!  I'm very happy. :-)

My solar oven recipe book is coming along in leaps and bounds!

Sunday, 28 November 2010

Homemade Ginger Beer

I was reading Paula's blog yesterday and on it she had a recipe for ginger beer - I just had to try it!

It was ABSOLUTELY delicious. Never again will I purchase ginger beer from the shop.  Even RMan, who normally doesn't drink ginger beer, declared it delicious and downed 1 1/2 glasses.

So, here goes:

Keep an empty 2lt bottle (2 1/2 pint) from a previous cooldrink.  Rinse it out well.

Take 35 - 45 gm (1.25 oz) of unpeeled root ginger and chop roughly.  Place it in a food processor and add 1/4 cup sugar, and the zest of one lime or lemon (I took a lemon from my tree, washed it, and used that) - process until everything is finely ground and syrupy.

Using a funnel, pour 3/4 cup sugar and 1/4 teaspoon yeast into the rinsed bottle.  Add the syrupy mixture to the bottle, and the juice from the lemon you zested.  Using water of your choice (I used tap water which had been filtered), add water to the bottle leaving 2.5 - 5cm (1 - 2") headspace at the top of the bottle.

Place the cap on tightly and shake well to mix (the skin of the ginger will float at the top).

Leave the filled bottle at room temperature until the bottle is hard - roughly 1 - 2 days.  (I left it lying on it's side and 22 hours later mine was rock hard).


Place in the refrigerator until cold, then pour into a glass using a strainer (to strain out all the bits) and enjoy.

I'm so happy that the bottle was hard after 22 hours - I seriously couldn't wait to try it.  And the 4 hours it was in the fridge were the longest ever...

The only change I will make to the recipe next time is to use 55 - 60gm (1.8oz) root ginger - I like my ginger beer strong, so that it tickles the back of my throat :-)

Thanks Paula, for sharing the recipe.  Does anyone have a recipe for any other cooldrinks that they would like to share?

Sunday, 21 November 2010

Ginger (zingiber officinale) update


Since my posting on 31/10/2010 my ginger plant has been coming along nicely on my kitchen nursery windowsill.

It now looks like this - and will be potted on this coming week.


It now has enough roots, so I shouldn't lose this one :-)

It's taken a while though - I suspended them just touching the water around the beginning of September this year!

Yummy - my own ginger next year.

Friday, 19 November 2010

Days of Yore

I'm going to have another soapbox moment today...

A few weeks ago I watched the complete BBC series "A Victorian Farm".

It was absolutely brilliant and utterly and totally frustrating - as I was left wondering why on earth the powers that be in this country don't purchase programmes like this for us all to watch? Educating, informative and uplifting. Who needs the latest movie which focusses on how to crash as many cars as possible in 1 - 2 hours of "entertainment", or produce a film which gives all those idiots / terrorists out there the latest outrageous idea's on how to inflict pain, torture and punishment on their fellow man?

It is a series which provides good, salt of the earth kind of information - which is sadly lacking in today's modern society. Especially for all of us who enjoy growing our own food, rearing whatever animals we are able, and getting on with our lives in as simple a way as possible.

"A Victorian Farm" dealt with life on a farm 100+ years ago for the period of a farming year. There were three main characters - I can only remember Ruth's name (and I think a guy called Alex) - because the names are not important - it is the lifestyle and methods from the days of yore which are.

But I was also left with wanting more...

So I googled a "Victorian Farm" to see if there were any more episodes, and I discovered that there was an earlier series called "Tales from a Green Valley" - the 2 DVD pack arrived a couple of days ago, and it is an even better series.


It is absolutely riveting and thoroughly enjoyable.  It is a perfect example of putting theoretical history into practice and provides a fascinating insight into how people lived their lives over 400 years ago.

I loved the bit in the unseen footage where Ruth was explaining that, in place of our modern shampoo, they would use fullers earth to remove the oil from their hair, rinsing it out straight away.  (Ruth further said that one couldn't do this too often, as the fullers earth really stripped away the oil from a persons head - they used to use fullers earth to remove the oil from fresh shorn sheep wool, etc.)

What I also found fascinating in both series, is discovering the origin of phrases like "upper crust" - i.e. the larney people :-) .  That came about because bread was cooked in a bread oven which was dirty from the wood with which they had heated it  - similar to a modern pizza oven, but more basic, and they had to work quickly to remove the burnt wood and residue mess so that the oven didn't lose too much heat before they "sealed" their dough in it in order to bake their bread.  The base of the bread picked up all that ash and mess.  The upper classes would slice and eat the top of the loaf, leaving the bottom (dirty) part of the loaf for the kitchen staff / lower classes.

Watching both these series highlights how much ingenuity was required on a daily basis - and affords a prime example of how little we use our brains to do our daily tasks today.  Modern conveniences have certainly caused man a reduction in use of that vital organ - and a dearth of the personal touch and care that was given to tasks in those days of yore.  Nowadays it's all about chemicals and profit!

And consuming the latest drug in order to "enhance" brain function.  Or possessing the latest iPad, BMW or designer clothing.  We've gone from cherishing and worshipping nature, to idolising and elevating possessions and people who are famous and wealthy, not because they are better, but solely because they are the "latest" and famous.

How sad.

But then there's the other aspect too - man, in general, has today become so focussed on me, myself and I - and in the VF or TFTGV it is apparent how important community was - for assisting with tasks on the farm, be they using the neighbour, his / her plough and horse, or at harvest time, and sharing in times of famine / loss, etc.  Interdependence within the local community created a richer, warmer relationship between them which, sadly, is  certainly lacking in our towns and cities today, but, also, to a smaller degree in our rural area's too.  Cities, in my mind, encourage peer pressure, jealously, hostility and greed.

Both "Tales from a Green Valley" and "A Victorian Farm" showed tasks that were performed sometimes better, often in a simpler way, although not necessarily quicker - but perhaps that is exactly what is missing today - we don't spend enough time thinking about what we are doing - we just blindly get it done as fast as we can, before we move onto the next one, so that we can finish as soon as possible and have our "time off"!

I highly recommend both of these series - if you can get hold of the DVD's on Kalahari or Amazon grab it / them with both hands :-)

Has anyone got any recommendations of what I can watch now - I'm hungry for more knowledge...?

Wednesday, 17 November 2010

Solar cooking - part 2

Yesterday I made RMan and RSons' dinner in the solar oven :

Beef Shin with beans and lentils

The night before I rinsed 1/2 cup lentils until the water ran clear and then I placed them in a container with enough water to cover.  Then placed 1/2 cup of haricot beans in a pot on the stove with 1 cup of water and boiled them for 5 minutes.  I then added the lentils to the par boiled beans, covered the pot and set it aside to soak overnight.

I placed the beans and lentils in a black pot and added 1 X 115gm tin of tomato paste, adding 2 extra tins of plain water.  1 tbsp mixed herbs, 1 tsp garlic flakes and 1 crumbled beef stock cube was added and mixed together. (For a hotter, spicy dish the optional extra spices to add are: 1 tsp ground cumin, 1 tsp crushed coriander seeds and 1 tsp chilli powder)

I removed the bones from 680 gms of beef shin and added the bones to the pot – the marrow in the bones will assist in providing a tasty gravy. I then cut the meat into 2cm cubes and added that to the pot.

3 X carrots were peeled and sliced and I roughly chopped 3 X large tomatoes. (If using potatoes, just wash and cut them to the required size – there is no need to peel.) On top of the beans / lentils I added the meat, then placing the vegetables on top of the meat - to cover it.


The pot was covered and placed in the solar oven which had been pre-heated to 130 – 140oC.

(If you find the gravy is a little thin, blend 1 – 2 tsp of maizena / cornflour with water and add to the stew 2 hours after placing the pot in the oven.  Allow to continue cooking for another 1 - 2 hours.)

Ensure that your pot faces the sun for at least 3 - 4 hours, and that the temperature inside the oven is above 120oC. This dish should cook for 3 hours – but all day will also do – it will not burn – the meat will just get more tender the longer it cooks.  Sprinkle with chopped parsley prior to serving.


I added a pot of rice (in boiling water) to the solar oven and let that cook for an hour - it was perfect rice with no starchy stickiness clumping the lot together - that is because the rice doesn't boil and release it's starch - it just simmers away.

The verdict from the menfolk - very tasty, delicious, tender and all gone...

And, today I have cooked Greek Chicken which I will serve with one of John's solar baked loaves of bread - that'll be perfect for mopping up the gravy.


Am I starving the men in my life?  RMan has attacked the hot freshly baked loaf - and the chicken has only been in the oven for an hour - with we still 5 hours still to go until dinner time...
To prepare and cook Greek Chicken is dead easy.

Rub 7  - 8 pieces of chicken with an oil / garlic / salt and pepper mixture.  Then take 7 pieces of cinnamon and place them at the base of your pot - put the chicken pieces on top of them.

Slice 3 tomatoes and place them round the chicken.  Add as many olives (halved) as you like and then cover the chicken with 7 - 8 slices of (unpeeled and washed) lemon. 

Add 100mls of white wine, cover and place in a solar oven pre-heated to a minimum of 130oC for 2 1/2 - 3 hours - any longer will only ensure that your chicken is fall off the bone tender.

Chicken cooked in the solar oven is an absolute treat - tender, tasty and moist - it will brown, but won't go crisp.  And the gravy that it produces - delicious.


It's 4.15pm and the chicken is cooked - it's now in the hotbox until dinnertime.  Note the gravy which has been produced.  What a clever little oven... :-)  And my dinner preparation is over for the day - what more could a woman ask for?
A tip for keeping the cooked chicken hot until dinner time - place it straight from the hot (130 - 150oC) solar oven into your hotbox (haybox) (http://ecofootprintsa.blogspot.com/p/trying-to-make-difference-start-of-our.html and scroll down the page to the 2nd photograph of my hotbox).

The total amount of electricity I consumed in cooking both meals was that which was used to boil two cups of water for the rice.  Otherwise - the sun did it all for me :-)  And the herbs, carrots and tomatoes came from my garden - as well as the lemon.

Monday, 15 November 2010

Solar Baking - biscuits

I know all my northern hemisphere readers will think this posting is not applicable to them, but I think it is pertinent to both northern and southern hemispheres.  And, in addition, my northern friends have their entire winter to investigate the availablity, and source their recipes to plan their 2011 summer cooking schedule, whilst they are in the grip of all that lovely snow... :-)

A couple of days ago one of the blogs I follow had a recipe for Christmas Cherry Ripe Biscuits.  It sounded too delicious!  So I had to take a peek.

Yummy, yummy, yummy - all my favourite ingredients!

The recipe is as follows:

Beat together:

125gm softened butter
1/2 cup raw sugar (I didn't have raw, so I used brown sugar)
1 tsp vanilla
1 egg, beaten (I didn't beat - just shoved it in with all the above and beat the mixture well)


Finally, mix in:

3 tbls glace cherries
1/2 cup choc chips
1/2 cup dessicated coconut
3/4 cup self raising four )
3/4 cup plain flour         ) I didn't have plain flour, so I used 1 1/2 cups of s/f flour

The rest of the ingredients ready to be mixed in the bowl.
I then rolled portions of the dough into balls about the size of a walnut, placed them on the baking tray and flattened each ball slightly with a fork.


But, this is where I changed the method.  Instead of putting it into the oven to bake at 180oC until they were light golden in colour I put it in my preheated solar oven.


Batch # 2 - plus two eggs I'm hard boiling for tuna salad tonight
Cooking took approximately 45 minutes.

RMan couldn't wait - he swiped one off the tray whilst I was putting the next batch in... :-)

10 minutes work in the kitchen, then let the sun take over and this is the result - brown, crispy and delicious!  This is definitely a keeper!

The only electricity I used was my hand held blender, for 3 minutes, which beat the butter, egg, sugar and vanilla together!

But, it's a funny thing - I prefer the cool of winter to the (sometimes overbearing) heat of summer.  However, this year I am looking forward to hot sunny days and cooking more and more in my solar oven.  Watch this space for more eco-friendly recipes... :-) 

Saturday, 13 November 2010

Ricotta cheese, yoghurt and cream cheese

Do you like yoghurt, ricotta and cream cheese?  Would you like to make it like your mother and grandmother used to?  Do you know how easy it is to make and how much money you can save?

Well, it starts with 5 ltrs of full cream milk, a couple of teaspoons of vinegar and a small 125ml tub of yoghurt with live cultures.

For the Ricotta cheese:

Pour 2 ltrs of full cream milk into a pot, add 3 tablespoons of vinegar and bring to the boil. 

The milk curdling / curds and whey forming with the addition of the vinegar
Boil for 30 seconds, remove from the heat, and allow to stand for 15 minutes.  This allows more curds to form and also allows the mixture to cool in order to squeeze it.


Take a strainer and lay a muslin cloth inside.  When the mixture is cooler, carefully pour it onto the muslin and allowing the whey to strain into another container below the strainer. 


When it has finished dripping, gather the cloth together and slowly squeeze out any residual moisture.  What is left in the cloth is your ricotta.  (The whey, which was strained off, can be used in baking - very good in home made bread - use it to dissolve your yeast in.)


For the yoghurt and cream cheese:

Place your 3lts of milk in a pot on the stove.  Bring to the boil.  Remove from the heat and set aside.  Allow to cool enough so that you can leave a finger in for 10 secs - then add your small tub of shop bought yoghurt.  Mix well.


Then put the mixture in sterilised jars, seal and place them in a cooler box overnight - wrapping them in warm towels or a blanket.  When you wake up the next morning you will have your home made yoghurt.


I kept 1/2 of the batch as yoghurt and used the other half to make cream cheese:


I placed 1/2 the yoghurt into a muslin lined strainer and suspended it in order to allow the whey to drain out.


This takes a while (about 1 - 1/2 hours).  When it stops dripping, give it a gentle squeeze to remove the last of the whey.


Then pack it into your tub, place in the fridge and voila! ricotta, yoghurt and cream cheese is back in stock!


Seriously, it couldn't be easier!

2 ltrs of full cream organic bst hormone free milk made:

246gms ricotta cheese
and 1140ml of whey (which I'll add yeast to next time I make bread)

Total cost: R16.39

If I purchased 250 gms ready made ricotta cheese it would've cost me R22.95

I thus saved: R6.56
.......................................................

3 ltrs of full cream organic bst hormone free milk and a 150gm tub of plain yoghurt (with probiotic cultures) made:

1.5kgs of yoghurt
and 500-odd gms of cream cheese

Total cost: R25.95 (milk) and R7.45 / 150gm (yoghurt) = R33.40

If I purchased 1.5gms of yoghurt it would've cost me R41.10 and 500gms of cream cheese would cost me R31.90 = R73.00

I thus saved R39.60

But, the cherry on top, is that I will retain 125gms of my home made yoghurt to use in my next batch, so, in future, I'll save that cost too.

Therefore my total savings making my own yoghurt and cream cheese will be R47.05

My power consumption was approximately 500 watts at a total cost of 46c