"Self-sufficiency does not mean 'going back' to the acceptance of a lower standard of living. On the contrary, it is the striving for a higher standard of living, for food that is organically grown and good, for the good life in pleasant surroundings... and for the satisfaction that comes from doing difficult and intricate jobs well and successfully." John Seymour ~ Self Sufficiency 2003

Wednesday, 9 January 2013

Lady of the Flies

We have a neighbouring smallholder, who, on 2.5 Ha has 1 cow, 22 sheep, an undetermined large number of chickens and pigs.  Which, for those of you who have animals know, can only mean one thing.

Flies.

Hundreds and thousands of them...!  Crawling everywhere.  On kitchen surfaces, clinging to light globes, falling into full tea / coffee cups and glasses of wine.  Food - I've got fly covers for that so that's OK.  But everywhere else - no thanks!  They have even been crawling all over us whilst we sleep.  Repulsive, disease spreading flies.

So, searching the Net I came across an eco-friendly recipe which I was assured would attract flies.
Ingredients for an eco-friendly fly trap
Basically, one takes 1/2 cup each of sugar and vinegar mixed with a cup of water.
All mixed together and covered with
a pierced aluminium foil lid
After placing it in a jar, pierce the lid.  I decided instead of sacrificing a lid, I would make one out of silver foil, and pierce that.
I made about 8 - 9 holes in the lid
 It worked - to a point.
Not a great success - 5 flies and a small moth
As you can see I only caught five flies and a small moth - over a period of five days.

So, the big guns had to be called in.  They may not be pretty, but heck, if they work, I'm not complaining, and neither is RMan.
An ugly fly strip - but look at the success!
These flies on the fly strip were trapped in only a 7 hour period.  And the fly strip is eco-friendly - as the sticky trap is made by applying resin rubber and mineral oil to a paper strip.
Eco-friendly fly catcher
No baiting, non-toxic, no odours and no mess.  Not pretty.  But it WORKS!

So - that is the lounge, kitchen and bathroom sorted.  In the bedroom I decided to go a little more upmarket.  As I could only get a double bed sized net DD and I sewed two mosquito nets together and suspended both above the bed.  Why two - well, I cannot handle anything "trapping" me when I sleep - LOL even my feet are outside the bed cover whilst I sleep - winter and summer.  The only thing which can be "trapped" by the bed covers is the bod - a draught up the back in winter is not my cup of tea.
DD and I joined two mosquito nets together
and draped that over our bed
Due to the size of our closest town, a double bed mosquito net is the largest they have.  I am trying to get hold of a king-sized mosquito net - for aesthetic reasons also - and then the "joined" net will be relocated to MKids room.  
I DO NOT take flies crawling all over me in the early morning.  EVER!  So the mozzie net stays!  Anyway, I always loved the idea of a four-poster bed, and this looks similar... :)

Now - I have a h-u-g-e field mouse problem - to the extent that I have NOT harvested a single tomato yet this year.  Does anyone know of an eco-friendly deterrent?

Saturday, 5 January 2013

The good, the bad, and the ugly...

Yeah, yeah, I know - I've been MIA for a couple of weeks.  The thing is with all the sun that has been shining down on our patch of the planet and with the accompanying heatwave of a measured 45oC (in the shade), plus 5 extra people to feed and water, the excess power produced by our solar panels was not available to use for blogging.  You see it was rather urgently needed to run a freezer in order to make ice to drop into any liquid which was splashed into a glass.  I could barely even read your blogs - had to try and catch an occasional glimpse via RMans iFone - and even managed to comment on one once too LOL

The four dogs (Scallywag and DD's three) also found it hard to handle the heat - but DD and WGuy had anticipated that and had purchased a small paddling pool for the dogs to lie in when required.  LOL it didn't just keep the dogs paws cool either...
Cooling down hot, swollen feet - move over dogs,
it's the humans turn now...
In addition the mains water pipe which supplies our area, developed a leak, and we were all without water for 3 - 4 days.  Did I ever bless our rain water tanks and the 8mtr3 they contained in total.  Not for the garden though.  Not this time.  There are definitely going to be more rain water tanks which will find a home in this garden in the very near future!

Rather, the water from them...

flushed our loo...
Rainwater to flush the loo...
 ...and washed us, and our dishes.
...to boil to wash us humans and the dishes.
Thankfully, RMan makes a point of ensuring that we always have a 25lt container of potable water, so that saw us through.  Well, some of us.  RMan, RSon and WGuy found that an amber coloured liquid which comes in a glass bottle suited their needs better.  It was a case of whatever can hydrate you...
25lts of potable water to hydrate
our overheating bodies
But DD, WGuy & MKid, three dogs and a cat, have returned to Jo'burg, RSon & Dr A to Cape Town, and now we have some surplus power and I can continue blogging :)

I hope that y'all had a wonderful New Year and are enjoying the start of 2013?

2012 was a strange year - chaotic and stressful on a number of fronts - financially to begin with, then the packing of our family home, the move to the farm and the building of and moving into our new home.

The weather of the last 10 days of the year mimicked all that.

We had gale force winds, a heatwave and an (enforced) drought.  And then there was the fire...

At the southern end of the area where we live - roughly 3 kms from our house- a fire sprang up one of the windy days.  Even though RMan valiantly joined the volunteer ranks (of 5 people) to bushwack the fire, and with assistance of the fire brigade (with their tiny fire engine) it continued to burn for three days.  Then we had some very welcome rain.  Not much, not enough to add any water to our dam, but enough to cool things down again. But not enough to finally quench the persistantly smoldering cow paddies.  The fire flared up a final time, before it was finally quenched. 

Prior to the rain we had a stunning sunset.  Unfortunately, my little camera is not up to scenery shots, but I hope you can get some idea of what it was like from the pic below.
This sunset was a prelude to a storm
 After the rain we were rewarded with a beautiful rainbow - one that stretched all the way from behind our dam...
God's gift to man - the beauty of a rainbow

My camera wasn't able to take a landscape pic
big enough to incorporate the entire rainbow in

one picture

... to the other side near our caravan.  Actually, the pic with the dam had a double rainbow, but that didn't come out in the photo.

On a final positive note, apart from my lettuce plants, and a swiss chard plant which went to seed, all the other vegetables in the shade cloth tunnel survived the heat wave.  Guess the porous pipe assisted in that too?!  The "shaded" ground must have been adequately watered to the extent that it could maintain enough water until the leak was fixed.  Another good reason to install a porous pipe shade cloth vegetable patch in your garden perhaps...? :)

Tuesday, 25 December 2012

Merry Merry

To those who read my blog - may I wish you a Merry, Peaceful and uplifting Christmas to all.
May your Christmas be filled with peace, love and contentment - and gratitude for all the blessings you receive on a daily basis.
Thank you all - for sharing part of yourselves with me via your comments and via your own blogs - you make my life richer with your friendship.

Monday, 17 December 2012

Pesky solutions

Because of the building chaos I started planting my seedlings late this season.

Before I did that though, I came across these fellows - left-overs from last year.  And what whoppers they were too.
Hidden treasure - and what a treasure :)
Ginamormous carrots and parsnips.
The carrot measured 21 cms long by 8 cms wide.  Who cared if they were a tad nibbled - I'm willing to share our harvest - to a point LOL

Who says you have to keep left-overs in the fridge?  Mother nature provides the best storage solution of all, I reckon.

But, speaking of nibbled.

I discovered that we have a family of hares who have taken up residence in our garden at night.  And, topping their list of midnight snacks was... 
Whose been eating my porridge corn?
  ... my mealies.  Hmmm, again sharing is caring, but c'mon guys, let the corn grow a little first - please!
Hare prevention proceeds.
I didn't get as many corn plants in the ground
as I'd hoped, but, hey - 
there's always next year :)
So, this called for a solution.  I had read somewhere that to create a stake of poles round a (small) mealie patch allowed one to provide support for them in windy areas.  So - poles went in at each corner and at mid-point between the corners of the small corn patch.  With cross poles too.
The poles and cross members go in
Round and over the poles...
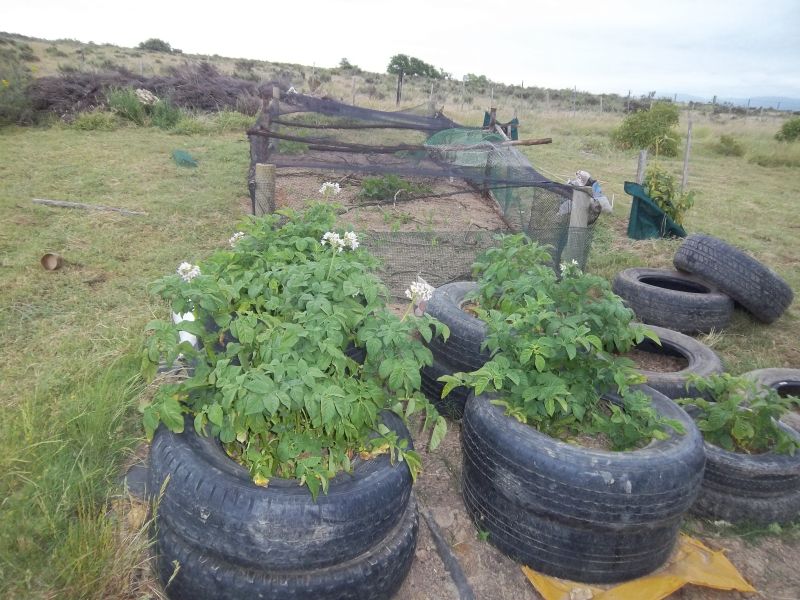
Protected corn bed behind, and my beautiful
potat
oes in tyres in front - they appear to
love their special beds, and it makes
harvesting them sooooo much easier, especially
as our soil hardens to a 
consistency of cement 
in the heat of summer.
...I draped bird netting - nice, perfect bird netting just waiting to entangle a paw or two - which never happened.  Clever hares :)
Grow little mealies - grow...
It worked!  :)
A bit of TLC, and look - my mealies had a
chance to grow and they're saying thank you
When the corn was high enough I simply removed the netting and allowed the corn to grow skywards.  And then had to drape the bird netting over the strawberries, as the birds have taken a fancy to a meal of them.

But, I have left the poles in situ - for when the plants are taller and might need some wind support.
Sunflowers, corn, beans and squash
happily sharing the same bed.  Thank

goodness for the porous pipe - in the
heat we're experiencing, it's taking
care of all the watering that's
needed :)
This is my first year of growing sunflowers, corn in any quantity (I didn't plant enough, but I've learnt my lesson for next year) and members of the squash family.  In our town house, with it's sandy beach soil garden, squash didn't perform - no matter how much compost I put into the ground. 

The soil on the farm - well now, that is a different matter.  Everything, thankfully, seems to love it.  Or is it because I prepared the beds with plenty of compost and combined growing corn, squash, beans and sunflowers in the same bed?  Whatever.  I'm thrilled :)

I love my sunflowers - their burst of yellow brightens up every day.  Even if they are a little confused and aren't facing the sun.  Guess the hectic winds we have blowing may have something to do with that?  Speaking of wind - or was it the hares...?
Broken and deformed  but
determined to make something
of it's life this sunflower
beat the odds
Whatever it was, something broke this sunflower stem - I thought the plant was a gonner.  But I left it in place, and it rewarded me by growing none the less.  So it's shorter, and it's deformed.  But I love it :)
Good morning day :)
Who could be grumpy when viewing this first thing in the morning?

So, what have I harvested from my garden which I planted late ?

Firstly, the ever faithful swiss chard :)  Bowls and bowls of yummy creamed spinach (or should I say creamed swiss chard?)  But you know what I mean.
Swiss chard - bolting a little
due to the heat
I've picked armfuls of the stuff and there's still more and more growing in the shadecloth greenhouse.
Yum - I can taste the creamed spinach swiss chard
DD, WGuy and MKid arrived late on Saturday.  MKid and DD came to inspect what was growing and then joined me in harvesting ... ta da! - my first ever marrows.  And gem squash.  And, as you can see from the pic below, we also harvested...
Broad beans, gem squash and no-so-baby marrows LOL
... broad beans!?!?!  In December?  Delicious they were too.  Added to a salad their cold, pre-cooked crunchiness added a special something extra.  I had left the base of the plants in the ground at what I thought was the end of their season in order to allow them to share their nitrogen with the next crop.  But, they obviously had decided that they wanted to produce more than nitrogen LOL

Does anyone have any recipes for preserving (baby or not so baby LOL) marrows - they're growing voraciously!

Monday, 10 December 2012

Inspired

This year my anticipation of, and for, Christmas seems to have been missing in action.  I guess with all the building work we lived through these past few months, then the all painting and varnishing, and unpacking, and preparing our home to welcome visitors, I am excited - but drained.  Creatively drained that is.

RMan is of German decent - his parents were both born there.  And he has always followed their Christmas traditions.  I have tried to cater for that - in fact, we join both his traditions with my UK born ones.  But, last Sunday, being the first Sunday in Advent, all I had the energy for was to plonk four candles on the table, with a bit of greenery round them.  A half token.  Not good enough, and I knew it.  My inspiration just wasn't there.

Someone knew that :)  And very kindly inspired me.  That someone was Diana.
Now that looks a whole lot better than what I
had on the table before :)
Bless you, Diana, you gave me a wonderful idea.

We currently have a plentitude of Kooigoed from the Helichrysum species growing on our land.  So, on Friday during the dogs evening walk, I had a pair of secateurs in hand, and I snipped and snipped to my hearts content.
A close up of the result
I placed the willow ring on a tray, and threaded a few wispy bits of Kooigoed through the top of it.  Then, taking a branch of the Kooigoed plant in one hand, I drew it through my fingers thus removing the leaves, which were then placed just inside the willow ring.  Filling the vase with sand in order to hold the candles securely, I layered the top of the sand with the flowers from the Kooigoed plant.  Instead of copying the traditional European Adventskranz and going for greenery, I have chosen to take what is available right here and now and work with that.

Now our room is filled with something more appropriate for the festive season, as well as the lovely smell of the Kooigoed which greets us every morning.  Not as chic and elegant as Diana's.  But it is simple and befitting of where, and who, we are.

Do you have an Adventskranz?  What are some of the unusual traditions in your household leading up to Christmas?

Saturday, 8 December 2012

At floor level

Even though we asked the builder nicely to be careful, our existing clay tile floors took a hammering, especially in our bathroom.  This is because they had to remove the temporary IBR (corrugated iron) roof which entailed knocking down part of the walls to remove the supporting beams.  Knocking down wall means falling bricks and debris.  Falling bricks and debris on a sealed clay floor means the seal is scratched / broken.

They did make the effort of placing gunplas (builders plastic) on the floors, but basically all that did was catch the mess.  Heavy bricks laughed at the gunplas.  And chipped a number of the floor tiles too.  Nothing I can do about them, as replacing them is not an option.  The tiles are embedded in 40cms (roughly 2 inches) of cement.
Sad, sad floors that ook nothing like
they should
And, of course, the demolition / cement / rain water mess found it's way under the gunplas.  Then the constant walking on that mess during the completion of Phase 2 stripped the seal on the raw clay tiles.

My poor tiles were a mess, and I wondered if we would ever be able to get them back to their previous state.
Unfortunately my camera isn't clear enough
to properly show you the damage, but
trust me, these floors were not a pretty
sight...
8 hours later, 2 pot scrubbers, an aching back and knees, no fingers left and I had the last of the dripped cement and cretestone off the floors.  Then it was time to try and reseal the floors.
Thank goodness for pot scourers
I'm happy to say that my efforts paid off.
All better now :)
We're both happy with the finished result :)

Then - upstairs.

The builder initially talked us into laying deck board as our floor.  Not knowing any better, we agreed.  Big mistake.

So...
MKid's room / the office:
A laborious job - each plank is laid
and carefully nailed in the "join"
area - roughly 8 - 10 nails / plank.
My back is aching for them just looking
at this photo LOL
... we had to purchase tongue and groove which was laid on a membrane to prevent "knocking" and "squeaking" where the two woods met.
Front guest bedroom.  Visible is the membrane
we used to try and prevent the two woods
from squeaking / knocking
Our double glazed window order was horribly delayed, so  "hierdie boers het Å‰ plan gemaak" (these farmers made a plan :) ) ...

The floor was well laid, and although we had some headaches / heart attacks when it rained, thankfully, hanging builders plastic at the windows may not have looked all that attractive, and may have crackled terribly with each tiny gust of wind, but it prevented too much damage to the wood.  

But, we got through that OK, the windows and floors are in, and all we have to do now is sand, stain and seal the wood.  However, it's Christmas shortly, we have family / guests arriving next weekend, so instead of rushing the job, we're going to let it lie as it is until we have the "space" to do it properly.

No rush.  After all, we have loose carpets, and the floor still has to be properly sanded...

Monday, 3 December 2012

Finally going up...

Warning: This is a picture heavy posting and may take some time to load...

The carpenter finally got started on the staircase to the upper two bedrooms. Exciting times - the indications were all there that the build was nearing completion.
The first stringer is positioned
The carpenter, Reuben, measured height and the the distance with one of the stringers.  Then he took that outside again and made the other stringer.
Stringer # 1 got it's tread supports
The tread distances were measured / calculated, and the supporting piece of wood was screwed in...
Stringer 1 & 2 and the treads in place
Excitement mounted as the completed structure grew before our eyes.
Securing the treads to their supports
Once that was complete, it was a case of all hands on deck as they schlepped the whole ready-made staircase inside.
Huffing and puffing - guess it was pretty heavy :)
Only when the staircase was inside and in situ did I spy a problem.
Spot the problem
Whilst I was out buying building materials, the carpenter, on RMan's instruction, had made the treads protrude over the edge of the stringers.  A word to females out there:  Don't leave interior decor decisions to your handyman husband.  Aesthetics are apparently not necessarily included their gene pool LOL 

So the staircase had to be schlepped outside again so that all the treads could be repositioned.
Finally, a staircase which has my approval
Guess the builders cursed me on a number of occasions - but I let it slide off.  I have to live in the finished product, not them :)
This picture perfectly illustrates the messy, dusty
conditions under which we lived for 4 months
The two existing beams supporting the mezzanine had been installed 1.2 mtrs apart, so that we could have a 1.2 mtr wide landing.  Well, we figured there was no way of hiding the mezzanine, so why not make a feature out of it.
A hole was cut and drilled straight through
the one outside wall in order to slot the
third beam in through it
But, being 1.2 mtrs wide, our builder advised us that it definitely required a third beam - in between the other two.  The maximum supporting distance between the two beams is not allowed to be more than 600mm.  So out came the angle grinders and the concrete drills... again!
The third supporting beam is installed
They knocked a hole through the one wall from the outside, and fed the third (middle) beam through that.
The lower layer of deck board in in
place
The lower layer of deck board was laid on top of the beams.  
We now have a mezzanine / landing to walk on
We opted for a wooden balustrade  - figuring that it was the most eco-friendly, and the lightest option.  Steel or glass would just have been too heavy (weight-wise), and would have caused twisting and distorting of the outer beam.  Not to mention a wooden balustrade is more in keeping with a farmhouse than steel or glass :)
Gunplas (builders plastic) was laid to try and
protect out clay tile floors
But, whilst the room was empty we decided that it was a good time to bring in the scaffolding, so that the ceiling could be skimmed, and the wall / ceiling joins / cornice could be finished / installed.  Get the mess inside finished in one building session of 3 days, as opposed to clearing everything out again a week or two later.
The complete staircase with the wooden
balustrade (bannisters)
Now, at last, RMan and I could climb the stairs and see the view (mess / chaos / upheaval) from the first floor LOL
View of the mess from above
It looked so ruddy high from up there - much higher than when one stands at the bottom and looks up.

But - would Scallywag make it up the stairs?  He is besotted with RMan and follows him like a shadow - literally.  Being condemned to staying downstairs could've resulted in plaintive whining - constant plaintive whining...
Hmmm - looking out here may have
great advantages... :)
As it turned out, going up took a couple of minutes to get the brain rewired and master, but the effort was worth the view from the window which was, co-incidentally, just at his height...
Help, Daddy.  I'm scared...
 ... but coming down again - hmmm, that took some thought.
Give me a moment to think about it...
He decided to take a break and think about it.  RMan and I devised a plan.  Sending RMan outside swayed the odds in favour of a reaction, and, finally mustering the courage...
Stop, RMan!  Stop!
Wait!  Wait for me.
I'm coming...
... and ignoring the open treads, Scallywag made a run for it.