Pages

Wednesday, 28 November 2012

Grey water filter

You may, or may not, know that we are so off grid that we only have the supply of municipal water.  And, not the best water at that.  But, it is drinkable, so mustn't complain... :)  And that, together with our rain water tanks should stand us in good stead for our human requirements.

The ramifications though, are that our "waste water" is our responsibility.  The black water goes into a large septic tank, and, providing that I feed the tank with "good bacteria" every month, all should be well.

But we didn't want our grey water (water from our shower, bathroom basin and kitchen sink) unnecessarily filling our septic tank.

So, we have installed plumbing to take the grey water to a "pond" ( in inverted comma's as it's a work in progress...:)  )
The "pond" in the foreground - not such a pleasant
view or experience
Initially, with the chaos of builders, building, mess and confusion, the water just ran to the "pond".  But the "pond" wasn't looking so good - in fact it was not pleasing at all.  Distinctly unappealing even to the bird life.  A direct result of all the inevitable kitchen grease and minute scraps of food which were being flushed down the drain.  So I put on my thinking cap and came up with this solution...

The higher hole was inserted on the side of the
kitchen sink pipe, and the lower hole is for
the pipe to the pond 
I purchased a 20lt black box, drilled two holes - one in the top at the end for the "in pipe" and one in the lower end for the "out pipe.  Then the "in pipe" and the "out pipe" got siliconed in place and fitted to our kitchen waste pipes.
Vermin proof lid on the grey water
filter box
It comes with a secure lid, so that will also deter vermin.
Larger filter stones layer the base of
the black box
Then, with RMan's assistance, I placed a layer of larger stones in the base of the box.
Smaller filter stones were laid on top of
the larger stone
On top of that we placed a layer of smaller stones.
A couple of layers of shade cloth
to hold the sand
On top of the stone I lay some shade cloth...
A layer of clean sand
... and filled the shade cloth with sand.
Test run...
As the water enters the box from the kitchen basin in lands on the sand and it then has to filter down through the sand, and the two different layers of stone before exiting the box and continuing on it's merry way to the "pond". A couple of days later I inspected the set-up to ensure that it was working correctly.  What I found was tiny scraps of food covering the top of the sand layer.  With my fertile imagination I envisaged a thriving community of nastiness, including a nasty smelly result, developing within a short space of time.

HA!

I had another plan.  We all know that washing machines like to chew just one of a pair of socks.  And that one invariably has the odd-sock-out lingering in the hopes that it's mate will surface somewhere.
Leftover socks that the washing machine
didn't fancy...
I decided enough was enough - I mean we had schlepped these odd socks all the way from our town house, and I still couldn't find it's mate.  So, it was time to put those socks to another good use...
Yup - they were put to good use
as an additional filter
Fixing it on to the end of the inlet pipe, I now have all those scraps being caught in the sock, instead of landing on the sand in the box.  An extra filter so to speak.
It works a treat :)
Yeah, cleaning out the sock on a weekly basis entails shoving on a pair of rubber gloves, but hey, I brought two babies into this world, and a greasy slimy sock is nothing compared to what they delivered on the odd occasion in their first few months of life...LOL

But, most importantly, the water that is heading for the pond is clean (er), and it doesn't smell anymore, and that result is worth a couple of minutes every 7 - 10 days in order to complete the unpleasant task of cleaning the sock...
Clean water - it works :)
We have a saying in this country - "a Boer maak a plan" (a farmer makes a plan).  McGyver - eat your heart out - or should that be "Thanks McGyver - I did learn something from watching your programme all those years ago..." :)
The plants are loving it :)
The plants in the pond are thriving - need I say any more...?

Saturday, 24 November 2012

Mayonnaise to the rescue

With the move my pot plants were neglected in the confusion and suffered a little.  And got shoved in the strangest places for safekeeping.

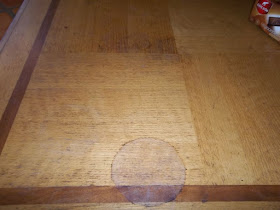
One of which was on our coffee table which was hiding in a corner away from falling bricks and potential builder's damage.  But, I have to say that the pot plant didn't suffer as much as the table did.
Water marks on our poor coffee table
from an over-watered pot plant
I have heard, and read, that one can rescue a piece of furniture with a watermark using mayonnaise.

I like the thought of this succeeding - I'd prefer to try this eco-friendlier method than some chemical laced solution.
Mayo to the rescue?
So I had to try it.  The first time I smeared it over, left it for a couple of hours, and then battled to get it off.  "Lucky I did it now", I thought, "imagine if I'd left it on for longer."  But I wasn't happy with the result.  What's all the fuss about - this isn't so impressive?

But, I don't give up easily, and the table kept shoving itself into my face.  So, a couple of days later I smeared some more mayo on the table - a generous amount this time.  And I walked away from it.
I left the mayo on the table overnight and this is
what it looked like the next morning
The next morning the mayo had gone all clear and the table looked better.  The dark outerr ring is what I think could be minute grains of soil which found their way into the swollen wood.  The clear coloured mayo was much easier to remove too.  Yay!
The centre water mark is almost invisible - far
more so in real life than it appears in this pic,
but the outer mark clearly still has an outline -
probably as a result of the "muddy" water
oozing into the swollen wet wood.  All
the other marks have disappeared :)
This is what it looks like now.  The water marks in the centre, and in odd spots round the table are gone and the main one on the edge will probably get another dose of mayo before I call it a day.  But there is a definite improvement, don't you think?

If the outer one is still visible then I'm going to call in RMan with his orbital sander and some very fine sand paper.  At least I'll know that the table has had some treatment prior to being sanded down a little...

Friday, 23 November 2012

Solar assistant

Firstly, Happy Thanksgiving for yesterday to all my American followers - I hope that it was a wonderful day for you all.  I think it is a very important tradition, and one which the rest of the world should follow - giving one day a year to recognize, and count, your blessings and taking the time to express heartfelt thanks for.  However, turkey is, in my book, a strictly Christmas meal, so I don't know if I could cook one for Thanksgiving and then another on Christmas day... LOL

Talking of Christmas, we have finally had some days which were suitable for baking in my solar oven.  I need really sunny days, as I don't want clouds drifting over and dropping the temperature inside by even 10 degrees.  Other food - it's not so critical, but baking...
Mandy - standing guard over the box which
teases her with smells and (eventually)
tidbits :)
My helper, Mandy, MKids dog, which we are looking after for him, has been carefully guarding my oven, just waiting each time for me to use it.  She does love the scraps that come out of it... :)
So, with the good weather, I have spent the last couple of days making solar baked Christmas cakes in my solar oven.  Yeah, I know it's a tad late, but I hope the fruit cakes will have enough time to mature before Christmas.  I couldn't have attempted it whilst the builders were here...

I manage to fit three cakes into the oven at a time - in different sized and shaped pots - mostly round, for that is the traditional Christmas cake shape, but I have also made some Christmas cake "logs".  Baking your Christmas cake in the solar oven is really the easiest way of baking a Christmas cake - it won't burn, and, if you get busy in the garden, and forget the cakes for an extra half-an-hour, no damage is caused to the cakes - well, nothing that an extra dose of Brandy wont sort out LOL
One of the six that I have baked so far - Christmas
gifts and one each for the kids.  Still three to go...
Moist and delicious - the smell filled the room
as I left them to cool on the wire rack.
The recipe I use for my solar Christmas cake can be found here, under the Bread, Biscuits and Cakes Recipes.  It's a pity that I wont / can't give Mandy a taste of the Christmas cake - damn, they smell sooooooo good :) 

To all those who follow my blog and who have ordered a solar oven from me - I am still awaiting arrival confirmation from DHL - I promise I will be in touch as soon as I hear something.  Thank you so much for your patience, and again, my sincere apologies for the delay...

Monday, 19 November 2012

Egged on...

You recall last year I mentioned that I was saving all the empty egg shells from the eggs that I used in cooking / breakfast, etc. as well as all the empty loo roll holders.  I have a limited number of seedling trays and I wanted to compliment that quantity of seeds I could grow without having to purchase more plastic (trays).
Normal seed trays together with empty egg
shells - I kept them in a recycled Styrofoam
boxes I got from RSon. The Sty
rofoam boxes
act like giant drip t
rays, and when covered
with bubble wrap which we used when packing 
the delicate items, they became miniature
hot houses :)
With the move from town to farm, a whole bunch of the shells got broken, but I did managed to use over 80 empty egg shells, as well as numerous empty loo roll holders :)

And, even though my planting was late this year, I have a good crop of seedlings peeping through the soil.  I'm not terribly worried as we have a long planting season here - heck, I've still got broad beans being produced on the plants I cut back.  Who would have thought in the heat we are already experiencing...?
Loads of empty egg shells in egg cartons - to hold
them upright.  They, too, became too soggy and
fell apart.
But, I thought I'd give you some feedback on egg shells vs loo roll holders...

The loo roll holders I found got too soggy, and fell apart when it came time to plant them out.  And one has to space them very closely together too - to prevent them from falling over.

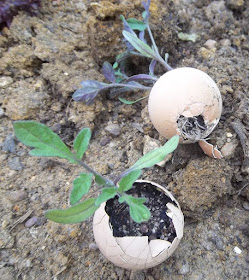
But the egg shells - they're a winner!!!!
You can see the roots peeping through
where I broke the 
shell prior to
planting out the seedlings.  The one
in the foreground is not planted yet -
I just propped it there to show you
the healthy seedling it has managed
to produce.  I planted them in the
ground leaving about 1cm (1/2 an inch)
of the shell above ground.
The benefit, for me, is that while I am reusing the empty egg shells, I am also simultaneously adding calcium to the soil when I plant out the seedlings.

And, hopefully, the extra benefit is that the bit of egg shell peeping above the ground will act as a cut-worm deterrent.

To use your egg shells, make sure that you cut the egg open as close as possible to the pointed end of the shell.  A hassle initially, as one is used to cracking eggs through the middle.  But, you soon get used to it :)

And just think of not having to sterilize those seedling trays ever again...!

A last tip - all those seedling trays you have lying around - keep them and use them to support the egg shells whilst the seeds are germinating.

Using empty egg shells, to grow seedlings, works.  I promise :)

Thursday, 15 November 2012

Nighttime visitors

With the recent heavy rains we experienced we discovered all sorts of different things.

Thankfully - we didn't discover any leaks LOL

But, you remember Blockhead?  Our eco-friendly pest control solution to sharing too much of our unharvested harvest with the local wildlife.
Blockhead in all his glory :)
He was the scarecrow that RMan and Mkid made last summer.  He took a dive and fell flat on his face.  Even though his feet were well anchored and providing support for his immense frame!
Sodden fields and clay result in...
The normally hard clay ground became so sodden with water, that he lost his balance with just a light puff of wind.  Straight onto a grape plant.  
Blockhead took a nose dive
Thankfully, the grape plant survived, and Blockhead is now once again on guard.  But this time the base has been reinforced LOL
Who is this...?
But, the rain also highlighted other things we were unaware of.  Such as nighttime visitors.

Each even I walk the dogs, and on one such walk I noticed tell-tale signs.  Such as this footprint that I haven't seen before.
No print that I have seen before
Could it be a badger?  Dr A reckons that the pigeon toed pattern certainly indicates a badger.  And I have seen what I believe was one a few months ago.  it also looks too small to be a "wild" cat (wink wink Roy)
Check out the scale, and the difference,
between the dog print and our visitor...
For scale I took another pic - this time with a matchbox next to it.  You can clearly see the difference between the dog paw print and our mysterious visitor's.  I reckon maybe Englishman may be able to clarify the finding...?

Tuesday, 13 November 2012

Our front entrance

I reckon it's time to give you a peek of what has kept us busy over the past 4 months.  So, over the next couple of weeks I'm going to give you a tour.  Starting from the outside...

...during the building of Phase 2 our front entrance underwent a make-over - and one, which I feel, makes it an entrance fitting of a farm house :)
BEFORE :
Previously we had narrow, unfriendly steps up
to the front door / patio
The previous builder had created very narrow steps to the front patio which were a  constant source of irritation to me, as they seemed to magnify the tall, narrowness of Phase 1 of the house - giving it the appearance of a house from a horror movie.  All it needed was dark, threatening skies and wind tossed trees to complete the setting. I couldn't wait to correct them.
The size of the future steps
A quick word with the builder, and the guys climbed into the job.
Scallywag approves :)
It wasn't a quick fix - it took them two entire days - marking out, adding foundation, knocking down and building up again where necessary.
Busy, busy, busy
But, by the end of the day, the improvement was clearly visible.
Much better :)
Another day was spent on plastering the steps with a coloured high lime plaster, and, after a bit of decorative work on my part, this is the end result...
AFTER :
Wider, and a more balanced, welcoming appearance
to the front of the house.  A couple of pot plants,
a rock with a face (which we schlepped with us
from Hout Bay) a bit of planting and a world
 difference - Welcome :)
... now I'm sure you'll feel more welcome and eager to visit :)

Sunday, 11 November 2012

Welcoming unexpected visitors

Our family doctor, Dr A, who has become a family friend, paid us the honour of arriving on Friday, with his wife, to spend the weekend with us - our first farm guests.  Dr A does not like driving long distances, and 300-odd kilometers from town to us is a long distance as far as he's concerned.  How wonderful it has been to spend some time with them both after 4 long months away.

Yesterday, we decided to show them a little of the area, and took them to Wildebraam - the local berry farm.  Just as I thought, the wife couldn't resist the goodies on offer, and with a severely lightened purse we all returned home "all shopped out" LOL

Relaxing on our front patio, there was a sudden commotion at our neighbours plot.  Our dogs reacted by leaping up and barking, and, after a casual glance around the corner of our house, I dismissed the noise as a chicken having difficulty producing an egg - our neighbour, CGuy has these odd chickens which really screech when it comes time to produce their daily offering.

About 10 minutes later we were startled to hear RMan being urgently called.  Opening the back door we found Robert, a worker from CGuy's plot, standing outside with a bloody cloth wrapped round his arm.  He had apparently been carrying two 4ltr glass bottles of water when one slipped, slid down, and smashed into the lower bottle, and breaking it.  The broken glass had then severed the skin of his right wrist - deeply and extremely seriously.

Thank goodness our GP was here!  According to Dr A it appeared as though Robert had cut his radial and ulna artery in his right wrist.  And he fears that he may have severed one of his tendons which controls the up / down movement of his hand.  But, keeping calm, I assisted Dr A in applying a tourniquet whilst Dr A applied pressure to the wound to staunch the bleeding.  D A then applied a packed bandage to the wound and RMan and Dr A rushed Robert to the local hospital.  Dr A reckons that a vascular surgeon will have to repair the damage.

But - what  if Dr A had not been here?  I fear that ill-equipped as I was, Robert may have bled to death.

And, it highlighted the inadequacy of my medical supplies.  Being as remotely situated as we are, I have to be better equipped - and mentally prepared!  And, with Dr A guidance, the medical supply list is currently being compiled :)

But, we have also had other guests.

This large lizard decided to play building inspector when Phase 2 was being built.  We passed inspection apparently :)
A large lizard managed to
camouflage itself against the
brickwork
Our dam also had the rare honour of being visited by an African Spoonbill.  I have never seen one before!
An African Spoonbill
RMan and I were tickled pink :)
You can make out the spoonbill easier
in this photo
And finally, we spied either a Blue Crane, our National bird, or a Blackheaded Heron.  The fading light left the question, but either are welcome to make the dam their watering hole. 
Blue Crane or Blackheaded Heron?
This has certainly been an important weekend - and left me without a doubt that, although I was prepared for a medical emergency in a town situation, I was not adequately equipped for what happened here yesterday.  I will be tomorrow though - once I have visited our local pharmacy...

And Dr A has assured me that he will always be at the end of the telephone connection to give me whatever medical advice / assistance I require, should another incident of this ilk occur in the future.  I am fortunate that I remain calm during an emergency, and only allow myself to react (fall apart LOL) once the situation is under control.  RMan, on the other hand, goes white and shaky at the first sign of blood.  But - he can perform the other important functions such as phoning to alert those concerned of the incoming emergency.

I believe that Dr A's unexpected visit was guided by the Highest power, and that God sent him here to help preserve a life.  For Robert may not have been as lucky had he only had RMan and I to help him given yesterday's situation...  The grateful lesson I (in fact both RMan and I) learnt yesterday will remain with me for the rest of my life.  Anticipate the worst, be prepared for it, and you will have a better chance of having a win-win outcome.

Monday, 5 November 2012

Welcome Kris

Please - join me in welcoming Kris.  She is the latest person to hit the followers button.

This is from Kris' profile info:

"Hi! I'm Kris, an avid gardener in NE Ohio (zone 5/6). I always seem to bite off juuuust a bit more than I can comfortably chew when it comes to garden/landscaping projects. In July 2008 concerns for native bee populations galvanized me to turn my 1.25-acre property into a bee and pollinator sanctuary. The name of my project is Melissa Majora, inspired by a "Doctor Who" episode where he explains that honeybees are going home to their own planet: Melissa Majoria. I altered the name a bit so as not to get a lot of search hits from "Who" fans. Meanwhile, over the course of the seasons, I'm discovering what gardening choices help not only bees, but other pollinators. It's fun, and, when the flowers are thick with flittin' and flyin' things, I get quite a buzz! :-D"

Kris has quite a few blogs - her main one can be found here.  Her others are:

http://www.melissa-majora2.blogspot.com/ is for the flowers she grows
http://www.melissa-majora3.blogspot.com/ is devoted to her vegetable growing
http://melissa-majora4.blogspot.com/ details her garden projects such as her turtorial on how she made her raised bed, or how she captures her rain water to mention only two
http://www.melissa-majora6.blogspot.com/ is for her household projects
http://melissa-majora7.blogspot.com/ this blog details what happens to all the produce from her garden :)

Kris - thank you for hitting the follow button.  I always reply to comments - even if it takes me a day or two.  However, in order for me to do so, the sun must provide the power for my 'puter and my internet service provider must keep me connected.  :)  Please - bear with me if ever my response to very welcome comments seems delayed :)

Sunday, 4 November 2012

Burn remedy

Disclaimer:  I have no medical training and am definitely not an expert.  The following is purely for your information, and if you use this information it is completely at your discretion. 


The other night I made French Fries as part of our dinner.  As with all things stove related I naturally burnt myself - splashing a nice dose of boiling oil on my finger..

I reacted as I always do, and as I was doing so, it occurred to me that perhaps not everyone knows the Eco-friendly remedy that I know...

Many, many years ago, when my children were small, my DD burnt herself severely enough for me to take her to our GP.  She had decided to walk across a still smoldering bonfire which had not burnt itself out as we had expected.  GP's wife, normally a fairly taciturn woman, on this occasion offered me advice which stuck.

If you burn yourself, and the burn is not an open one (i.e. the skin has not been broken) the immediate remedy is as follows.

Either briefly rinse the wound to remove any remnants which may have caused the burn, or, if an oil burn, gently blot the area with kitchen paper towel (if you use it - I don't) or with loo paper / paper serviette / tissue.  This is in order to absorb as much oil as possible.

Then pour a container of milk (full cream, 2%, low fat, whatever - in makes no difference) onto a container which is large enough for you to fit the burnt area into.  You'll need to pour enough milk to cover the burnt area.
Pain - pain - pain!  I didn't know where the burn
was specifically, so I shoved all my fingers
into the milk :)
Lower the injured part of your body into the milk and leave it submerged until the pain of the burn has disappeared.  This can take anything from 10 minutes to an hour, or hour-and-a-half. 
Do nothing else to the burnt area.  And do not apply butter, as they did in the old days, as the butter takes on the heat of the burn and continues the burning process.
As you can see the circled area is where
the boiling oil landed - and, the next
morning, there is only a faint mark left
as proof of the injury.
What you are left with is a burn which is a pain free mark only - and as you can see there is no blister!
As a child DD had run out the greet her dad when he came home from work.  Her knee came in contact with the hot exhaust pipe.  Submerging the burnt area in milk also resulted in a mark only.

It seriously works!  But - do not use this on a wound which is open, or where the blister has broken.  For those open kind of injuries, if they are serious enough, get to your GP!

And, by the way, this remedy is very appealing to children - it takes the "nastiness" out of the incident, and, when their wound is feeling better, let them feed the now unusable milk to the family pets...:)