"Self-sufficiency does not mean 'going back' to the acceptance of a lower standard of living. On the contrary, it is the striving for a higher standard of living, for food that is organically grown and good, for the good life in pleasant surroundings... and for the satisfaction that comes from doing difficult and intricate jobs well and successfully." John Seymour ~ Self Sufficiency 2003

Saturday 24 June 2017

Rain water harvesting installation

I am a member of two facebook groups which try to assist people in the Western Cape, as well as the rest of South Africa, with regards to drought solutions - namely Water Shedding SA and Water Shortage South Africa.  I know that most of this will be of interest to South African readers, but, perhaps everyone should be aware of, and will benefit from how to help themselves to become more self-sufficient with regards to their water - and it's storage - especially rain water.  Water is our most precious comodity - more valuable than gold, diamonds, oil or anything else considered precious by mankind.

In those groups I have read so many posts from people asking who can install their rain water tanks. I think the "lack of knowledge" and cost implication (of firstly purchasing the tank, and then the additional cost of getting a company to come and do the installation / gutter link up) may be preventing people from installing a rain water tank. So I thought I would share the simplicity of it.
For those of you are new readers of my blog, here is some background: we live on a 2 Ha smallholding and we have installed 9 X 5 000lt tanks over the past 7 - 8 years.
Our potable water is directed from our mains pipe into the top of
 the potable water storage tank
 As our "mains" water supply is erratic (either Overberg Water has "pump" / Escom power supply problems or farmers accidentally plough up the main line - this happens quite frequently) so we have dedicated one X 5 000 lt tank to potable water. Given the aforementioned causes of possible breaks in our potable water supply, water independence / security is therefore imperative for us - especially in the heat of summer.
Details of water connection from pump to the house, and our
 power source to the pump
Of the remaining 8 X tanks, 3 X tanks are positioned at the end of gutters and collect rainwater and the balance of 5 X tanks are postioned on the higher parts of the land in order to irrigate via gravity and / or pump.
A secure base is vital for a water storage tank
Please ensure that you either position your tank on a (smooth) concrete slab, a square of level pavers, or a good 10cm thick bed of gravel (please ensure that there are NO SHARP GRAVEL POINTS sticking up or they could puncture the tank).
Our tank / pump connection
1 000lt (filled weight is 1 ton), 2000 lt (filled weight is 2 tons) or 5 000lt (filled weight is 5 ton) tanks are heavy when they are full, and when the ground beneath them is wet from (hopefully good 😀👍👍 ) rains, the risk of the tank falling sideways / collapsing is a possibility IF the tank isn't sitting level. This definitely applies to a clay soil - as clay is "volatile" when very wet.


Two pics showing one of the two types of valves we used - in these pictures the image on the left with the handle pointing upwards, the valve is closed and in the image on the right showing the handle lying parallel to the valve, the the valve is open.

When you purchase your tank(s) ask the supplier for the specific water tank fitting requirements. Then, either get them to supply those parts, or get the tank supplier to write them down and take that list to your local hardware store. Don't forget the plumbers tape - to seal ALL the connection threads 😀  The majority of tank fittings are 40mm - both the inlet and outlet points. If you want to reduce that outlet size in order to connect a normal garden hosepipe, then your hardware store will know, and supply you with those fittings as long as you know the diameter of garden hose that you use. From tank outlet fitting size of 40mm to 1/2 inch garden hose = 12mm fittings, or 3/4 inch garden hose are 19mm fittings.
You will see two different valves in the pics - a plastic one and a metal one. Either valve can be used quite easily and is only dependent on what your hardware store stocks.
Cutting the water tank lid in order to insert the gutter downpipe can be achieved with the use of a utility / Stanley knife. Mark out the gutter profile on the lid, drill a "start" hole and cut away...
Shadecloth filter catching debris from our roof and preventing it
 from entering the tank
We use a piece of 80% shadecloth as our debris fiter and it works well. Hooking it over the water tank lid securing pin "protrusions" ensures that it is held in place.
It's easy to cut a hole in the top of the tank lid with a utility or
 Stanley knife
Also, when the lid is in position the "close fit" adds to that shadecloth filter position securiity. Ours have not moved in 7 - 8 years. Emptying the debris is as simple as lifting off the piece of shadecloth, shaking off the debris, and replacing the shadelcoth over the tank securing pin protrusions.
The lid helps to keep the shadecloth in position
First flushes are also easy to install and, if you go that route, I would recommend that you have a large mouthed valve at the end of the first flush pipe in order to facilitate easy expulsion / removal of the debris. Please remember to use a PVC weld if you are joining fittings with no thread. This is also obtainable from your hardware store.
Open source diagram of a first flush system
Another first flush diagram
If you want / need to connect your tank to your house you will need a pump and the knowledge of how to do this. If you do not know how to do this, ONLY then you would need to call on the services of a plumber.
I recommend a wide mouthed valve at the end of your first flush
 pipe to enable easy cleaning of the debris within
I know this seems to be a lot of info to absorb, but most of it is commonsense if you logically think about what you are doing.

Good luck 😀

Saturday 17 June 2017

Hydroponic update

You'll remember last year back in April I started a small hydroponic system.

This is a report back and a change of plan.
My newly installed small hydroponic ssystem
The lettuce still found the direct sunlight too strong and went to seed.  I will have to grow them in the shade next summer, with light being provided by bouncing it off a north facing wall.
The cabbages grown in the ground, without question, performed
 better than the hydroponic ones
 The cabbages - nope, not successful.
The hydroponic peas did well, and also didn't display any signs
 of "mildew" on their leaves
The peas?  They did beautifully 😄

And the tomatoes - they produced nicely - though not as well as those that were planted in the ground.

So, not a great result.  Not a "Yeeeha, Eureka!!" moment.

Perhaps it was my "feeding" of the water.  Being out in the sticks, and not wanting to incur costs buying and transporting hydroponic plant "food" I only used a seaweed concentrate in the pump tank.

But, I am not discouraged.

So, I have drawn inspriation from this pic I saw a while ago...
This image inspired me to plant strawberries in gutters which
hang on either side of my raised beds
As you know I hung gutters on the side edges of my raised beds and planted strawberries in them.
The current situation / progress of my gutter strawberries
(nope, they aren't battling weeds, but rather self-seeded
 rocket seedlings.  I love rocket, so I'm letting them stay
where they fell)
They are doing well, and this seasons strawberries are beginning to form and hang down the sides of the gutter.    So, I have decided to use the hydroponic pipe to grow strawberries and I will leave the exisiting  strawbwerry plants in the gutter for comparison.

Yes.  I can grow strawberries in the ground, and they have been successful, but the slugs have been just as successful in their quest to devour portions of every strawberry that happened to touch the soil.
The reserve / return reservoir which collects the pumped water back
 to the pumping tank via gravity.
I have suspended a stocking filled with organic fertiliser beneath
 the pipe's overflow outlet.
In place of the seaweed concentrate, I have added a measured portion of organic fertilizer to a stocking which hangs into the return water reservoir.  Everytime the pump switches on, the water falling into the reservoir falls onto the stocking (and it's contents) thereby "disturbing" it and releasing the nutrients.
The organic fertilizer RMan uses for our fruit trees
I planted the hydroponic strawberry runners about 3 weeks ago, and already the roots are beginning to grow out of the bottom of the yoghurt containers I use as hydroponic plant pots. 
New strawberry runners planted three weeks ago are already
 producing roots outside of the tub.  The strawberries were planted
 in a palm peat / vermiculite mixture.
I have the pump on a timer which switches on for 15 minutes every hour from 7.00a.m. to 7.00 p.m.  After that the water which remains in the pipe must suffice until the pump circulates the water again.
A shallow "bowl" of water permanently remains in the base of the
 pipe for access by the plants when required.  It doesn't fill the
 pipe completely and thereby provides air to the roots as well.
The new strawberry plants seem happy and are beginning to grow new leaves.
That, to me is a happy looking strawberry plant 😃
Let's see if I can get it right this time...

I am determined to be successful, as, given climate change / global warming / predicted global water shortages, I believe that hydroponics will figure massively in the future with regards to feeding the masses.  Being inquisitive, I would like to understand the process / problems in using this growing method.

Friday 16 June 2017

Wake up call

I seem to be quite negative in my postings lately - my apologies.  But I think when life hands you lemons you still need to gather the lemons together in order to make lemonade.
Image source: Digital Globe
Images collected on June 14th show the devastation from
 the unprecedented wildfires in Knysna, South Africa. The before
 and after comparison show near-infrared images displaying
 healthy vegetation in red, and burned areas in black/gray.
The recent catastrophes (storms and fires) in the Western Cape have been horrific to experience / watch.  300 kms of the picturesque Garden Route was completely obliterated.  Hundreds of thousands of people lost everything.  11 people are known to have perished in that fire, and who knows how many animals.  Thankfully, in anticipation of the storm, the provincial government closed schools on Wednesday 7th June.  Thankfully, because 135 schools were damaged...

 RMan and I are now hyper aware of how vulnerable we all are, and will, where possible, take measures to prevent a major calamity of this type from negatively impacting us - as far as we possibly can.

We are currently rectifying the damage that was done to our house by the gale force winds which we experienced - barge boards ripped off / destroyed and roof tiles blown off.  To say that the winds were scary is an understatement.  Add to that runaway fires...  We did have a fire spring up in the nearby village during last Saturday's gale force wind, but thankfully the fire department managed to sort that out - only God knows how they did it.  That fire damaged our Internet tower and we were without a connection for 5 days whilst the tower, wiring and the equipment was replaced.

My heart bleeds for those affected in the garden route - the 1 000's of homes and lifetime memories lost, the lives lost...  Just too terrible.

In our area we all received the Overberg Water Drought letter with our water accounts recently. Drought restrictions and penalties are now in force.

A link to Duivenhoks Dam which supplies us with water 
(https://www.westerncape.gov.za/general-publication/latest-western-cape-dam-levels)
shows that the dam is still reflecting 62% (as of 2/6/2017) so personally, I have not been too perturbed.

However, on looking at my rainfall records, a different picture emerges. (see image below).
Rainfall records from Nov 2013 to June 2017
What this means for our summer season time will tell...


For those of us that grow our own vegetables / fruit bearing trees a tip I'd like to share is that Sutherland Sawmills in Swellendam sells wood mulch (fine and coarse) for +/- R50.00 a trailer load. We did this last summer and have found that placing a thick layer round our veggie beds / base of our trees helped them to conserve water during the hotter months thereby assisting in ensuring their survival and their intended function i.e. food production. As wood mulch apparently temporarily ties up nitrogen in the surface of soil against with which it has contact, ways of replenishing that nitrogen is through the addition of an organic nitrogen supplement e.g. alpaca, horse, cow, chicken manure and even human urine - even (non-seeding) weeds will fulfil this function for as they break down they return to the soil what they have taken from it in order to grow.  I know that very few of my readers live in our area, but I'm sure if you Google you'll find a sawmill or bulk mulch supplier close to you.

Helping each other helps all of us enjoy our individual patches of heaven 😀


Anyone have any other water saving / disaster avoiding tips that they'd care to share?


Note to Sol if you read this post:  Permission to view your blog is denied to me ;)  Maybe you need to send me another invite?  

Thursday 8 June 2017

Cape of storms...

2 days from hell.

140km / hour winds.

Some rain has fallen - but much more is needed to ease the drought.

Snow covering most of the mountains of the Western Cape.


And a runaway gale-force wind fuelled fire which has almost destroyed a town of 77 000 people - Kynsna, Western Cape (http://www.news24.com/SouthAfrica/News/live-knysna-evacuation-underway-20170607 and http://www.news24.com/SouthAfrica/News/gallery-cape-wildfires-20170608)

Terrible.  Terrible.  Terrible 😭

Saturday 3 June 2017

Raised bed with a difference

Why a raised bed with a difference?

Because this raised bed is not for growing vegetables.

Oh no!!  But, with that said, this has just as important a purpose, but is for indoors.

You see, I have noticed that the latest addition to our family loves - just loves - climbing on anything and  everything in order to take a nap.  By anything I mean things like on top of the patio table, a pile of mulch, patio chairs - anything.

Now, we made her a comfy bed oh the floor for nighttime snoozes, but, as I mentioned in an earlier posting, the bed isn't good enough.  Our couches are the preferred beds...

I have nothing against animals - especially dogs - but I do object to doggy smell on my furniture.  And I object especially after said dog has had a roll in a pile of alpaca poo...

'Nuff said.

So, we covered the couches in shower curtains.

Nope - that didn't deter her either.  Stellar merely plonked herself on top of the shower curtain.

That is when the "raised bed" connection finally sank into my brain.
Stellar on her blankets on the floor, with her old pair
 of jeans bolsterer to snuggle up to
It didn't matter how comfy we made her bed on the floor, Stellar wanted to sleep with a view.

So I googled raised dog beds.

And found these:


Gulp.

R900 - R1100.00  ($70 - 86 or 62 - 76 or £54 - 66.00)  That's bloody insane!!

But I really would like to give her some protection from the cold floor and the floor level draughts - if, and when, winter finally hits...  😕  I don't feel bad in summer - the cool floor is just what is needed for those hot, summer nights.  But, winter - that's something totally different.

Especially if she's unwell.

Last Monday we noticed that she was not her usual bouncy self - just lethargically lying round, and not eating much.  She didn't even try to pinch the stray black cat's food - the stray (whom we've called Blackie - original I know) has adopted us, and, even though we have de-wormed it, and given it flea and tick prevention, we are trying to keep it outside, as opposed to Squeak who is an inside cat.

A trip to the vet revealed that Stellar had early stages of tick bite fever - biliary.  How is this possible - she was still protected by her Bravecto tablet, and at the end of the previous week we had fitted her with a Seretso collar...???

Thankfully, catching it early meant that the injection worked fairly quickly and by this last Friday morning she was back to her mischievous, energetic, bouncy self.

So, w.r.t the raised bed it was thinking cap time.

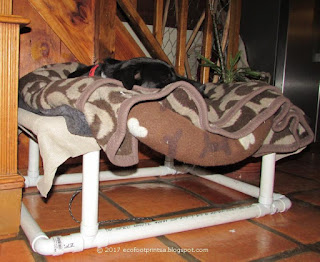
And I came up with this... 

An upside down view of the raised bed that RMan and I threw
 together.  We joined the Coolaroo clips with ski rope so that
 if we have to re-tension them in future it'll be a breeze.
 Also, criss-crossing the ski rope  below the shadecloth creates
 an additional support too.
Using left over shadecloth and Coolaroo butterfly clips from our patio awning, some ski rope from the garage...
The sum total spent on purchasing components
 to make Stellar's raised bed
... and the parts we purchased from the Co-Op, all it ended up costing us was the enormous sum of R270.88  ($21.16 or 18.75 or £16.41)  What a win  😁
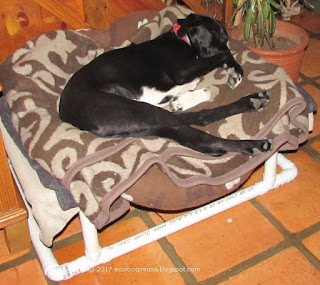
Can Stellar get much comfier...?
This will also get her off the cold floor and away from draughts.

Best of all...?
There is space for her to grow into as well... 😊
Stellar l-o-v-e-s it 😂  And has made absolutely no attempt to get on the couches since receiving her raised bed 😂